Slay the Spire

Slay the Spire

440 ratings
Slay the Spire Silent Style
By Lightja
Comprehensive guide to deck building for the silent. Includes strategies applicable from the base game all the way up to Ascension 15. I aim to provide sensible and nuanced advice on various builds/cards/relics based on the situation rather than concrete ratings since the value of most cards is going to wildly vary. Additionally I'll cover shop/pathing/blessing advice and anything else that might come up, hopefully I'll cover any questions you might have and you will hopefully complete ascension 15 as well.
2
2
7
3
   
Award
Favorite
Favorited
Unfavorite
Introduction: Silent Basics & Overview (Silent vs Ironclad)
5-17-2023 update: It's unlikely that I'll actually update this guide any longer. This was written when the game was relatively new, so it's quite a bit out of date. However, there is still quite a bit of good information in here. If you think of this guide as more of a guide to how to think about the game and its choices rather than a prescriptive guide on how to play Silent, you may still find this information useful.

EDIT: A few more weeks and a few hundred hours later, my perception of much of the information in this guide has changed quite dramatically. I still think the guide is valuable to anyone who is new to the silent, but I have future plans to revamp this guide entirely. The biggest change is that I will be removing the archetype section entirely and instead devote multiple sections to how a deck can develop certain functions (mitigation/frontloaded damage/backloaded damage/etc), since that's a better way of approaching Slay the Spire, especially if you want more consistent wins. Going for an archetype will certainly get you through ascension 15, but it will likely take more than a couple tries. I also rate most of the attack cards much more highly now, mostly for the function of taking out elites and hallway fights more easily. My preferred style of playing silent was definitely more poison and defense oriented before, but I've changed my style to suit what the game offers me instead, which gives much more consistent wins. So my revamp of this guide will be more of an advanced guide than a beginner's guide, whereas this guide can still serve someone new to the game very well in learning how to beat the game up to ascension 15, but my next guide will help you win ascension 15 more consistently.

I just want to preface this guide by saying that everyone plays the game differently. The beauty of this game is that there are so many crazy synergies, combos, and styles that anyone can find a different way to beat the game all the way up to Ascension 15. Some may disagree with my evaluations of cards and specific strategies, but these strategies have gotten me through Ascension 15, so I know they work. Even if you disagree or don't end up playing the game the same way I do, you will hopefully still learn something.

Aside from this introduction, most of the guide will assume you know the basics of what the cards, relics, and enemy encounters/abilities are. If you don't know all of that information, it will also be contained in the guide, but due to the vast interconnected/synergistic nature of all the skills/cards/relics, there's no easy way to go about teaching a completely new player all the necessary information in a linear fashion. As a result, you may find yourself jumping around the various sections of this guide by necessity.

After playing a bit as the Ironclad you'll unlock the Silent. If you're used to playing as the Ironclad, you'll have to make some significant adjustments to your play-style to be successful with the Silent. The most noticeable difference is the starting relics.

https://steamuserimages-a.akamaihd.net/ugc/933807761346591705/01A859AF4B11E0BA1DA14FD7A9BF423F70A37E36/?interpolation=lanczos-none&output-format=jpeg&output-quality=95&fit=inside%7C256%3A*
With the ironclad you typically focus more on dealing damage quickly. Once again, there are many ways to play both classes, but typically Ironclad is str/damage focused, whereas the silent is dex/block focused. Because there are 51 floors you have ample opportunities to take damage. Unless you have a perfect deck, you could hit a bad draw and take significant damage due to the nature of RNG. On the Ironclad this isn't as much of a concern because you heal 6 after every combat. As a result, on the Ironclad you can feel pretty comfortable taking 1 damage as a tradeoff for dealing 6. Decision making is a lot more complicated on the silent because taking that 1 damage can snowball to 20, and could force a rest over an upgrade. Normally that isn't run-breaking, but once you get to high ascensions losing out on an upgrade can easily snowball to the end of your run. Because of this you'll often find yourself using a 3rd block to get your block from 10->15 to block an 11 damage attack and drawing out the fight. Do beware though, there are some fights where taking the damage can be worth it to end it more quickly. It helps to know how the AI of various encounters work so that you can plan for this, which I'll go into more detail on later.

In addition to being more defense-focused, Silent is just all-around more skill/power focused. The nice thing about this is that most of your best powers cost 1, as opposed to the important 3-cost powers of the ironclad. This allows you to take your turn to prevent damage while still getting a power up. Still, you'll often find yourself taking the most damage during almost all fights at the very beginning while you're setting up. On the face of it, Silent's relic seems like it wouldn't be as useful if you're used to playing as the ironclad. However since the power setup phase is usually the most dangerous phase for the silent, this can help a lot in getting you started with a good foundation.

There are of course more offensive ways to play The Silent, but typically, your play will need to be more cautious and the fights will be more drawn out. enemy str-increase abilities are more of a concern due to the turtle-style nature of most silent decks, but there are ways Silent deals with these mechanics.

In this guide, I will focus on the decisions you have to make in the game (when to take a card, whether you should buy a relic, etc) rather than giving every card/relic/etc a flat rating, because everything in this game is highly situational and ultimately comes down to making the right decisions. This guide will be quite long and comprehensive, so I recommend using the table of contents to view the information you'll find most useful, you don't really need to go in any specific order to learn from the guide. Also, you'll find a lot of information/detail that is mostly unnecessary when you're not doing high ascension, but never hurts to know nonetheless.
Deck Archetypes and Styles
While I will outline many of the various archetypes below, please understand that rarely does any deck fit neatly into one and only one category. Because of the random nature of the game you're likely to have cards from multiple archetypes, and some archetypes work well together anyways.

Poison - Poison is the most common archetype of any silent build, and arguably the best. It's personally the main damage in about 90% of my runs. Noxious Fumes is an absolute must. If you want the run to not last forever, you probably want another direct poison attack such as Bouncing Flask, Deadly Poison, or Envenom if you have a hybrid shiv/poison deck. Due to how Noxious Fumes works, your poison will deal more damage each turn even if you never use another poison skill, so this leaves your energy free to block and use utility cards and not feel like you're just wasting your turn. Easily the most flexible of the Silent archetypes (works well with all other archetypes) and is highly recommended for beginners. My advice is probably also the most useful for this archetype.

Shiv - Probably the most obvious 2nd archetype for the silent. There are various skills/powers that generate shivs, increase their damage, or apply poison to them. Shiv has great potential with the right cards, but I personally rarely play it. However it's a bit too card dependent for my tastes, and while it can synergize quite well with poison, I personally find more success in focusing more on poison alone if I've already gotten poison cards. However you've got to work with what you're dealt, so if you get good shiv cards early before you see poisons, it's good to take them to see where it goes. However certain shiv cards are better early-shiv-build cards than others, so try and pay attention to that. I will go over this more in the card section, but basically the #1 shiv card that you usually can't go wrong with taking (especially in act 1) is Cloak and Dagger. However due to my relative inexperience with this archetype, my advice in this specific area may be a bit questionable, however I'll do my best to give my reasoning for why I prefer certain cards to others and you can decide for yourself.

Power Control - This is a very difficult to define archetype that focuses on winning through the use of powers. Because The Silent's best cards are powers, almost all archetypes use a lot of powers, so it's difficult to have a pure power control deck, because you'll need to kill stuff with something. Pretty much every deck, with maybe the rare exception of extremely focused discard/cycle decks will use powers, and usually a good bit of them, so almost every deck you play as the silent will fall somewhat into this category, but The Silent is unique from The Ironclad because you can win basically from powers alone.

Deck Cycle/Discard - The only other archetype that can really play by itself. However it's important to note that while you can be successful with a pure discard/cycle deck under the right circumstances, it's extremely rare to have such a pure deck, and because of this, I'd focus on using the advantages of this archetype to enhance your shiv or poison deck. Basically a cycle deck is able to cycle through the entire deck (or very close to it) every turn. Sounds difficult, but with a small enough deck and the right draw cards it's entirely possible. This allows for a lot more consistency since you know you'll come across all of your cards on most turns, and also allows for certain combos such as blur locks. My favorite play-style is a combination of poison and cycle, so I'll have some good insights into this archetype as well. This is also the best archetype to get the infinite achievement with, and probably the best to get the you are nothing achievement with. It's difficult to get an infinitely cycling deck, but when you can it's a very satisfying feeling. This is probably the only time I'd consider not taking noxious fumes since your fights will likely only last a few rounds and noxious fumes will only get in the way, but as I stated above, typically you'll want to use this style in conjunction with other strategies.

Once again, there are other ways to play, but the way I see it, these are the primary archetypes, especially if you're reading this guide because you're new to the Silent and want the basics. There are lots of other interesting builds (Grand Finale comes to mind), but you'll typically want to experiment with those on their own, although you'll find commentary on how to use all the cards in the coming sections.
Whale Blessings
Whale blessings in my mind are fairly straightforward in terms of which benefits are the best, but are somewhat map dependent so be sure to check on your map before choosing.

For those who want the quick and dirty answer, here's roughly how I rate the blessings in order:

  1. Lower Max HP for 250 gold
  2. Lower Max HP for 2 card removals (2xStrike or Strike/Parasite)
  3. Free 100 gold
  4. Lower Max HP for random rare relic (could be amazing, but very inconsistent)
  5. Free upgrade card (always Neutralize)
  6. Free card removal
  7. 99 gold for 2 card removals (2xStrike or Strike/Parasite)
  8. 99 gold for random rare relic (slightly higher rated before Ascension 10 when you get Parasite)
  9. Free common relic
  10. Next 3 combats enemies start at 1 hp (use to snipe an elite or fight an elite with full hp, 2 elites if you're really lucky would make this top tier)
  11. Lower Max HP/99 gold for choose a rare card
  12. 3 Potions (use these to try and clear an extra elite if you can for another relic)
  13. Lower Max HP for 2 card transforms (2xStrike usually)
  14. Free card transform (Strike usually)
  15. 99 gold for 2 card transforms (2xStrike usually)
  16. Replace starter relic with boss relic - I don't think I've ever seen this with none of the above options available, but it can make for some interesting runs. If you're willing to take some bad runs here and there and/or restart after the first boss this option probably has the biggest potential payoff.

Option 4 - replace starter relic with boss relic
This can make for some interesting runs if you get something like Snecko Eye or Sozu first, but our starter relic is incredibly useful for us, so you're taking a pretty big risk by gambling it away. With that being said, I never take it on a serious run, but if all the other options suck and I'm just looking to have some fun I'll take it occasionally.

I can go more in depth if people want, but for now I'll just quickly explain my reasoning. 250 gold on top of 99 allows you to remove your parasite (or a strike) and likely buy whatever relics are there if you see any particularly nice ones, in addition to any necessary cards that will help you fight an elite. One of my favorite runs started with a toxic egg in the first shop. Gold is more highly valued when your ideal path crosses a shop, especially an early shop. Removals are great because they not only save you 75/175 gold on removals, but prevent those increases in price so that your first removals are still 75, so it's the same value in terms of raw gold, assuming you ultimately remove 4 cards, but gold allows you to buy cards/relics instead. Buying cards is especially important in ascension runs that force you to fight elites in act 1. Any random blessings I'm always hesitant to take, but common/rare relics and choose a rare can start off a run very nicely. Neow's Lament (3x1hp fights) is highly map-based, but can usually be used to snipe an elite or get close to one with full hp for a clean-as-possible fight.
General Strategies
Pathing - Pathing is very situational, so there's no easy ranking of what encounters are the best and worst. Things change as your deck does, but there are some basic principles you can try to follow. First, if your deck is already strong, it's usually best to avoid monsters, but you'll need early monsters to get your deck going. Events are almost always good to visit. Shops can be the top priority, but it really depends on your deck situation and how much gold you have. You always want to make sure you go through a shop before the last boss of act 3 if you have any gold remaining when you get there. Elites are also highly situational, I personally tend to avoid them, but the payoff can be worth it.

Card Removal - I always remove all of my strikes before any of my defends, the only exception being when you get a lot of removals early in the game from events before you've added damage cards, because you may need those strikes to end encounters with buff/building debuff mechanics early.

Card Upgrades - I always prioritize utility upgrades over static dmg/block upgrades, so Neutralize is often my first upgrade. Specific choices will depend on your deck, so check the cards sections if you're trying to decide on a specific upgrade.
Act 1: The Beginning
Act 1 lays the foundation of your entire run. You'll mostly have your niche set by the end of act 1, with only minor tweaks/improvements in act 2. Fortunately our best cards are mostly uncommon cards so we don't need to rely on killing the boss to get our decks setup. You'll be wanting to take cards more than any other act, sometimes cards you wouldn't normally take. However with that being said, don't be afraid to skip cards, but just keep in mind that you'll need more than your base deck when you finally encounter elites. I personally trend towards smaller decks, but your preference may be different.

In terms of pathing, you want to hit an early store if you got bonus gold from your blessing, otherwise try to hit 3-4 monsters before you encounter an elite. Ideally find a path that allows you to progress through monsters for cards but allows you to fork off and avoid elites in case you don't get the cards you need to fight them. "?" events are also good because they can be beneficial or be combat for more cards.

Take as many elites as you can, but only when you have the damage and remaining HP to do so. You'll need some kind of extra damage to take them out. Flying Knee, Deadly Poison (if you can upgrade it before getting to the elite), Bouncing Flask, and upgraded Noxious Fumes I find to be my ideals personally, and any one of those should be adequate. Dagger Throw is also a potential option. Having a Footwork can also be very beneficial. Dash can be useful against the Gremlin Nob (and most of the early elites frankly), but its usefulness falls off later in most decks. Be prepared to take some damage regardless of who you fight, especially on higher ascension levels. Cloak and Dagger is another good card that gives both defense and damage and could become useful later in a shiv build. Unless you're trying to win streak, Act 1 is the best time to take risks because the payoff can be huge, and if it's not you can just restart without too much time lost. Speaking of restarting, if you get bad cards/relics/events/etc you may just want to avoid all combat and reach the boss as soon as possible so you can restart with a blessing, but a blessing is not necessary to win even on Ascension 15. Even if you're trying to win streak, you probably want to take some amount of risk so that you can build your deck/relics up for later acts, although risk is a complicated thing when trying to win streak, so be careful.

The bosses don't require too much preparation, just add useful cards to your deck and try to form an archetype that you can start building on in act 2. You may not even have a fully chosen archetype by the time you reach the boss, but just make sure you're not too varied on your cards, but don't be too afraid to pick up cards either.
Act 1 - Monster Encounters
First 3 Monster Encounters - The first 3 fights in act 1 will be very easy and you can avoid damage most of the time unless you get unlucky draws. I find that even on Ascension 15 playing defensive is better even against the cultist and jaw worm encounters. The Cultist encounter grows at a steady 3/4 str every turn, so you can plan accordingly, whereas the Jaw Worm uses his buff randomly, so you only need to worry about taking him out quickly after he uses his buff a couple times, otherwise just focus on preventing damage and deal damage with your remaining mana. For the louses focus the red ones first and trigger all shields before attacking shielded lice. The slimes are pretty random, but again you should play defensively. If you get unlucky you'll take some damage, but usually they aren't too bad.

4th+ Monster Encounters - These encounters are more difficult and some can deal as much damage as elites do, particularly the lots of slimes and gremlin gang encounters.

  • Slaver (18.75% chance) - two types of slavers are possible, but this fight is pretty easy, just prevent damage and take them down slowly, there's no need to rush here.
  • Thugs/Wildlife (18.75% chance) - comes in a variety of Slaver/Cultist/Looter/Fungi Beast/Jaw Worm with a Louse/Medium Slime. Focus the Louse/Slime first, but try not to let the Looter steal gold from you if you can avoid it, it might be worth taking some damage to kill the looter quickly or possibly even attacking it first.
  • Large Acid or Spike Slime (12.5% chance) - fairly simple, just play defensively and do your best to split them at as low hp as possible. Once they hit 50% hp they'll stop their current move and split. If they're debuffing or you can block all their damage, just get it as close to 50% as you can and wait until next round to do more damage and split it at lower hp. If you're going to take ~3+ damage and can prevent it by splitting them even at high HP it's worth it to do so most of the time.
  • 3 Louse (12.5% chance) - Same as the 2 louse encounters in the first 3, pretty easy, focus the red ones first and prevent damage.
  • 2 Fungi Beast (12.5% chance) - Fairly easy fight, although is common to take a little bit of damage. Focus the lower hp beast first, or the first to buff, and be careful with the vulnerable the triggers when they die.
  • Looter (12.5% chance) - Pretty straightforward, sometimes they run faster than other times, but be sure to kill him even if it means taking a bit of damage because losing that gold can be pretty bad, especially if you have a crucial shop coming up.
  • Lots of Slimes (6.25% chance) - 5 small slimes, 3 spike and 2 acid. Sucks when you get this encounter because you're probably gonna take some damage if you don't have aoe damage like dagger spray or just good draws. Spike slimes always attack, so focus those first, starting with the lowest HP slime. You should be willing to take some damage on the first round to kill a spike slime, as you'll probably be weakened from round 2 and onward. Once you get down to 1 spike and 2 acid slimes you're pretty safe and can take it slow.
  • Gremlin Gang (6.25% chance) - 4 Gremlins, can include 2x Fat, 2x Mad, 2x Sneaky, Shield, and Wizard. Sneaky and Wizard Gremlins should die first as they do the most damage. Sometimes you can kill a Sneaky before a Wizard and still kill the wizard before he gets his big hit off, but if you're not sure you can do that, just focus the wizard gremlin first, then the sneaky gremlins. Then kill the Shield, Fat, and Angry Gremlins in that order. Like the slimes, you're likely to take some damage during this encounter, especially if you get a bad combination, but once you have 1-2 of them dead it's a lot safer.
Act 1 - Elite Encounters
3 Sentries - The easiest elite encounter. Start with the outside sentry with the lowest HP. That way after you get the first down you're taking only 9 dmg/turn which is manageable most of the time. Can be a long fight but usually does the least damage. Explosive/Fire potions will help you kill the first sentry, which lets you get to the much safer point in the encounter during which you're only taking 9 damage per turn instead of 18 and 9 alternating, which will help you prevent a lot of damage.

Gremlin Nob - The worst encounter. gains str whenever you use a skill, so you have to kill him fast. This can be especially difficult if BFlask/DPoison is your main damage and you've already removed some strikes. I tend to avoid blocking for the first hit, but I use Survivor any time it's avalable and start defending when you're 2-3 turns from killing him, but prioritize damage most of the time. Dash, Neutralize, and Sucker Punch are all viable mitigation tactics that don't trigger his anger. Powers don't trigger anger so be sure to get those up if you have them. Artifact Potion helps a lot here to avoid the first vulnerable. Explosive/Fire potions will let you end the encounter faster, but save them until they'd kill him and only use them if they prevent at least ~8 or so damage. If you have a poison potion I'd just open up with it.

Lagavulin - Can be made a lot easier with powers. He gives you 3 turns before he wakes, so get up any footwork/noxious fumes/infinite blades you can before you can wake him. Do note that he only wakes up when you break his 8 hp shield, so you can hit him with an upgraded Neutralize without waking him. Also, Noxious Fumes doesn't wake him until after the turn after you play it, so you can skip the first round you play it too. Even if you don't have powers you can just wait until you roll a good starting hand to open up with to maximize your opening damage. Because his hex reduces str/dex, you should be willing to take a little damage to speed up the fight. For example, if a defend will put you over the amount he hits for (meaning some of the value is wasted), I'd probably use a strike/attack instead usually, unless he's already close to dead and you're sure you can avoid the damage. Artifact potions can prevent the hex. Explosive/Fire potions will let you end the encounter faster, but save them until they'd kill him and only use them if they prevent at least ~8 or so damage. If you have a poison potion I'd just open up with it.

Act 1 - Bosses
Bosses

The Guardian - Easiest boss by far. As long as you have ~20 hp you should be safe using the rest site for an upgrade. The fight really only gets easier as it goes on so if you can survive the first few rounds you should be fine, just avoid damage and deal damage when you have everything blocked and he's not attacking. No special preparation is needed for this boss.

Slime Boss - Just like the large slime encounter, you want to split him at as low HP as possible. But you can take some damage in order to do so since you'll be healing after the fight, although on ascension 5+ you still want to avoid as much damage as possible since you only heal 75% of your missing HP, so it might be worth it to split him early to avoid damage, but usually it's worth taking the damage because the latter half of the fight is usually harder. Using Fire/Explosive potions on this fight can make it far, far easier as you can use them to split at lower hp. Even explosive potions are better to use on the boss slime. Because the AI is pretty random, you can sometimes take this fight with a bad deck and sometimes you'll lose with a really good deck, but most of the time it isn't too bad. I prefer to focus the Spike Slimes first, and always the small slimes before the large slimes.

Hexaghost - A bit of a DPS race, although with 35 hp or so he usually doesn't cause too many problems for me. It may be worth it to take some damage to kill him faster before the burns build up. When he gets 6 green flames he'll use his big attack, so just be prepared for that.
Act 1 - Events
Coming Soon.
Act 2: The Gauntlet
So you've reached act 2, most of the time you can get here, but realistically, most runs also end here. Even the earliest encounters will test your deck, but if you have a solid foundation built and you can handle act 2 you'll find that you will probably clear act 3 no problem. You'll want to focus on fleshing out your archetype, or quickly choose one if you haven't already. During Act 2 you can still take some risks, especially if your deck is of questionable strength, but if you have a decent foundation it's probably best to just take the path of least resistance to the boss.

Pathing - I almost always avoid elites in act 2 as much as possible because some of the elites can be harder than the boss, and can destroy decks that could otherwise clear act 2 and 3 without issue. After I've chosen the path with the least elites, I'll try to avoid monsters as much as possible, even taking a shop with 0 gold can be worth it to avoid monsters unless you really need the cards to flesh out your deck. Shops when you have gold can be the highest priority because there are probably a few cards that will make or break your deck at this point.

More Act 2 information coming soon.
Act 3: The Finale
If you've successfully navigated act 2 and beat the boss without too much difficulty, congratulations, you probably won. Most of this act will be spent preparing for the boss and taking cards that'll finish up or slightly improve your deck.

Pathing - Probably the most important thing is hitting a shop before the boss, the later the better. Otherwise, elites here are much easier than in act 2, but an unlucky draw can still get you killed, so be wary. If your deck is slow to kill things you may want to avoid elites because they tend to punish longer fights but are easier to setup than act 2. After a little bit of experience you can probably tell if your deck is ready for the boss, and most of the time the relics you get from elites wont make or break a deck if you've already made it this far. The monster encounters in this act are by far the easiest for silent to take no damage on, so it can be good to hit up a bunch of them for the opportunity to get the last few cards you might need, or cards specific to the boss you'll be up against. Malaise is almost always a good pickup in act 3, especially late in the act, as it'll make all the bosses a lot easier.

More Act 3 information coming soon.
Ascension Strategy
Coming soon.
Cards - Basics
Cards sometimes fall into multiple categories, so if it fits one of the following categories, it'll be placed in the first it matches in the following order:

  1. Powers
  2. Attacks/Damage Skills - Cards that deal damage (Dash is here)
  3. Block Cards - Cards that give block (Cloak and Dagger is here)
  4. Utility Cards - Cards that purely give utility and/or don't fall into the above categories.

Cards will be listed in their sections alphabetically.

Terminology:
  • Setup / Setup Phase - the beginning of a fight when you're still using all your Powers/Exhaust cards, during this phase you'll need to be playing cards that may not provide defenses in order to set you up for the rest of the fight. Because of this, this is often the most dangerous phase of any encounter for The Silent, so while even cheap powers can be useful, they can dilute your deck early on making setup more difficult than it needs to be.
  • Dead Card - a card that is unable to be played due to not meeting the conditions for playing it, or requiring too much energy to play. Dead cards seriously hurt the consistency of your deck.


Powers - Your bread and butter as The Silent. Most are cheap and increase in value the longer the fight goes on, which is typically fairly long with most Silent decks, but if you have more of a quick kill deck, powers are going to be weighted less. However do note that the more powers you have, the harder it is to set up your deck, but usually once you've set up your powers you're in a position to kill whatever you're fighting. Because of this, you'll want to be somewhat prudent about choosing powers. Once you've got a good set up, it can be wise to avoid picking up more powers. Mummified hand makes picking up excessive powers a lot more worth it, especially low cost powers, the only exception being when you're up against Awakened One, who gains str for every power played.

Attacks and Damage Skills - This is how most decks will do damage if you aren't trying to build around A Thousand Cuts/Tingsha or some relic build. You'll likely need to pick up a couple of these early for the act 1 elites and boss.

Block cards - because The Silent is inherently a defensive character you'll find you need these for a successful deck unlike The Ironclad who can rely almost entirely on attacks. Almost all of these also give some form of utility as well.

Utility Cards - These are what make the various builds viable. Draw cards particularly are important for consistency and enabling certain builds, but there are lots of interesting ways The Silent's skills work together.
Cards - Powers
A Thousand Cuts - Fantastic Power. Especially good with cloak and dagger or whenever you play a lot of cards in one turn. 2 energy can make it tough to setup, and it really demands an upgrade, but when you can get it into play it's a fantastic power.


Accuracy - Usually only a good pick if you have a decent shiv deck going. If you have a couple of upgraded Cloak and Dagger cards you might consider it, but don't take it too early as it can end up being a dead card during setup or just a low value card in general.


After Image -
Basically a weaker version of Footwork. Footwork gives 2/3 block per defensive card played, whereas After Image gives 1 block for ALL cards played. The only time I'd take After Image over Footwork is if I'm running a shiv deck and/or plan to be playing more attack cards than defend cards. However, it can still be worth taking if you don't have a footwork and is generally speaking a bit more flexible, so it's usually not a bad pick unless you already have a footwork or two and aren't running shiv. Mid-priority upgrade to make it innate.


Caltrops - Fairly weak power, it can be useful for certain encounters, but the value is fairly low for most encounters. But given that it is a 1 energy power, it's not bad. I go back and forth on whether to pick this or not, but typically if I do it's because I don't have many other good cards in my deck yet. It dilutes the deck and can make setup more difficult, and is one of the worst powers for the awakened act 3 boss, but overall it's not a terrible card. Especially useful against encounters with enemies that attack multiple times (especially byrds/hexaghost). Low-Medium upgrade priority.


Envenom - I go back and forth on this one, but if you have a decent shiv deck going it can be decent. Becomes more usable with Snecko Skull, but typically I just skip Envenom. It helps accelerate your dps per round which can often be a problem with shiv decks which can struggle against certain dps race bosses. However an upgrade is basically required because for 2 energy it doesn't provide enough energy early in the fight unless you get a lucky window to lay it down.


Footwork - The gold standard of Silent Powers. I'd take this card in pretty much any deck unless you're trying to force a 1-2 turn kill deck, which is pretty rare and typically not the ideal strategy, and in that case you probably want to avoid almost all powers. Since you'll be playing a lot of block cards with most builds you'll almost always get good value out of this card. Usually I'll take 2 if I see them, 3 or more is questionable, but if you can get setup you can take just about anything. It also increases the value of 0/1 cost blocks a lot more, allowing for more flexibility with your energy. Also, since it buffs your blocks and only costs 1 energy it's very easy to setup while taking 0 or minimal damage, and gets even easier (and more effective) with an upgrade, so it's typically one of my highest priority upgrades. This is basically a neutral card against the awakened one (a3 boss) since the extra block mostly negates the extra strength.

Infinite Blades -
This is a pretty overrated power, especially to take early on, but can be a decent pickup if you're struggling to find useful cards in the beginning. Otherwise I'd only take it once you have some shiv synergy. Mostly that means Envenom, Accuracy, or Kunai/Shuriken. It's a flat 4 damage per turn at its base, so it pales in comparison to Noxious Fumes. An upgrade (which makes it innate only) can actually be a detriment since it's usually one of the last powers you want to worry about setting up, so I tend to avoid upgrading it at all unless maybe you have Kunai/Shuriken.


Noxious Fumes - Just like footwork, this is the gold standard of Silent Powers. The ever increasing poison enables all poison builds and can even help with pure shiv decks just to help with aoe damage and to increase damage per round against enemies that buff. I always take it if I see it. The first Noxious Fumes you get should be one of your highest priority upgrades, but after the first upgrade, if you have a 2nd, it's a lower priority upgrade, but still medium-high priority. I usually wont take a 3rd if I see it, but 2 is usually a good bet. I would however tend to avoid taking an extra if you're already in act 3 and see you're going up against The Awakened One since that fight isn't a dps race and the extra power will just make it harder. The only exception is if you have a very inconsistent deck where the extra turns could turn up with a bad draw. Tough call, but I usually avoid a 2nd against The Awakened One. Taking a 3rd is where the value falls off a lot because it makes setup more difficult, but is still not a bad card ultimately.

Tools of the Trade - One of the better Silent Powers as it just straight up increases the draw rate and consistency of your deck. This also has amazing synergy with Reflex and Tactician, so if you already have one of those you should pretty much always take this power, even over Adrenaline. Can be especially good with an upgrade since at 0 cost it's very easy to setup. The only time I might not take this after a boss is if I see Adrenaline, and sometimes Envenom if I already have a good shiv deck, but this is usually my favorite boss drop after Adrenaline. It might be a bad pickup against The Awakened One in act 3, but all in all is a very useful card. Fairly high priority upgrade.


Well-Laid Plans Also one of the most amazing SIlent Powers, I always take it if I see it. With an upgrade it's nearly twice as useful and the 0 cost makes it a guaranteed setup. I just wouldn't take two as it does end up diluting your deck and there's usually not more than 2 cards you need to hold onto in your hand from turn to turn anyways. This enables some of the crazier builds and makes harder to use cards much, much easier to use, for example outmaneuver, Grand Finale, Skewer, and Catalyst. Even if you don't have some fancy strategy lined up, holding onto a block card can ensure a safe turn next round. Even if all you have left in your hand is a wound/injury, it prevents those cards from being shuffled into your discard/draw pile, so you should pretty much always hold onto cards with it unless they damage you or are ethereal curses/statuses.

Wraith Form -
You can see the old, terrible wraith form. Now it gives 3/4 turns of intangible at the cost of 1 dex per turn. The 1 dex loss continues after the 3/4 turns of intangible. The new version is much stronger and can be extremely valuable in hallway fights which only last a few turns anyways, and can be especially useful against certain bosses with big attacks, like The Champ or Awakened One. Easier to play with multiple copies, and artifact negates the dex loss. Upgrading it to 4 turns is a fairly valuable upgrade.
Cards - Attack and Damage Skills (A -> D)
All-Out Attack -
New version discards 1 random card instead of drawing 1 less card next turn. The new version is much better and is one of the strongest consistent AoE cards in the silent's arsenal. I always pick this if I am lacking AoE damage. The random discard is easy to fairly play around, just play it last, but can be awkward with finisher.


Backstab - I always take 1, sometimes 2, if I still have my starter relic. This guarantees you can play almost your full starting hand every time. Even without my starter deck, having 1 is quite good frontloaded damage.


Bane - I go back and forth on Bane. It's a lot of damage for 1 energy when poison is up, or it's basically a strike. If you have a bottled fumes, it might be worth picking up, but it tends to be unreliable. However, if you need frontloaded damage to compliment poison it's a decent pick.


Blade Dance -
Good with shiv synergy (or after image), but really I'd almost always rather have Cloak and Dagger, which provides 1/2 shivs in addition to block, making it a lot more versatile. Without shiv synergy it's basically the equivalent of a strike, so usually I avoid this card. The only time you may consider taking it is when you have Kunai or Shuriken as an upgraded version gives you 3 attacks, always triggering Kunai/Shuriken. Even still I'd probably just prefer cloak and dagger, but if you already have a lot of shiv synergy it's not a terrible pickup. Low-Medium Priority upgrade.


Bouncing Flask -
The main downside is that it costs 2 energy, making it difficult to play without taking damage a lot of the time. The other downside is that it bounces randomly, making it difficult to target certain enemies in multi-enemy encounters. Has great synergy with Snecko Skull and helps to clear artifact quickly. However the new version of deadly poison is pretty much superior in every way, so the downsides mean I tend to avoid this card nowadays unless I need it for a specific single target fight.


Catalyst - This is a good card and a fun card for poison builds. I'd only take it if you have a Deadly Poison or Bouncing Flask, but once you do it's got a lot of value for 1 energy. Useful for ending fights quickly, especially fights like Time Eater, and I pretty much always take one when I've got Noxious Fumes and Deadly Poison/Bouncing Flask. The only downside is that it is a dead card at the start of a fight. Late in Act 3 I'll even take a second since all the bosses either have two phases or two bosses. Can have really fun synergy with Burst also. With Bouncing Flask/Deadly Poison, Burst+, and 2 Catalyst you can kill just about anything in the game in 1 turn (12*9*9 = 972, 6*3*3*3*3 = 486), including Time Eater. Don't be afraid to use it even against targets with just 5-10 poison. Medium-high priority upgrade.


Choke - Basically a weaker version of Finisher. the 2 cost means it can't be used as effectively, but I think the effect cuts through shields because it reads "loses 3/5 HP" and not takes 3/5 damage. Could be useful, but poison is typically better for that. Might be worth taking if you have enough shivs, but I tend to avoid it personally. Low-Medium priority upgrade.


Corpse Explosion - There are a few places where this is useful (byrds/darklings/other AoE), but given that it's a dead card 90% of the time, I always avoid it. Low-medium priority upgrade.


Now it's called crippling cloud and applies 4/7 poison and 2 weak to all enemies, exhaust. The new version is much better for AoE damage with some added surviability, and the exhaust is usually a good feature. A decent card to have, but it won't make or break any deck really.


Stronger card than it looks at first glance. Only 1 cost and it does more damage than a strike even against single targets, making it quite useful early on, especially against byrd's and slime/gremlin groups in act 1. However the usefulness falls off later in the game, but all in all isn't a terrible card to take early. Also scales well with strength. Mid priority upgrade.


Good utility damage card, useful early on, but its usefulness falls off later in the game. However the utility of the card means it could still come in handy, but there are better cards to take. I usually avoid it, but I usually don't regret it when I pick it up, the main thing I don't like about it is that it doesn't neatly fit into any niche so it just feels like it dilutes my deck a bit. But if you like running thicker decks this is usually a decent pickup. Low priority upgrade.


Useful early game, especially against Gremlin Nob since it's an attack that gives block, but leg sweep is usually a superior 2-cost block card. It has a good energy to value ratio, and can be useful if you have excess energy (think ice cream/outmaneuver/multiple energy relics). I usually will pick it up if I see it in act 1, after that it depends on how my deck is looking. Probably the best card with Necronomicon. Low-Medium priority upgrade.


I liked this card better than bouncing flask at 4/6 poison, and now that it's 5/7 it's probably one of the best poison cards. Because it's only 1 cost you can use it a lot more often than you can bouncing flask which often ends up as a dead card, and it also can target specific enemies which is usually more useful in AoE encounters. The only time I'd say bouncing flask is superior is if you have Snecko Skull. It's a mid-high priority upgrade.


I used to think this was a mediocre card, but nowadays I find myself taking it almost every time. The frontloaded damage for 1 energy is useful, even if it's against 1 target, and it can completely save your deck in certain AoE fights, and the self-exhaust means it doesn't dilute your deck as much as other AoE cards. Low priority upgrade.
Cards - Attack and Damage Skills (E -> R)
Useful early on as a higher damage slice that exhausts and has more synergies (envenom/kunai/strength/etc). Not a bad pickup early, but later on only take it if you have the synergies for it.


Kind of a strange card, doesn't work in many decks besides pure discard decks. If you have a bunch of Prepared+ it might be worth taking, but usually I'd avoid this card. If you're going for a pure discard/cycle deck (which you probably shouldn't), but I've personally never used this card successfully.


A good card for shiv decks, usually beats out Choke since it both does more damage and only costs 1 energy, so it's almost always usable. Also has great synergy with envenom, and if you have str boosts it gets significantly stronger. Also becomes stronger with energy relics/cards, and infinite blades + well-laid plans is an easy setup to a strong finisher. Medium-High priority upgrade.


This card is useful for enabling a block/skill heavy deck to deal frontloaded damage, however it needs to be enabled somewhat. A high skill:power/attack card ratio and a lot of card draw will make this card significantly stronger. It can be very bad in some decks, so make sure it works with yours, or plan on making it work in the future, before you take it.


Good card in the early game since it gives you energy for the following turn. I'll still pretty much always pick one up in act 1 though since the energy is especially useful before you have boss relics. If I have a decent niche in act 2 or later I usually won't take it because it dilutes my deck. Pretty situational, but all-in-all it's a pretty good card. Low priority upgrade.


One of the best act 1 cards, and can single handedly carry you through 3+ elite fights enabling you to pick up more relics. With an upgrade, the diminishing damage almost never becomes a problem because fights don't last that long, especially if you have a bigger deck. It can be harder to upgrade in later acts as certain scaling cards like fumes, or footwork might take priority. If you can spare an upgrade it's always worth it, otherwise it's sometimes worth taking. High priority upgrade.


Very situational, I've only made this card work a handful of times, but if you have the right draw it can be worth taking. With well-laid plans you can hold onto it until it's usable, but you want to make sure you have a combination of 1/2/3 draw cards such as dagger throw/prepared/backflip/acrobatics so that you can tailor the size of your draw pile and make it usable. Highly situational, it can be good, but I tend to avoid it. Definitely don't take it unless you have at least 2-3 different draw cards and well-laid plans, as it will very often end up as a dead card and make your deck very inconsistent. Low priority upgrade.


I usually don't take this card, but I do still find it very useful, especially early game. I tend to always try to have enough weak cards to keep at least 1 enemy weakened at all times, and under those circumstances this card has basically no downside since it pays for itself in a drawn card and energy. However, because power setup is the most difficult phase for The Silent, you'll often find it as a dead card at the times that matter most. In my opinion the minimal damage it does, even at 0-detriment, doesn't make up for the increased difficulty in your setup phase, but if you're short on powers and don't have much of a setup phase anyways it could be worth taking. Low priority upgrade.


Difficult to evaluate, but in the right deck it can be fantastic. It's better with a higher % of discard cards, and less card draw, and is almost always a dead card when drawn turn 1 with your starter relic. However with enough discard and trading in your starter relic it can be useful, but if you're not certain, my advice is to avoid this card.


You always start with this card and it's a great card. It's usually my first upgrade unless I come across an early Noxious Fumes, and I might upgrade Deadly Poison first if I'm about to fight an elite, but you can almost never go wrong with upgrading this card. If I come across the duplicate a card event sometimes I'll duplicate it for the extra weak if I don't have another weak card.


Can be decent if you find it early and you just need energy efficient damage, but I usually avoid it, since Deadly Poison is a better 1-cost card with a poison build and most other attacks are better in non-poison builds. Low priority upgrade.


I used to think this card was bad, but man was I wrong. It can be difficult to see the impact of the next turn card draw, but that is a huge factor of what makes this card good. Additionally, the high impact damage, especially when upgraded, makes it fantastic for frontloading damage, and also allows you to focus your front loaded damage into fewer cards so you're drawing your powers and defensive cards when you need them. Mid priority upgrade.


I find Dagger Throw to be more useful because it gives Discard and does more damage, so I almost never take this card. If you already have Grand Finale, it's a decent 1-card draw pick, but there aren't many circumstances where I'd take this card. Low priority upgrade.


Like most 2 energy cards, it's fairly useless most of the time which makes it dangerous for the consistency for your deck unless you have a lot of energy. Can synergize well with strength, envenom, or the boot, but overall is a mediocre card at best with little utility.
Cards - Attack and Damage Skills (S -> Z)
I tend to avoid this card unless I have Ice Cream and energy generation, but under those circumstances it can be a win condition. X energy makes it rarely a dead card, but flat damage abilities with no utility usually aren't ideal cards for The Silent. Without much synergy it can be viewed as a way to dump your energy into front loaded damage without loading your deck with attacks. Solid card early, mid-high priority upgrade.


0 energy attack. The main downside is that it can end up diluting your deck. However it can increase the value of energy-cost cards that draw cards (e.g. Acrobatics/Expertise) since you can still get value out of them when using them at 1 energy. Much more useful in the early game, but usefulness falls off hard and can end up being detrimental in some decks. Low priority upgrade.


A surprisingly decent pickup because it's the only 1-cost weak card, and also provides some front loaded damage. With an upgraded neutralize and a smallish deck you can keep an enemy permanently weakened and deal a little bit of damage, but if you can afford the extra energy Leg Sweep is usually a better pick because of the block it provides. But if you encounter it early on, it's usually a decent card to take if there aren't better options. High priority upgrade.


This is another interesting card that I personally haven't found much of a use for yet. The usefulness lies more in its discard synergy with cards like reflex/tactician/underhanded strike than its damage, but 12 damage for 1 energy isn't bad. But for most decks there are usually better cards you can take. However it might be worth considering if you have Tactician/Reflex.
Cards - Block
Probably the best block card. The 2 card draw in addition to providing block makes this card pretty much never a dead card, and can drastically increase the consistency of many decks. Becomes a lot more useful with 4+ energy, but not bad with 3. Sometimes there are better options if you're lacking in certain areas, but if it's the only useful card that drops I almost always take it. Low priority upgrade.


Blur is kind of complicated, but I find myself taking it almost any time I see it. One blur is good because it preserves your block between turns so that you can make use of a bad draw with all defenses against a non-attacking enemy to build block for next turn. Two blurs is even better because it allows you to keep your block up permanently with enough cycle (just a couple backflips and maybe an acrobatics is usually enough). The effect stacks, so if you use 2 blur in a single turn your block will persist through the next two turns, and with enough cycle you'll find yourself with 5+ stacks of blur, essentially giving you persistent block like Ironclad's Barricade without the 3-cost it takes it set that up. The blur stacks are much, much more useful when you have a footwork or two. you can find yourself building enough block to turtle through just about any fight, building up block faster than enemies increase in strength. If you get multiple blurs and enough cycle it can make pretty much any enemy into a joke, the only exception being enemies that add enough statuses to break your blur lock. I find blur decks to be the easiest to play, so if you're really struggling on ascension you'll eventually find a couple of blurs and a footwork and make a joke out of anything you encounter. Low priority upgrade.

Probably the best shiv card in the game since it provides block, and with just 1 energy cost it's incredibly flexible providing both damage and block. Also at 6 block it's the highest 1-cost block card. I will almost always take it in act 1 even if I'm not sure I'll end up with shiv, as it's usually the precondition for me starting a shiv build to begin with. Even if you don't end up going shiv it'll be a useful card because it provides both block and damage. The only time it might end up being a detriment to your deck is if you're up against time eater and you can't use the shiv(s) it creates, as those unused shivs will get shuffled into your discard/draw pile and dilute your deck. If you do build some shiv synergy, it can be a very high priority upgrade, otherwise it's a low priority upgrade.


I usually like to have 1 deflect in my deck, but its usefulness is pretty situational. 0 Energy block is good, but it can take the place of a more useful card. If you don't end up with energy relics it is particularly useful, and with dexterity boosts the difference in block between deflect and other energy-costing cards negligible. It's also got increased usefulness with a lot of cycle/draw cards like acrobatics/expertise as it can get value out of those cards even when used at 1 energy. Much more useful early, but can still be quite useful late game. Downsides are deck dilution, bad snecko skull synergy, and bad in certain fights (chosen/snecko/time eater). Low priority upgrade.


Dodge and Roll is very underrated in my opinion, but is more useful in some decks than others. It's the only card that benefits from dexterity twice. With this and blur lock/calipers you'll never run out of block. However, even without blur/calipers/dex boosts, this card is almost never a dead card because if you have the energy to play it, even if you don't need the block this turn, it'll provide some flexibility next turn to play other cards. I almost always take one if I see it. Low priority upgrade.


Looks a lot better than it is. It draws a card and sometimes gives you block for 0 energy, so it replaces itself and sometimes gives block. Sounds great, and it is great, most of the time. However it's bad in certain fights (snecko/chosen/time eater), it prevents you from picking up snecko skull, and it's an overall low impact card, so it may not be worth taking early, but if you're in act 3 and are not going up against time eater, it's almost always worth taking. Its usefulness increases with dex however. Low priority upgrade.


This is probably the only 2-cost card that I find myself taking consistently. While it's not always usable, for 2 cost the 12/15 block and 2/3 weak often make it more valuable per energy than two 1-cost block cards, making it the only 2-cost card that is very rarely ever a dead card. I like to have at least one weak card besides Neutralize and this is usually my favorite pick. Medium priority upgrade.
Cards - Utility (A -> M)
It can be a beneficial card, but it's never going to make or break a deck, and usually you'll draw it when you want something else. The potion it gives is almost always worth the 1 energy at some point, however for that turn it might give you a damage potion when you need block, so the inconsistency means I tend to avoid this card. It can help you build up potions for bosses if necessary, especially with potion belt, but if you have the free energy to use it, you probably dont need the potion. Low priority upgrade.


I find Acrobatics to be an exceptionally useful card, especially with 4+ energy. Even if you don't need it that turn, it can help you by cutting through useless cards next turn if your draw pile is full of useless cards, or it can make your turn more optimal by giving you better cards. Basically a mandatory card for cycle/discard decks, but can be useful in pretty much all decks. Medium-High priority upgrade.


Pretty much one of the silent's best cards. Gives energy, costs 0, and replaces itself with more than 1 card. Makes setup easier which is the hardest part of any encounter for The Silent. I'll often find myself duplicating it if given the opportunity, and you really can't go wrong with taking multiple if you see them. Medium-High priority upgrade.


The Silent really doesn't have a lot of useful high cost cards, so the usefulness of this card is really diminished by that fact. But if you have a lot of draw (acrobatics/expertise), you might find this card useful. Probably the time it's the most useful is when you end up taking Snecko Eye, otherwise I tend to avoid it, but really it's not bad because it allows you to play all the cards in your hand, but you might already have enough energy to play all your cards and it might take the place of something more useful. Less valuable with energy relics and/or low/0 cost cards, increased value with high cost cards/low energy. High priority upgrade if you have draw cards like Acrobatics/Expertise, otherwise Low priority.


If you play like me you have almost all skills in your deck anyways, so you can almost never go wrong with Burst, especially if you can hold it for a specific target with well-laid plans. It allows you to play exhaust skills (e.g. Catalyst/Adrenaline) twice, and gives you the flexibility to do more damage or block as needed. It can even help maintain a blur lock with just 1 blur. It's value goes up when played with 2-cost cards like Bouncing Flask/Leg Sweep, but once it's upgraded it provides extra value even with 1-cost cards, and I even find myself using it with 0 cost cards (deflect/escape plan/finesse) since it allows you to double the value of those cards for 1 energy. Mid-High priority upgrade.


This card is pretty complicated, and I find myself avoiding it sometimes, but it's usually a good pickup. Works especially well with discard synergies, but can also just be very helpful with the setup phase of fights. It can be detrimental if you have plenty of energy to play all your cards because it takes the place of a card, but most of the time you can find a good use for it, and after setup you can exhaust it for 0 energy and be done with it. Upgrading it is a complicated matter because it gets rid of Exhaust, which makes it great for cycle decks, particularly when trying to get a blur lock going, but not being able to get rid of it can make it a dead card once your deck is safely set up, so only certain types of decks which rely on cycling through your entire deck 1+ times per turn should really upgrade it. I usually only take it later in the game after I have a few powers to setup each fight.

I personally don't take this card very often, because the cost of discarding 3/2 cards often leaves you with no use for the energy, making it very often a dead card. One major exception is when you have Ice Cream because even if it's the last card in your hand you can use it and retain the energy for next turn, but even then I find that the excess energy becomes unnecessary after a few rounds and you find yourself wishing you had drawn a different card instead. However it can be quite useful with discard synergies and cards like tactician/reflex, but it still relies on those cards being in your hand to use it. It also increases dramatically in value when you have draw cards like Acrobatics/Expertise, but you probably need 2-3 draw cards for it to be worth taking if you don't have discard synergies/ice cream. It is one of the cards that can enable a deck to cycle infinitely and kill anything in 1 round, but I wouldn't rely on that happening. High priority upgrade.

I personally almost never take this card because of the randomness it introduces, and I prefer to build my decks around consistency. However I'll sometimes take it if I have dead branch or if it comes pre-upgraded. Low priority upgrade.


With the X+1 upgrade it is better since you can get an effect out of it at 0 energy, but there are probably better things you can do with your energy, and you might prefer to just have drawn a different card instead. Is better with energy relics (tea set/lantern/boss energy relics), but I typically just avoid it.


Another underrated card in my opinion. I'd only take it if you find yourself with excess energy (relics/ice cream/outmaneuver/etc), but if you do have excess energy it can help you make much better use of that energy. I probably would still consider Acrobatics the superior draw card, but Expertise definitely has its place, especially if you have a bunch of 0 cost cards like deflect/slice. Upgrade is essentially mandatory because it makes it usable from the start of your turn, by upgrading the amount of cards from 6 to 8.


Probably one of the strongest defensive silent cards. I used to think it was bad, but it's pretty much good all around. You can completely negate a large number of fights (hexaghost/stabby book/time eater). Even if you use it against single attack enemies, the weak it provides makes it worth the energy. It's a rare now, so it competes against a lot of other strong cards, but even then it's probably one of the best rare cards still.
Cards - Utility (M -> Z)
Can make some fights incredibly one-sided (4x Malaise on Time Eater for example), but most fights can be won without it, and it's probably not going to make a deck win a run that wouldn't otherwise already be able to win. But even if you just use it on a backflip it can be useful. Easier to use with well-laid plans, so under the right circumstances it could be useful, but those circumstances often don't come up. I do like Nightmare, but it's a very difficult card to explain or evaluate, so I'd recommend avoiding it for new players unless you just wanna have fun or are desperate for a win condition. Low priority upgrade.


I find myself taking this card quite often, especially if I have an acrobatics or two, because it allows me to get a lot of value out of them. With enough cycle you can basically have +3 energy every turn, and can make for some very one-sided fights. It's also a good card to use when you don't have any damage cards in your hand but have enough block with 1+ energy remaining to use. It's also far more usable when you already have an energy relic. However, it can end up being a dead card, so I tend to not take it until I have an energy relic or a couple acrobatics, but a good portion of my high ascension wins use outmaneuver, but probably because I favor a lot of cycle cards. Medium priority upgrade


Usually it's not worth the 2 energy. Maybe with enough excess energy (probably ice cream+concentrate/outmaneuver)/cycle in the right shiv deck it could be good, but it's difficult for me to get value out of this card. High priority upgrade.


Quite a useful card actually. Just think of it as a block card, it doesn't scale with dex, but it is many times more useful against multi-hit attacks or multiple enemies. I find myself taking at least 1-2 if they come up, but don't be afraid to use it after setup if you're comfortable with your remaining deck so that you don't draw it when you don't need it. Low priority upgrade.


Actively bad when unupgraded, even when upgraded it's mediocre, however it can become good with certain discard synergies. Think of it like this, when you draw prepared you're drawing 1 less card, but you get to trade out 1/2 of your cards for 1/2 more cards. Unupgraded you're just trading 1 card for what would've taken prepared's place, which means you'll never play 5 cards that turn. I only take Prepared when I have discard synergies.


Seems pretty useless at first glance, but if you have a couple acrobatics/prepareds it can drastically increase their usefulness. Furthermore, it has insane synergy with tools of the trade. If I have tools of the trade I'll always take one of these and upgrade it because it turns draw 1/discard 1 into essentially draw 3 extra when it comes up. Definitely don't take it before you have tools of the trade or 2-3 prepared/acrobatics, and you probably don't want to take more than 1.


Not particularly useful, but can be usable when upgraded (0 cost). I'll sometimes take it if I find one that's already upgraded, but I wont otherwise. It could be more useful with cards like Nightmare, but it essentially reduces the cards in your hand that turn by 2, which usually means you only have 3 cards to work with. Works better with high cost cards, but can be useful for putting a backflip/acrobatics in place for next turn if you don't need it this turn. All in all, when upgraded it's not bad, it can increase consistency, but it also ends up taking a spot in your deck that is usually filled by other cards. Medium-High priority upgrade.


Can be useful if you already have a lot of shiv/discard synergy and extra draw, or sometimes with dead branch. If you have the energy to draw cards and still play this your energy is probably better spent on playing the cards you're discarding. Perhaps if you could reduce its cost, but the upgraded shivs just do 2 additional damage each. Low priority upgrade.


Enables infinite combos with cycle/discard decks and has great synergy with Tools of the Trade. Similar to Reflex, you'll want to have 2-3 discard cards or tools of the trade first. Well-laid plans also makes it easier to play. Just be careful taking this card if you don't have adequate discard because it can end up being a dead card quite easily, and sometimes even if you discard it you might not have any use for the energy, so it helps to have something like ice cream and/or an energy dump (e.g. Skewer/Malaise). High priority upgrade.


Weak in most hallway fights and very good on most bosses. Just try and think how much damage value you'll get out of it when evaluating this card. It can increase the length of your setup phase, but it's a pretty good card especially early on, and even later if you're using attacks for damage. Medium-High priority upgrade.


Fairly terrible all around. Still bad when changed to sneaky strike. The only time I'd take this card is if you have tools of the trade, don't have reflex or tactician, and it's late enough that you don't expect to get them as it gets you a little extra value out of that discard. Low priority upgrade.
Relics - Basics
Relics are random so you can't really rely on them, but some of them can be game changing or archetype defining, so it's usually worth accepting some level of risk to get them. With that being said, if you already have a solid deck, I prefer to avoid the elites so an unlucky draw doesn't end my run prematurely.

You'll almost always want to pick up relics (except maybe dead branch), so really the only decision making involving relics is purchasing them (with the exception of boss relics), so I'll do my best to cover that for specific relics. In your last shop you want to spend all your gold, so if you have remaining gold and there are no cards that you want you should probably buy even minor benefit relics.
Relics - Common
Anchor - Start each combat with 10 block. This is a minor benefit, as it helps you set up and in early fights can help you get some early damage.


Ancient Tea Set - Whenever you enter a rest site, start the next combat with 2 extra energy. Similar to Anchor, it helps with setup, more useful with relics such as ice cream energy cards in your deck. Always active for bosses which is nice. A decent pickup from stores late game if you don't have anything else to buy.

Art of War - If you do not play any attacks during your turn, gain an extra energy next turn. This relic is quite good for poison builds which do their damage through skills and powers and rarely play attacks anyways. For shiv it isn't as good, but still can be a minor benefit. This can be one of the best buys with the right deck (can basically be the best energy relic if you never play attacks anyways), but often isn't worth the gold.

Bag of Marbles - At the start of each combat, apply 1 vulnerable to ALL enemies. Very minor benefit, not worth buying unless your deck is able to do 1 turn kills, in which case you probably don't even need it. Most of your first turn is spent playing powers/block anyways.

Bag of Preparation - At the start of each combat, draw 2 additional cards. Very nice relic and I often buy it when I see it if I have the extra gold. Makes setup easier, doubly useful with Gambling Chip.


Blood Vial - At the start of each combat, heal 2 HP - Minor benefit, healing never hurts, but not really worth buying because it's not going to make an otherwise unwinnable run winnable.


Bronze Scales -
Whenever you take damage, deal 3 damage back - Minor benefit, useful in specific encounters (especially byrds) so it's really nice if you get it early on, but it falls off in usefulness later. If you don't have much to deal with byrds when you're in late act 1 it can be a decent pickup, but usually you want to spend your gold on card removals/cards at that point in the game.

Dream Catcher - Whenever you rest you may add a card to your deck. Minor benefit, as you'll be spending most rest sites upgrading, but it can help if you're really short on cards and have most of your useful cards upgraded already. I wouldn't buy it.

Happy Flower - Every 3 turns, gain 1 energy - Very nice simple relic that helps you out every 3rd turn. Not much to say other than it's not too reliable and wont make or break a deck so it's usually not worth buying, but it's nice to run into. Extra useful with Ice Cream.


Juzu Bracelet - Regular enemy combats are no longer encountered in "?" rooms. Good for speed runs, and decent in most runs if you already have a decent card, but not really worth buying.


Lantern - Gain 1 energy at the start of each combat. Another decent setup relic that helps get your deck going, and sometimes I will actually buy it if I have the extra gold.


Oddly Smooth Stone - At the start of each combat, gain 1 dexterity. Solid relic, basically an innate 1/2 or 1/3 footwork, I like having it, but I've never bought it.


Omamori - Negate the next 2 curses you obtain - decent relic, although I'd never really buy it because you can't rely on coming up on curses. It can enable you to pick up Calling Bell, and enable you to take risks in events that give you curses.


- Orichalcum - If you end your turn without block, gain 6 block - I'd never really buy this with silent, but it does have some synergy with thread and needle since you get 11 block if you don't block. Only useful when you get a bad draw and end up with no block cards.


Pen Nib - Every 10th attack you play deals double damage. Can be quite good with a shiv deck if you line it up with an attack like finisher/skewer, but since most of your damage is either done through skills or low damage attacks like shiv, this isn't always particularly useful. I personally wouldn't buy it.


Prayer Wheel - Non-boss chests now also contain cards. Can be a surprisingly useful pickup if you get it before the first boss chest but it falls off in usefulness the later you get it. If there aren't many good options in an early store, it can be a good buy, but usually I avoid it.


Regal Pillow - Heal an additional 15 HP when you rest. Can be useful on high ascension runs when you sacrifice max HP reducing the effectiveness of rest sites, but if you're needing to rest at rest sites enough to get value out of this relic your deck is probably too weak to complete the run. Might be useful if your deck is strong and mostly upgraded, but takes a bunch of damage during setup.


Singing Bowl - When adding cards to your deck, you may add +2 Max HP instead - minor benefit, I often skip cards so I do tend to get some value out of it, but the max HP isn't that useful. Not worth buying.


Snecko Skull - Whenever you apply poison, apply an additional 1 poison - This is a fantastic relic and I almost always buy it when I see it. Has excellent synergy with envenom and bouncing flask, and useful for all other poison too.


Strawberry - Raise your Max HP by 7 - not particularly useful, but might be worth picking up in the last shop, but even then it's probably not going to save you from anything.


Tiny Chest - Gain 30 gold, you are 10% more likely to find treasure in ? rooms - Very minor benefit, the 10% boost is too unreliable to be worth purchasing.


Vajra - At the start of each combat, gain 1 strength. Can be quite useful in shiv decks, but is pretty useless in poison decks. I'd maybe buy it with the right shiv deck, but usually I'd save my gold for something better unless it's the last shop.


War Paint - Upon Pick up, upgrade 2 random skills - Almost always ends up upgrading block, survivor if you're lucky. Not really worth buying, but is a minor benefit if you happen upon it. I've never really seen it drop late game and actually upgrade useful skill, but it could in theory.


Whetstone - Upon pick up, upgrade 2 random attacks - Even more useless than War Paint since it usually upgrades strikes. It can be quite nice if it upgrades Neutralize, but usually it's already upgraded. Too unreliable to purchase.
Relics - Uncommon (A -> O)
Blue Candle - Curse cards can now be played. Playing a curse will make you lose 1 HP and exhausts the card. Usually you wont have curses or you'll be removing them anyways, but might be useful if you have du-vu doll with a shiv build as the str bonus remains after you exhaust the curse, but usually if you're using this relic your deck already has issues. Not worth buying.

Bottled Flame - Upon pick up, choose an attack card. At the start of each combat, this card will be in your hand. Not particularly useful for silent as there aren't any attack cards you really need in the start of any encounter since you're usually wanting to block and get up powers, but if I get it I'll usually pick neutralize since it lowers enemy damage for 0 energy, making setup easier. Not worth buying.

Bottled Lightning - Upon pick up, choose a skill card. At the start of each combat, this card will be in your hand. Much more useful than flame, doubly useful with Apotheosis. Usually I pick a backflip, or a prepared+ if I dont have an energy relic. This help the first turn be more effective. Not usually worth buying, but is nice if you find it.

Bottled Tornado - Upon pick up, choose a Power card. At the start of each combat, this card will be in your hand. Also quite useful for Silent as the opener is all about laying out your powers. I usually choose a footwork because getting footwork up makes the rest of your setup easier. Might be worth buying if there aren't better options.

Centennial Puzzle - The first time you lose HP each combat, draw 3 cards. Another useful relic to help with startup. Not game changing but it makes things easier, however you usually want to completely avoid losing HP so it's less useful than other relics. I wouldn't buy it.

Darkstone Pendant - Whenever you obtain a curse, increase max HP by 6. Pretty useless since you want to avoid curses typically. However you can remove the curses and retain the max HP, so it does make cursed events more appealing.


Frozen Egg - Whenever you add a Power to your deck it is upgraded. Quite good, especially early on, as it gives you more flexibility with upgrades and rest sites. I'll usually buy it if I find it in act 1, although it takes some time to get value, so you might need to spend that gold fleshing out your deck.

Gremlin Horn - Whenever an enemy dies, gain 1 energy and draw 1 card. Can be useful in multi-enemy encounters, but often isn't helpful and isn't game changing. I wouldn't buy it.


Kunai - Every time you play 3 attacks in a single turn, gain 1 Dexterity. This has fantastic synergy with shiv builds as you can often play 3 attacks without spending any energy, which means as the fight goes on your defenses just get better and better. I'll usually buy it if I find it early or if I already have a couple of shiv cards. Great synergy with Cloak and Dagger+ and Infinite Blades as it allows you to gain dexterity almost every turn.

Letter Opener - Every time you play 3 skills in a single turn, deal 5 damage to ALL enemies. Quite useful for enabling a cycle deck to kill without damage skills/attacks, and just useful in general because Silent plays a lot of skills. I don't know that I'd buy it, but I'm always happy when I find it.

Matryoshka - The next 2 non-boss chests you open contain 2 relics. If you can guarantee you'll open 2 chests (meaning you're in act 1 or first half of act 2), it can be worth buying if you get lucky, but I tend to avoid it due to the randomness it introduces.


Meat on the Bone - If your HP is at or below 50% at the end of combat, heal 12 HP. I find this to be especially useful in high ascension runs when you have low max HP because it triggers almost every fight later on, and allows you to take a little more damage/risk during your setup phase. I might buy it if I have <60 max HP and am taking damage during setup, but usually there are better things to buy.

Mercury Hourglass - At the start of your turn, deal 3 damage to ALL enemies. Useful-ish for Silent because fights tend to take awhile, and lets you turtle up a bit better, but not really worth buying.


Molten Egg - Whenever you add an Attack to your deck it is upgraded. Not bad, but since Silent is more skill focused, it isn't as useful as the other egg relics. Not worth buying.


Mummified Hand - Whenever you play a power, a random card in your hand costs 0 for this turn - quite a useful setup card and allows you to take a lot of powers without too much detriment. Probably my favorite setup relic, and I will buy it if I already have ~3+ powers and there aren't better options available.

Ninja Scroll - Start each combat with 3 shivs in hand. Nice relic, especially for shiv builds, but usually you have to play your shiv synergy cards first so you need to get lucky for this relic to be anything more than a 12 damage opener. I'm not sure exactly how it works with bag of preparation since that'd put you over 10 cards on your starting turn, it might depend on the order you pick them up, but bag of preparation is definitely superior. I wouldn't buy this relic.
Ornamental Fan - Every time you play 3 attacks in a single turn, gain 4 block. The block on this relic needs to be buffed imo. It can be useful when you're playing 0 energy shivs, but the 4 block is too minimal to really be useful. I wouldn't buy it.

Relics - Uncommon (P -> Z)
Pantograph - At the start of boss combats, heal 25 HP. Nice when you find it because it allows you to use final rest sites in each acts for upgrades more easily, but usually not worth buying unless it's your last shop


Paper Krane - Enemies with Weak now deal 50% less damage rather than 25% - This relic is amazing, and it drastically increases the value of weak cards, especially neutralize. I almost always buy it if I find it.


Pear - Raise your Max HP by 10 - Pretty basic relic, not really worth buying unless it's the last shop and there's nothing else to buy.


Runic Dodecahedron - If your HP is full, gain 1 energy at the start of every turn - In high ascension runs this is pretty terrible, but when you full heal after boss fights it isn't as bad. I've had one a15 run where I bought it and made it work through all of act 3 because my deck was so dominant, but it's very rare that you actually find a use for it. Usually not worth buying, as the value goes away when you need it the most.

Shuriken - Every time you play 3 attacks in a single turn, gain 1 Strength - amazing relic for shiv builds, as strength is exceptionally useful since you're playing so many attacks. I'll always buy this if I already have a couple of shiv cards and it's early, but if you're looking at doing mostly poison it's not worth buying really. I prefer Kunai, but Shuriken can be very powerful too.

Smiling Mask - The merchant's card removal service now always costs 50 gold - Quite a useful relic if you get it early on and can hit up a bunch of shops. It usually ends up paying for itself if you get it in the first half of your run, so it's usually a good buy, but there may be better options available.

The Courier - The merchant no longer runs out of cards, relics, or potions, and his prices are reduced by 20%. Can be useful if you get it early enough, there are usually better things to spend your gold on, but if you see it in act 1 and there's nothing else worth buying, it's probably a decent pickup.


Toolbox - At the start of each combat, add a random colorless card to your hand. This can be good, but it can sometimes be detrimental. I'd say most of the time it's good, but due to the randomness it introduces I wouldn't buy it. I will typically pick it up if I find it though since most colorless cards are useful.

Tough Bandages - Whenever you discard a card during your turn, gain 3 block. Quite a useful card, and makes prepared+ particularly useful because it now gives you 6 block. Also enables you to use Acrobatics more easily since it provides 3 block. Also increases survivor block by 3. All in all, this is a great relic, and if I have a couple of discard cards I will buy it if I see it.

Toxic Egg - Whenever you add a Skill to your deck it is upgraded. One of the best uncommon relics for Silent, especially if you find it early. Almost all your most useful cards are skills, so your deck will be much, much stronger with this relic. Obviously it isn't as good when you already have picked up most of your important cards, but early on it's one of the best relics to buy.
Relics - Rare (A -> G)
Bird Faced Urn - Whenever you play a power, heal 2 HP. Easily one of the best relics for Silent since you'll likely be playing 3+ powers every round, making it almost equal to Ironclad's starter relic, and in some cases even better. Makes setup easier since you know you can comfortably take some damage if you need to. Usually worth buying.

Calipers - At the start of your turn, lose 15 block rather than all of your block. Can be an insane relic with the right deck. However you need to generate more than 15 block per turn to make use of it. Blur can actually still be helpful in getting your block up even with calipers as it prevents the 15 block loss for a turn. But to make good use of Calipers you need at least 1 footwork, ideally 2, but with a decent setup you can take down just about anything with calipers, similar to a good blur lock. Dodge and Roll is especially useful with calipers since the block it gives is essentially doubled, and benefits twice from footwork. Much better late game than early game, so if you see it early it's a questionable pickup, but if you can survive to the late game with it, it's usually going to be worth it.

Dead Branch - Whenever you exhaust a card, add a random card to your hand - One of the only relics you don't want to pick up even for free. Granted, it can be very fun, but it introduces too much randomness and often dead cards into your deck. I do like to take it on occasion and go shiv just to mess around, but if you're playing seriously you should really avoid this relic.

Du-vu Doll - For each curse in your deck, start each combat with 1 additional strength - If you're running shiv with blue candle already, it might be worth taking, but usually it's not very useful.


Frozen Eye - When viewing your draw pile, cards are now shown in order - Amazing relic, with a little bit of draw and careful planning even a bad deck can beat the game with this relic. Granted, most people don't take the time to look at their draw pile, but if you actually use it as intended, it's very powerful. I'll usually buy it if I have a couple of draw cards in my deck, which is most of the time.

Gambling Chip - At the start of each combat, discard any number of cards and draw that many - Fantastic setup relic, as it can get rid of the cards you don't want and give you a more ideal first turn. Usually worth buying if you have the gold, but there might be better options depending how dependent your deck is on the first turn setup.

Ginger - You can no longer become weakened - Good for shiv decks, but not useful for all encounters so I typically wouldn't buy it unless you're worried about a specific encounter with weak, but that's usually not an issue in the later acts.

Relics - Rare (K -> Z)
Girya - You can now gain strength at rest sites (3 times max) - Can be quite good for a shiv build, but you probably need the rest sites for upgrades, so I wouldn't buy this unless the benefit of 1 str outweighs any upgrades you may need.


Ice Cream - Energy is now conserved between turns - One of the best relics in the game. However personally I've yet to have a run where it completely powered my success. It's a lot better if you already have an energy relic and lots of card draw so you don't run out of things to spend energy on. It's good at pretty much all points in the game. Can turn Skewer into a win condition. I usually pick it up if I have the gold.

Mango - Raise your Max HP by 14 - Fairly simple, nothing game changing about it, might be worth buying in the last shop, otherwise there are probably better options.


Old Coin - Gain 300 gold - Gain 300 gold, fantastic, now you can buy another relic or some cards. Not sure if this is ever actually in the store.


Peace Pipe - You can now remove cards from your deck at rest sites - Can be useful for building a highly specialized and optimized / minimalist deck, but most of the time you'll be spending the rest sites upgrading so it's a mediocre relic and I usually pass on it unless I have a specific build in mind (such as an infinite drop kick build)

Red Skull - While your HP is at or below 50%, you have 3 additional strength - Can be quite good with shiv, especially on high ascension where you'll never be at max HP, and also good synergy with meat on the bone, allowing you to risk taking a bit of damage to boost your own. Might be worth taking in some circumstances, but most of the time I'd spend my gold on other things.

Shovel - You can now dig for loot at rest sites - can be nice if you don't have any important upgrades to get, but I personally wouldn't buy it.


Sundial - Every 3 times you shuffle your deck, gain 2 energy - can help dramatically with turning a cycle deck into an infinite cycle deck. Even if you don't have enough cycle to get through your deck in 3 turns, most silent decks can get through their deck in 1-2 turns so it ends up being a lot of energy. I'll pick it up if I have a lot of card draw/discard.

Thread and Needle - At the start of each combat, gain 5 plated armor - Great relic, makes the early game a whole lot easier with 5 block every turn until you take damage. However the usefulness falls off later, but it never becomes useless. I usually wont buy it unless there's nothing else to buy, but it can be worth it early on.

Tingsha - Whenever you discard a card during your turn, deal 3 damage to a random enemy for each card discarded - Great synergy with discard decks and tough bandages. Just like tough bandages, it increases the value of prepared by making it actually a functional card besides swapping cards around. Also can enable infinite cycle decks to kill in 1 turn.

Torii - Whenever you would receive 5 or less unblocked damage, reduce it to 1 - Pretty solid relic, great against Byrds, but later in the game it becomes a lot less useful. I wouldn't buy it most of the time.


Unceasing Top - Whenever you have no cards in your hand during your turn, draw a card - You can create some crazy combos with this relic, and it makes energy relics like ice cream and energy cards like outmaneuver/concentrate a lot more usable. You can use concentrate as the last card in your hand and still draw cards to replace the ones you discarded and spend the energy you get from it. Also increases in value if you have a lot of 0 cost cards.
Relics - Boss
Astrolabe - Upon pickup, choose and transform 3 cards, then upgrade them - Lower priority than most energy relics, but can be a decent choice if you want to get rid of your strikes and hope for something good. Probably not the best choice if you already have a good archetype set up, but even if you get very unlucky it probably wont hurt your deck more than the 3 strikes do anyways.

Black Star - Elites now drop 2 relics - if you have a dominant enough deck to take on a lot of elites it can be worth it, but I tend to avoid it because I prefer to avoid elites most of the time.


Calling Bell - Obtain 3 curses and 3 relics - Can be worth it if you already have Omamori, but 3 curses is usually too much to deal with for it to be worth it, but it can be a fun choice every now and then.


Cursed Key - Gain 1 energy at the start of each turn. Whenever you open a non-boss chess obtain a curse - Easily one of the best energy relic because it adds up to only 2 curses, or you can just avoid the curses by skipping the chest, and they come 1 at a time giving you plenty of time to remove them.

Ectoplasm - Gain 1 energy at the start of each turn. You can no longer gain gold - It's a solid energy relic, but losing gold is a pretty severe disadvantage if you take it after the act 1 boss. I'd only take it if you have a solid deck going already and are only missing a couple of cards.

Eternal Feather - For every 5 cards in your deck, heal 2 HP whenever you enter a Rest Site - Not a top choice at all, but has no downside really. More effective with thicker decks, but I only take this if there are no other good options.


Lizard Tail - When you would die, heal to 50% of your max HP instead (works once) - Probably the worst relic. If you were going to die you probably weren't going to complete the run anyways. It can however allow you to take more risky upgrades/avoid resting at rest sites though.

Orrery - Choose and add 5 cards to your deck - a decent choice if there aren't other good options available, can help you flesh out a build if your deck is really lacking, but I find myself skipping most of the card options it gives you anyways.


Pandora's Box - Transform all strikes and defends - This is actually quite a lot better than it seems at first glance. You'll ideally want to remove these strikes/defends anyways and it can easily turn a garbage deck into a very good one, so I end up putting this as one of my higher priority boss relics, but do note that since it gets rid of all of your defends you'll need to have a fair bit of defensive cards already, and you'll probably want to pick some more up pretty soon after. But all in all it's a very fun and useful boss relic. Many of my successful high ascension runs used Pandora's Box.

Philosopher's Stone - Gain 1 energy at the start of each turn. ALL enemies start with 2 Strength - It's a good relic, but it can also really screw you on monsters and elites, especially multi enemy encounters. If you can manage to get through the trash mobs it's a lot more useful on bosses, but I find myself taking other relics in act 1 since it can cause byrds to completely trash you in early act 2 even with a good deck.

Question Card - On card reward screens, choose from 4 cards instead of 3. Not a great choice, but not a bad choice if there aren't good options available. It'll help you refine your deck and get the cards you need more easily. Not much more to say, it's a medium priority boss relic.


Runic Dome - Gain 1 energy at the start of each turn. You can no longer see enemy intents. This can be quite good if you're patient enough to read the AI of the various mobs or if you've played enough to know them. Even if you know the AI there is some level of randomness so it's still a disadvantage, but for certain fights it is the best energy relic. I personally just avoid it a lot because I'm too lazy to read the AI.

Runic Pyramid - At the end of your turn, you no longer discard your hand. Draw 1 less card each turn. This can be quite a good relic, but it makes well-laid plans useless, and an upgraded well-laid plans is probably better anyways. If you have a bunch of useless cards you might find your hand littered with them, so it's better with a small deck. Situational, but I take it from time to time.

Snecko Eye - Draw 2 additional cards each turn. Start each combat confused - This relic is too random for my tastes, but the extra card draw can counteract the increased energy cost to some extent. Is useful if you take bullet time, but since most of your good cards are low cost anyways, it's usually not the best choice.

Sozu - Gain 1 energy at the start of each turn. You can no longer obtain potions - Probably the best energy relic. Potions are good, but I prefer to focus on my cards anyways. I take this any time I see it.


The Specimen - Whenever an enemy dies, transfer any poison it has to a random enemy. Great for multi-enemy encounters, useless against single enemy encounters. I take it if there are no other good options available, but it's a pretty low priority relic for me.


Tiny House - Obtain 1 potion. Gain 30 gold. Raise Max HP by 5. Obtain 1 card. Upgrade 1 random card - Garbage, never has helped me win a run, just gives you a very minor buff. You might take it over lizard tail and calling bell though.


Velvet Choker - Gain 1 energy at the start of each turn. You cannot play more than 6 cards per turn. It's an energy relic, but since a lot of Silent's cards are low cost it ends up restraining me a lot. The tradeoff is usually worth it, but since I like to play a lot of cycle cards personally I usually avoid it.

White Beast Statue - Potions always drop after combat - Honestly I'm too lazy to use potions in every combat, but this can be a useful relic. I have won a high ascension run I had no business winning because I had alchemize and White Beast Statue and could use 2 potions every fight, but I prefer to have a deck that doesn't rely on potions.
Relics - Event
Bloody Idol - Whenever you gain gold, heal 5 HP - if you happen to get the golden idol, then get this event, this is a very solid relic, congrats.


Enchiridion - At the start of each combat, add a random power to your hand. It costs 0 until the end of your turn - Easily one of the best relics for Silent since it gives you a free power. It's a bit random, but usually makes reading the Cursed Tome worth it.


Golden Idol - Enemies drop 25% more gold - Great relic and it comes in act 1, if you find it, definitely don't take ectoplasm.


Necronomicon - The first attack played each turn that costs 2 or more is played twice. When you take this relic, become cursed - Can be good if you have 2 cost attacks, but most of the time I don't. Try and grab a Dash or Predator, or Riddle with Holes if you have Envenom. Not bad overall.

Neow's Lament - Enemies in your first 3 combats will have 1 hp - Whale Blessing, great when you can use it to snipe an elite and gets your run going more quickly.


Nilry's Codex - At the end of your turn you can choose 1 of 3 random cards to shuffle into your draw pile - There's really no downside to this other than that it can be quite random, so it's usually worth having, but be careful that you don't dilute your deck with random cards, and remember it goes into your draw pile so you'll probably draw it soon after adding it, which can make planning with it much easier.

Nloth's Gift - Triples the chance of receiving rare cards as monster rewards - Costs a random relic. If you get it for a bad relic, it's not bad, but really the only rare card we want a lot of is Adrenaline, so I'd say it's mediocre for silent most of the time, and usually not worth the sacrifice.

Odd Mushroom - When vulnerable, take 25% more damage instead of 50% - I almost always take this event if I have the extra HP to spare the damage to usually causes, it's quite nice, but not game changing.


Red Mask - At the start of each combat, apply 1 weak to ALL enemies - Another relic that makes setup easier. Costs all of your gold to obtain. Usually comes very late, so if there are no other stores before the boss, or you have very little gold, I'd take it, but even with an upcoming store it's a decent relic for ~100-200 gold.

Spirit Poop - it's unpleasant - One of the best relics in the game. Joking, but if you have it it means you got rid of a curse through the bonfire event, so congrats, you got a good event.
Relics - Shop Only
Cauldron - When obtained, brews 5 random potions - Terrible, I've never seen a scenario where I'd take this. You can't even hold 5 potions.


Lee's Waffle - Raise your Max HP by 7 and heal all of your HP - can be a decent buy if you're low on health as it'll let you use rest sites for upgrades. Otherwise only useful as a late relic.


Medical Kit - Status Cards can now be played. Playing a status exhausts it - Might be worth dying if your deck is very small and particularly vulnerable to statuses like Burn for act 3 encounters, but most of the time I save my gold for better things.


Membership Card - In future acts, shops appear 50% more often. BONUS: 20% discount on all products! - can be quite good if you get it early on, especially combined with golden idol or another discount relic. Usually is a surprisingly good buy in act 1.


Strange Spoon - Cards which exhaust will instead discard 50% of the time - I never really take this because it's unreliable, but I could see it causing problems with shiv decks since those shivs will end up diluting your deck, but it could be useful with cards like Alchemize, Malaise, Piercing Wail, and Catalyst.

Toy Ornithopter - Whenever you use a potion, heal 3 HP - not good in a vacuum, but if you already have white beast statue, alchemize, or both, that translates to 3-6 hp every combat which is quite good, so if you have those it's probably worth picking up if there aren't other good things to spend your gold on.
Resources and Credits
Credit to reddit user /u/_crude_ for his Comprehensive Guide to Silent in High Ascension. His guide was quite helpful in refining my own play and recognizing cards that were useful that I wasn't using as much. We have some conflicting opinions but agree on most things. You can find his guide here:

Slay the Spire reference[docs.google.com] - Great for telling you about all the encounters and AI, especially useful if you are using Runic Dome. A lot of high quality information. I'm not sure who made it, but kudos to whoever did, very useful stuff.

Slay the spire with the silent: Turtle Style - another guide, by lacker, that I used when learning the silent, one of the first guides I read. Much more limited in information but it helped me get started

31 Comments
ToM! 24 Aug, 2024 @ 3:41pm 
Thank you for your guide - is is outdated but still very helpful. If you ever change one thing, please just write the cards Name as a Headline / Intro to the cards text.
You have all the cardpictures in and thats really nice but if i use the guide, i use "search" to find a specific card to see what you think of it. Most times i cant find it, because the cards name is not in the text
This would be *very* helpful to use this
CHOO CHOO 21 Dec, 2023 @ 3:07am 
Even if much of the guide is technically outdated or overly opinionated, I found it a good and helpful read that highlighted various important concepts for playing the Silent.
Blue Box 31 Jan, 2023 @ 3:18pm 
Yeah this guide is very out of date look a Corpse Explosion section, the rework is not stated at all.
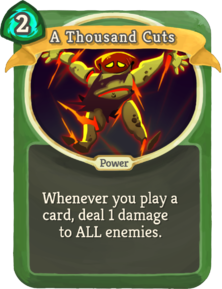
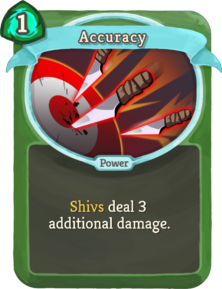
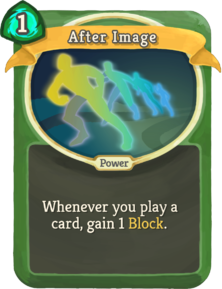
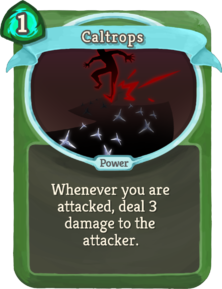
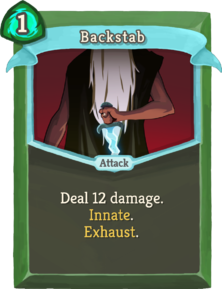
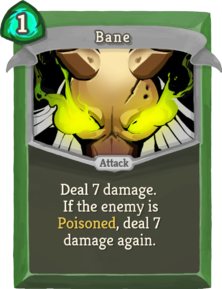
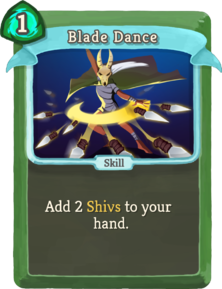
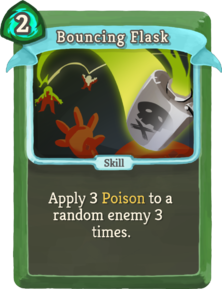
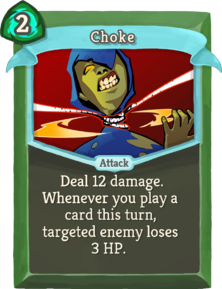
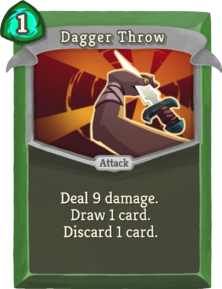
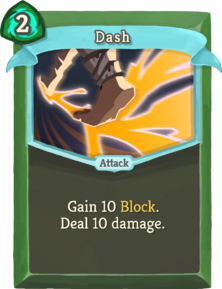
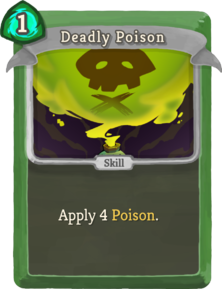
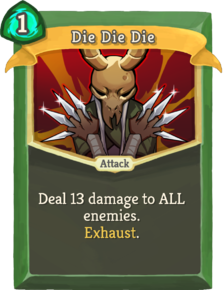
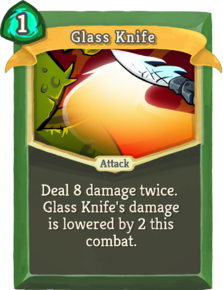
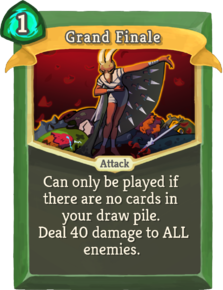
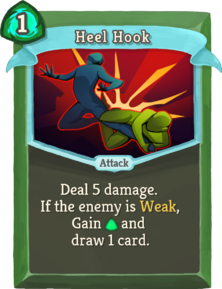
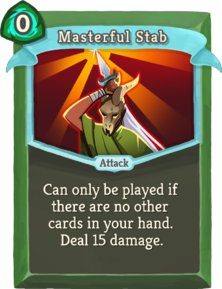
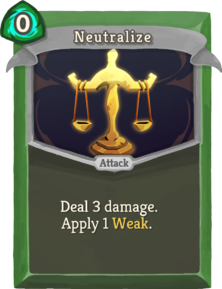
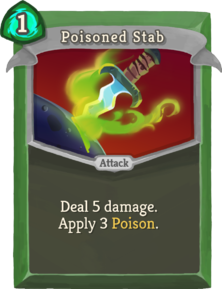
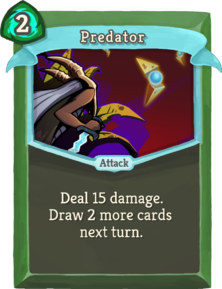
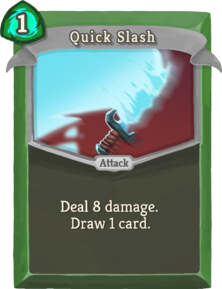
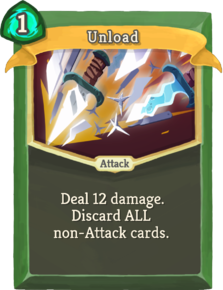
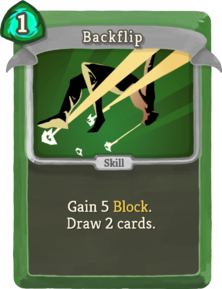
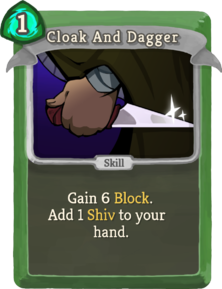
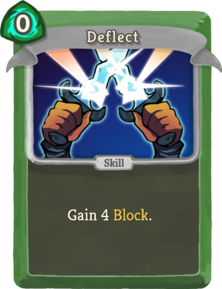
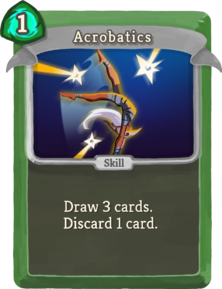
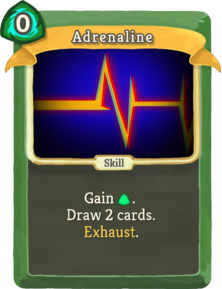
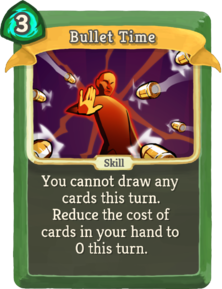
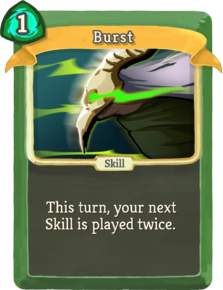
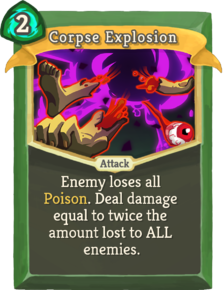
https://slay-the-spire.fandom.com/wiki/Corpse_Explosion
kgoblin 18 Jan, 2022 @ 7:42pm 
Guide is very, very out of date, with some no-pick cards being a LOT different now (eg. underhanded blow is a must have now for discard decks). Some of the advice was also sketchy even when the guide was written... heel hook has always been amazing if you're playing a weak deck, & is unchanged from 2018
ant4given 8 Oct, 2021 @ 11:20am 
thanks for guide.
Neebert 13 Jul, 2021 @ 3:27pm 
If all else fails Nightmare triple poison. 81 x there start poison seems to do the trick IMO.
Mofire 28 Jun, 2021 @ 2:20pm 
Typo: "Escape Plan" mentions bad synergy with Sneko Skull, where I'm assuming you mean Snecko EYE.
Krasnaya Anna 25 Apr, 2021 @ 5:06am 
Legit guide helped my through my first runs a lot.
Am now a asc 20 Silent, feel free to ask for help/advice
FlamezOfDarkness 24 Aug, 2020 @ 5:01pm 
ALSO for "The Cauldron" you said that the player cannot hold 5 potions, however this isnt true because 3 of my runs now I've gotten a "Potion Belt" or a something "Belt" that allowed me to carry +2 more potions. The Cauldron still isnt great, but if a player already has the Belt and comes aross the Cauldron it may be more useful.
FlamezOfDarkness 24 Aug, 2020 @ 4:59pm 
I haven't sunk 100's of hours into this game but I fully FULLY agree with the "Whale Blessings" No. 10 spot. First 3 enemies starting with 1 health is something I would barely choose before. I always thought it was only really a good option for someone trying to get the 20 minute run achievement.

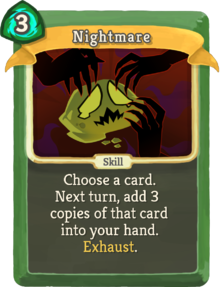
Then I chose it once because my other two options would curse me and ended up making it to an Elite fight before it ran out and he dropped to 1HP. EASY Relic right there.