Wolfpack

Wolfpack

113 ratings
TDC ATTACK GUIDE
By Gizmo
A Guide explaining the use of the TDC how to set it up in a combat situation and setup an attack on a convoy or target
3
2
   
Award
Favorite
Favorited
Unfavorite
The TDC
TDC Scares a lot of people at first but hopefully i can show you that this need not be the case and by the end of this guide with a little practice you should be attacking with some level of confidence...

The TDC requires several settings to be set in order to hit the desired target.

1. Range to to target
2. Speed of target
3. Angle On the bow (AOB)
4. Torpedo depth
5. Target length

The rest the TDC will do for you, but this still looks imposing to most new players, we will go through each one and put it together at the end in what i believe to be the most important part of launching an attack..

Target Identification

While target ID is not directly required by the TDC it is VITAL that we ID our target correctly.. a mistake here can and will throw off all our data and result in a miss, so take care to get identification correct..

i suggest you watch the developers own guide on this on youtube, it does a way better job of explaining how to use it than i could here..


1. Range

Range is the distance from your Uboat to the target, to determine this we look at our target recognition manual ID our target (lets say its a "heavy tanker type-20" click it to get the info sheet..

we know from our manual that the "mast height" is 47m, we now go to our periscope and Begin to range the target.

place the middle horizontal bar at the waterline of the ship then count how many vertical lines on the left side of the scope it is to the top of the ships mast (the highest point) and note your magnification zoom (zoomed in or out)...

so lets say its 8 lines to the top of the mast and we are zoomed in, time to calculate the range! divide the targets mast height given in the manual by the number of centiradians (vertical lines on the scope) to get the range! so 47 divided by 8 which is 5.8... then because we are zoomed in we need to multiply that answer by 4, so the full calculation is 47 divided by 8 multiply by 4 = 23.5 this is your range in hectometres and lucky for us that's what the TDC uses.. but if we wanted that converting to meters for navigation purposes 1 hectometre is 100m so 23.5hm is simply 2350m... please note that if your "not" zoomed in you do not need to multiply by 4 at the end its just mast height divide by centiradians (vertical lines on the scope)..

get used to taking ranges you will be taking lots of them not just for the TDC but for attack setup which we will talk about latter, so practice practice practice!...


2. Target speed

target speed is another crucial bit of data we need, to work out a targets speed we try our best to get as close 90 degrees of the target and you MUST be at a FULL STOP! (0 knots) then place the vertical line on the scope on the front of the bow and start the stop watch (T).. stop the the watch when the virtical line touches the edge of the stern (rear) now we simply divide the ships length given in the manual by the time taken for the ship to pass, so for example.. we know our target (heavy tanker type-20) length is 125m and lets say it takes 30 seconds to fully pass our vertical line in the scope.. we divide 125 by 30 then we multiply that by 2 to get our speed in knots which is 8.3 knots.. we have our speed ready to input into the TDC or use in navigation

3. Angle on Bow (AOB)

if there is anything that confuses people its AOB, the most important thing to understand is that AOB is take from the perspective of the target... so the AOB dial on the TDC is the target NOT your sub! the top of the dial (zero degrees) is the front/bow of the target, the bottom of the dial (180 degrees) is the stern/rear of the target..

now there are lots of clever ways of getting close to exact AOB measurements, but 90% of the time i just eyeball it.. that is take an educated guess... yes this doesn't need to to be within .00001, we do our best to get it as close as possible but don't get sweating over this, in my experience peoples issues with AOB are not estimating the value.. its attack setup!.. so many people ask me to teach them TDC and i let them show me what they are doing first.. and they want to attack at all strange angles.. while this can be done by an experienced TDC officer its not ideal and definitely not what a new TDC officer should be attempting! its like asking a new trainee sniper to make a 1.5 mile shot in a gale! we will talk more on this later but your main job is to be as close to 90 degrees to the target as possible when firing!..

but back to the dreaded AOB dial, you have a port and stb side.. so first thing to work out is what side of the target you are on, so lets say we are to the left of the target so we are port of the target.. so swing your AOB needle to port, now we need the angle... look through the periscope capture that image in your head of the angle you see the target at, now look at the dial and pretend your on the bridge of the target and you had to point out your sub, break it down to help yourself... is your sub dead ahead (0 degree's)? is it 90 degree's? not quite then how about 45 degrees? close but still not exactly 45 how about 40 degrees?... it takes a little practice but remember this doesn't need to be super super accurate unless your engaging at silly ranges.. another thing to remember is that the bearing of your sub has NO relation to AOB... your sub could be pointing north-east-south or west it doesnt matter... all that matters is where your sub is in relation to the the target!

The next mistake i see is weather the given periscope is being tracked by the TDC computer or not.. for the sake of argument lets say we are viewing our target from the attack periscope in the coning tower... on the top right of the TDC you will see a dial called "angle tracking" this determines if the TDC is tracking or not and what equipment its tracking.. default is off, so if we set that dial to "AP" the TDC is now tracking the Attack Periscope, this will take range and AOB and adjust the AOB as you turn the periscope so your AOB is always changing with rotation of the periscope, so set to "AP" put your scope on the center of the ship and estimate the AOB get a crew member to input this into the TDC now you have your AOB set, because of the way the TDC tracks its best to input range before AOB or the TDC will screw it up. initially i don't track with the periscope i input the range and then make an estimation on AOB,this means these numbers will not move, as the attack draws closer and the target comes into my attack box i will then switch to tracking, updating my ranges and AOB, so make sure tracking is "off" in the early stages of the attack setup or you will get lost pretty easily.. then switch to tracked in the later stages when you have more refined data and are close to firing...

don't get all screwy over AOB, you will get more accurate with practice, but if your other data is accurate and your ranges are not insane you need not sweat AOB, just remember AOB is taken from the perspective of the target NOT your sub!

4 Torpedo Depth

This is the easiest of the lot.. set and forget.. take a look at the ship data in your manual and look at the "draft" our target has a draft of 4m... that's the depth of the ship under water... so if we set our torpedo's to 6M then they will simply pass right bellow the hull.. so we must always be shallower than the draft... on a 4m draft i would just set to 2m - 3m.. the only time this needs changing is if your target changes..

5 Target Length

Another easy one, again look at ship data and input your targets length in to the TDC, once again no need to change this unless your target changes...
Prologue to attack
That's your TDC setup! if you get the above correct you hit... but there is a lot to do here, even a good crew and take several minutes to get all this data... factor into that combat pressure and the need to take several readings to refine your setup you MUST... MUST allow time to do it right, so many times i see people get visual on the convoy and steam in throw numbers at the TDC and expect to hit with no thought on the attack angle or giving themselves time to do what is needed, so this next part of the guide will focus on setting up the attack, which is at-least 70% of the deal when its comes to having a successful attack IMO...

The strengths of a Uboat are NOT accuracy! its stealth, this is one factor people don't seem to fully grasp at the beginning, running in and doing the steps on the TDC and firing is a hail marry, you have taken 1 set of measurements the chances of you getting that perfect or zero, drastically lowering your chances of a hit..

To swing the chances of a hit and kill in our favour we must set up the attack correctly slowly gaining information on the target/convoy as we go...

Once the convoy is spotted we observe and get a visual in our head of how the convoy is setup.. this requires initial ID of the ships and their position within the convoy, while we are doing this we are manoeuvring to either the port or STBD flank of the convoy keeping out of visual range, keep them close enough that you can just about see them with enough clarity to get ID's and ranges.. all this is done on the surface so you must be aware of your ranges as not to get spotted, make sure you keep a close eye on any escorts and be ready to dive at a moments notice, so have your main ballast flooded at this point, you can do this phase submerged but i like the flexability on the surface, so prefer to skirt at range..

Now we roughly match the convoy's coarse as best we can then select a ship that has been identified to start gathering data on convoy, we will use this ship several times so be sure you can pick it out from the rest..
Attack Setup
Once your happy you are roughly following the convoys coarse as best as possible at this stage its time for your Navigation officer to earn his pay, select your protractor and select show angle from the top menu bar, while holding space rotate the protractor until the shown angle matches that of your uboats coarse, all info from now on will be resting on this being accurate! once done you have now turned your protractor so that it reads a RELATIVE bearing, so 0-deg's should now be pointing to the front of your uboat and its heading, (NOTE: to reset your protractor back to default click the North arrow sign on the top bar)

Before calibration
After calibration

now get another crew member to look directly at your chosen ship through the periscope, he then gives the NAV the bearing to the center of said ship and the number of range markers to the top of ships mast, decimalise if need for E.G (3.4).. then a range is calculated once you have a range the NAV will then plot the bearing given from your boat to the target while also making the plot line the same length as the range given, so if the range is 23 your plot line will be 2300m from your current location.. mark this line with a time stamp at your uboats position and a cross at the target end and start the stop watch, we do this every 3 minutes! be sure to not change coarse while doing this! if a coarse change is ordered then the NAV must recalibrate the protractor again to be sure 0-deg's is on your bow THIS IS CRITICAL!

plotting bearings and range to target
More plotting


Repeat this several times at 3 minute intervals, 3x is a minimum personally if my readings coincide with each other, once complete draw a line through the crosses plotted this should give you a estimated coarse on the convoy, you now have a trace on the convoy and can predict exactly where they will be , because we plotted at 3 min intervals we can also get a rough speed estimate using the the distance tool together with the time tool!.. click one of the crosses and drag to the next cross while adjusting the speed setting slider, once you have a time of roughly 3 mins give or take you have your estimate convoy speed, check your new speed setting across all available cross markers to make sure your close, but it will vary a little, please note that this estimated speed is NOT accurate enough for TDC use!

Plotting the coarse of the convoy

Now we have an estimated coarse and speed and we can begin setting up our attack box, we now turn to match the convoys coarse via our new trace and go full ahead at flank speed and blow main ballast to rig for speed allowing us to race ahead of the convoy... how far you run ahead is up to you and can be calculated via your speed difference but you must at-least loose visual contact to give yourself time to get into position!
The Attack Box
Once you begin extending infront of the convoy its down to NAV to draw up the "ATTACK BOX" , this is a box that you can customise to you needs!

This box gives us a visual reference on the map as to where we need to be, begin by extending our your convoy trace/coarse line riiiiiiight out in front of the convoy, then just in front of the convoy draw a 90-deg line out from the trace with a range of around 1400/1500m do the same at the other end at the same distance you did the first.. then draw a line connecting the 2 range lines, this connecting line should be the same bearing as the trace/convoy coarse bearing or at least within a couple of deg's repeat this as needed at different ranges, giving you range lines to the convoy trace, but you at least need a 1000m range line.

1k works nice because any further the far side of the convoy is a little to far, to much closer and the near side of the convoy is right on top of you.. so a 1000m is highly recommended... that's your attack box completed... there are other additions you can make but this is more than good enough for an accurate attack...

Creating the box
Box complete with 1000m range line

The Layup
Once you have your attack box complete and you have extended out far enough from the convoy its time to start laying up, DO NOT turn in at 90 deg's here, there is a chance the convoy could catch up to soon, so turn in at a more shallow angle at first, anything from 35 to 45 deg's, once you start to approach the 1500m range line flood main ballast and make ready for periscope depth and cut to half speed, double check all battery's are charged and compressed air is full and button the hatch then make your final turn in so you are now 90 deg's to the trace line, aim to be 90 deg's as you hit the 1500m line, then begin to dive for periscope depth, and slowly approach your chosen range marker (1000m 800m advised) and stop the boat dead... take this free time to balance the boat at periscope depth as dive planes will no longer be effective so use of the negative tank is crucial at this point... while doing so double check all blow valves are closed off as to not leak compressed air slowly blowing ballast... congratulations you are not set up silently ready to bring death to anything you so choose, you are 90 deg's from the trace meaning once the convoy rolls across your bow you will have a near dead on 90 deg's to the target... the odds are now MASSIVELY in our favour!..... NOW WE WAIT!...

Keep checking the hydro's to make sure the convoy has not changed coarse and turned, once they come back into visual range then you start taking your measurements...

IN POSSITION
Final phase of attack!
its important to note that you can now target several ships, but its VITAL that the first target should be the furthest one on the opposite/far side of the convoy, this gives time for the torpedo's to hit target 1 and target 2 who is a lot closer will be hit around the same time, if done the other way around the closer target will get hit to soon giving the convoy time to start taking evasive manoeuvres resulting in a possible miss on target 2!

What ever target you are going to hit first start inputting known data into the TDC... torp depth - target length, then take a range, this will be a massive range of like 40 hectometres, but still input it into the TDC, its good practice and gets all involved into the swing of setup, switch the TDC to tracking on the "ATTACK PERISCOPE" the captain should at this point order "no use" of the observation periscope as its a lot easier to detect so keep it down!..

Now take an estimated AOB, at this range its rough, but we are dialling it in and we refine all these measurements as they approach the kill zone, next we calculate the speed, again because we have taken the time to set up properly we are in position and at a FULL STOP so our speed readings will be accurate, now due to the AOB your speed readings will get more accurate as they get closer to 90 deg's but its gives us a damn good estimate even at this angle to .5 of a knot.. input this into the TDC...

now we just keep repeating this slowly dialling in our data getting more and more accurate as we take more so just repeat RANGE->AOB->SPEED and constantly update your TDC as you go... giving you lots of practice at the dreaded AOB, make sure you are pointing the scope at the center of the target and don't move the scope until your crew mate has adjusted the AOB to your request, this is because the AOB will now move with rotation of the periscope and will throw your numbers off! so be mind-full of this, also leave the periscope and check the AOB, does it look right to what you are seeing? flip back and forth if needed..

If you followed this correctly you should be targeting the furthest ship on the opposite/far side of the convoy, and took several measurements as they get closer... its good practice to fire within a 20 degree window of 0 degree's to your bow either way.. this cuts down on deflection and TDC error..

lets say the convoy is moving from port to stb the torpedo should be fired on the edge of your window as its the furthest one away so firing at around 340 is nice as this again cuts down on deflection at that range...

triple check all your numbers do one last range and AOB (speed should be solid by now) wait for your first and furthest target to roll by to around 340 deg's aim for the center and fire one.. your crew mate now selects tube 2 wait a couple of seconds and fire another... take a "time to target" on the torps and start the watch...

now quickly start inputting the data for your second target, torp depth and length, speed will be the same, take a range and AOB and refine with the time you have left, and depending on the range fire around 10 deg's.. again if the ship is running from port to STB you fire around 350-deg's.. again aim center fire tube 3!... tube 4 selected wait a few seconds and fire.. take a time to target and someone else start the watch.... note the time to target is rough its not exact by any means...

once this is done its time wait for the fireworks... if you have a lot of destroyers about its best to periscope down dive and bug out... go through the convoy and exit at the rear, this makes it harder for the the destroyers to get a bead on you because of the noise from the convoy, ahead full and get out of dodge and just extend and get some distance between you and the convoy, once you exit the rear of the convoy care needs to be taken on engine speed as we have now lost the cover of the convoy, so adjust as required, then rinse and repeat untill you have the tonnage you want... if there are no destroyers then you can sit there happily looking through your scope and wait for the explosions! if all has gone well you should have a 100% hit ratio... well done! you just sank 2 ships in one attack and they never know you were there!.. if you do miss you will have a decent idea why because with all the measurements you made previous you will have an idea which might of been a little off... but most importantly if you do miss a torpedo ANALYSE WHY!... even if the first hit but the second missed.. celebrate the hit but find out why that one missed!.. you will carry this info with you for future attacks and can layup accordingly and make adjustments to how you go about the final phase of your attacks...

learning how to input data into the TDC is one thing.. but learning how to set up to make the most of your attack is another.. the attack setup is crucial in getting good hit ratio's and is a huge part in being succesfull, yes you can hit just by throwing the numbers in.. but swing the odd in your favour and your kill ratio will sore....

I hope this will be of use to people wanting to understand the idea of attack and setup but dont want their heads blown with nasa grade math :)

Good Hunting! and good luck! and most of all HAVE FUN!
o7
44 Comments
Legion Of Metal 30 Jan, 2020 @ 4:48pm 
Recently i have started to get my head around the TDC. even started getting kills! Completing easy difficulty and just shy of completing medium difficulty. seems to be going pretty well!

That is...until i read about this attack box and lay up nonsense.

well i call it "nonsense" im sure it makes sense to others but all that drawing and messing around that can be ruined at any given time at a moments notice just does not at all seem worth it. i cant get my head around it and i dont have the intellect do understand it.

Must stress that is an error fully on my behalf. But again...it seems like a lot of messing around.
maybe il have a look on youtube or something to see how people can do it.
Gizmo  [author] 1 May, 2019 @ 12:48pm 
@ponyhair that's great news!!! Great work! And thx for the feedback 👍
PonyHair 29 Apr, 2019 @ 9:12pm 
Thanks to your guide, I have gotten my hit ratio to 100% on Easy/solo and feel like I am finally ready to join a crew as a competent member of the Kriegsmarine
Gizmo  [author] 8 Apr, 2019 @ 7:40am 
Angle on bow is measurement in degrees taken from the perspective of the target.. 0 degs is dead ahead of the target 180 degs is the rear of the target.. 90 degs port would be looking directly at the left side of the target
rocketdrive 7 Apr, 2019 @ 11:19pm 
so does an angle on bow mean the target is heading directly at you or directly away from you?
Gizmo  [author] 5 Apr, 2019 @ 7:36am 
@mrBmbastic i love that name!! lol and thank you
mrBmbastic 5 Apr, 2019 @ 3:14am 
good shit
Gizmo  [author] 1 Apr, 2019 @ 1:22am 
@lawdul28 thx buddy hope it's of some help to ya
MicrosoftWord7 31 Mar, 2019 @ 12:30pm 
@Gizz01

Thanks for the guide! Much appreciated
Gutted 30 Mar, 2019 @ 3:51pm 
Despite already knowing the answer, i went ahead and made a short video clip to test it for you.

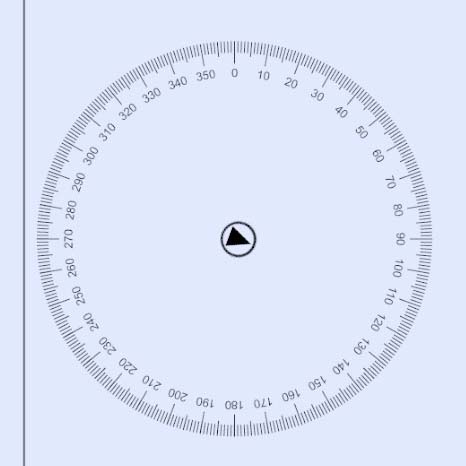
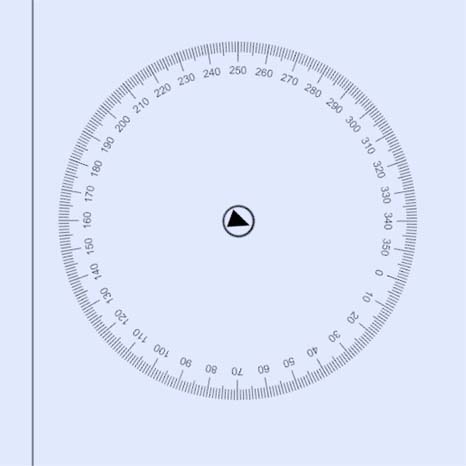
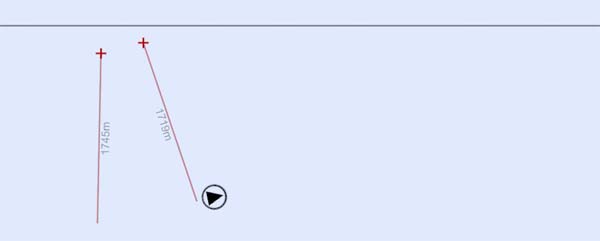
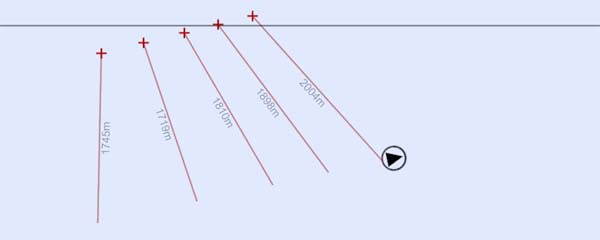
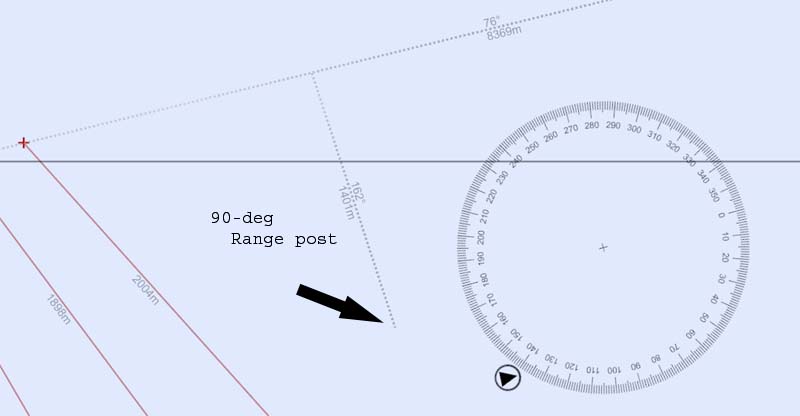
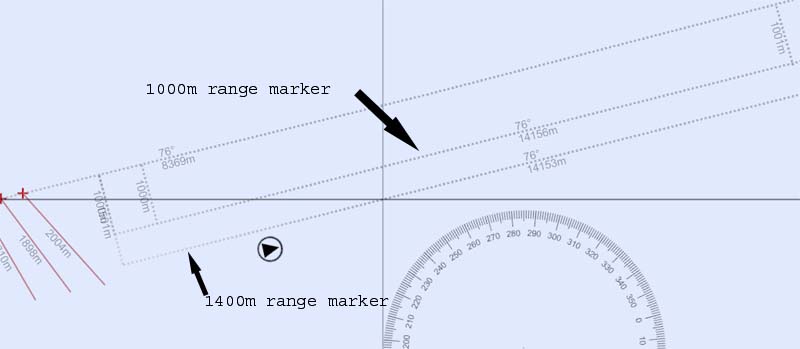
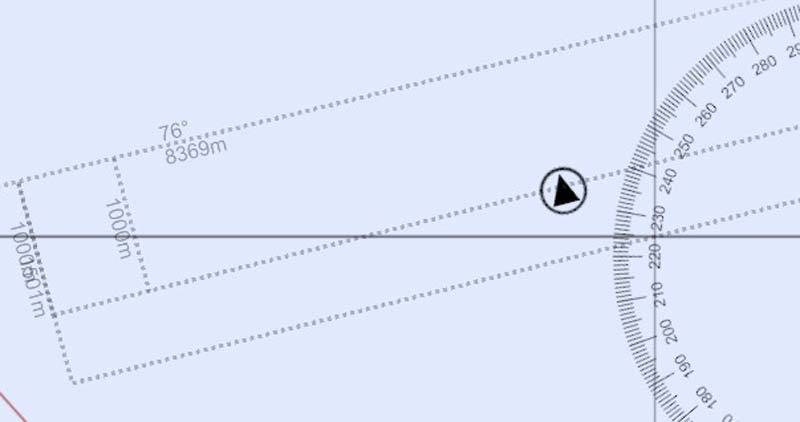
You can plainly see that AOB is not affected by range. Though if you ever see a slight wiggle, it may be because of the way the game derives it and you are seeing rounding errors and can disregard it. Gyro angle, will be affeted by range.

https://www.youtube.com/watch?v=Sh7NATNm8rk&feature=youtu.be

^ video still uploading at time of post