Microsoft Flight Simulator (2020)

Microsoft Flight Simulator (2020)

150 ratings
G1000 Autopilot basics
By HeloRanger618
The basics on how to use the GFC 700 Autopilot for VFR and IFR flight.
2
11
2
   
Award
Favorite
Favorited
Unfavorite
Overview
The GFC 700 is the Garmin Autopilot included with the G1000 Panel, such as in the Cessna 172. Other planes have a different autopilot button layout but generally function the same.


The GFC700 is made up of three parts which all work together to fly the plane. The flight director, autopilot and manual electric trim.


The flight director is the "computer" which actually tells the autopilot where to go. The flight director is shown as the magenta bars above the yellow attitude indicator. You can fly the aircraft with the flight director on, and the autopilot off. Just hand fly the aircraft and match what the magenta flight director bars are doing. The autopilot cannot be on without the flight director on.

The autopilot consists of servos in the wings which control the ailerons. This allows the autopilot to roll the aircraft. The pitch is also controlled by a servo in the tail which controls the elevator for climbs and descents. The electric trim is also controlled by servo which allows the autopilot to make fine pitch adjustments to maintain level flight at all speed ranges dictated by the pilots throttle position.


Any autopilot function you activate will show up above the attitude indicator. Commonly known as the score board. Active modes are shown in green, armed modes shown in white. Armed modes that are turning active such as an altitude being captured will flash then turn green when fully captured.

In the above picture you can see three separate black boxes. The left box shows your lateral modes such as heading (HDG), navigation (GPS, LOC), or ROL which holds the current bank angle.

The center box shows the autopilot status.

The right box shows vertical modes such and altitude hold (ALT), vertical speed (VS) or flight level change (FLC).

The autopilot can be disengaged by pressing the AP button or the AP disconnect button on the yoke.
Autopilot for VFR (visual flight rules) flight
Starting at the top left.

AP: Autopilot on
This will activate both the autopilot and the flight director. It will also lock in your current attitude and hold it. ROL and PIT will show in the score board indicating ROLL HOLD and PITCH HOLD.

HDG: Heading mode
This will allow the pilot to control the heading of the aircraft using the heading bug.
The heading bug is the small blue box that rotates around the HSI (horizontal situation indicator).
Use the HDG knob above the AP button to move the bug around the compass, pushing the knob in will sync the bug to you current heading. It is good practice to sync the bug prior to engaging heading mode unless it is already set to a desired heading. Heading mode will turn the aircraft at a standard rate turn of 3 degrees per second.

NAV: Navigation mode
This mode will fly the aircraft according to the navigation source you are using. If you are using GPS then the aircraft will follow the magenta line. Radio navigation such as VOR's will show in green. It will follow your entire flight plan including all way points. Use the course deviation indicator (CDI) soft key at the bottom of the primary flight display (PFD) to change navigation sources.

APR: Approach mode
Covered in the next section.

VS: Vertical speed mode
Used to change altitude by controlling the aircraft's pitch to hold a certain climb or descent rate in feet per minute (FPM). Use the NOSE UP and NOSE DN buttons to control the rate of climb or descent in 100 foot per minute increments. It is common practice to only us VS for descents, as aircraft performance at higher altitudes degrades the autopilot will hold the climb rate without considering airspeed. The autopilot could stall the aircraft trying to maintain a high climb rate at a low airspeed.

FLC: Flight Level Change
Used to climb or descend based on airspeed. Use the NOSE UP and NOSE DN to control the airspeed at which you want to climb or descend. This is used to climb at a constant airspeed with the rate of climb changing based on the pitch set by the auto pilot. This is the preferred method to climb while using the autopilot. The airspeed will hold constant, the rate of climb will fluctuate. The aircraft will not stall as long as a safe climb airspeed is selected.

***For both VS and FLC an altitude will need to be set with the ALT knob prior to activating these modes. The autopilot will auto level at the selected altitude.

Top Right

FD: Flight Director
Turns on the flight director without the autopilot. The magenta bar will guide the plane according the the active modes. The pilot will have to hand fly the aircraft to follow the flight director as the autopilot is not on. Hit AP to turn the autopilot on and it will take control of the aircraft. Again, the autopilot cannot be on without the flight director.

ALT: Altitude hold
Pressing the ALT button will lock in the current altitude and the aircraft will hold it. The altitude will be displayed in the right autopilot status box.

VNV: Vertical Navigation
I do not believe this mode is currently active in MSFS 2020. This button will arm vertical navigation which allows the flight director to follow a planned a top of descent (TOD) and bottom of descent (BOD) to a waypoint or to a preset altitude.

BC: Back Course
Covered in the next section


Autopilot for IFR (instrument flight rules) flight
All of the modes in the previous section are also used for IFR flight. Heading mode would be used to follow vectors from approach control for example.
APR: Approach Mode
Used to activate approach mode which will tighten the tolerances at which it follows the course and will also arm glide slope (GS), lateral navigation (LNAV), etc for use in flying approaches. You will only be able to arm approach mode when the final approach fix (FAF) is the next waypoint in your flight plan or you are in vectors to final mode and approaching the approach course.

As you can see in the picture below the pilot is flying an Instrument Landing System (ILS) approach using both lateral and vertical guidance to the runway. Localizer (LOC) is active as it is green in the scoreboard. The autopilot is following the localizer nav source in the HSI. Glide slope (GS) is also active, the autopilot is following the glideslope down to the runway. The glide slope is presented as the diamond in the small box next to the altimeter tape.


BC: Back Course
Only used to fly certain approaches which utilize a back course. Basically this is an approach that is flown in reverse so the pilot would have to interpret the HSI in reverse. This mode will show the HSI in the normal format.
10 Comments
Puck641 15 Nov, 2024 @ 10:10pm 
This is what I use for the Diamond DA62 and the DA40NG

Set Flight Plan in MSFS or Import a Flight Plan fron Little NavMap

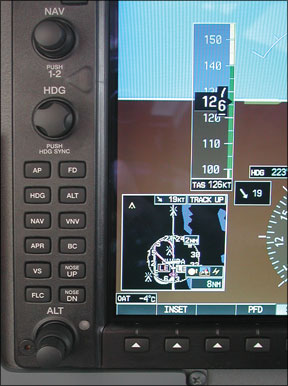
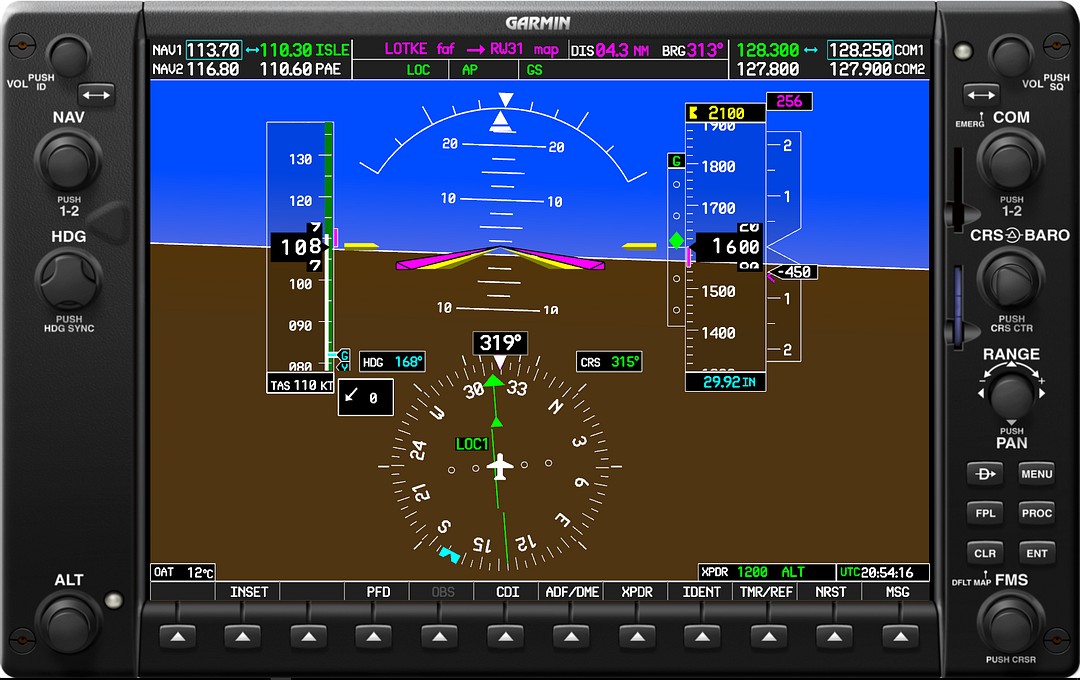
1. CDI to GPS / TERM (PINK COURSE TO FLY)
2. Set altitude with Knobs (ALT) (Outer Knob = 1000's Inner Knob = 100's) Press Inner Knob to LOCK Altitude)
4. VS ON and use UP / Down (Next to 2nd Screen)
5. NAV ON (Next to 2nd Screen)
6. TAKE OFF "FLY"
7. Gear up (if needed)
8. Flaps UP
9. Auto Pilot ON

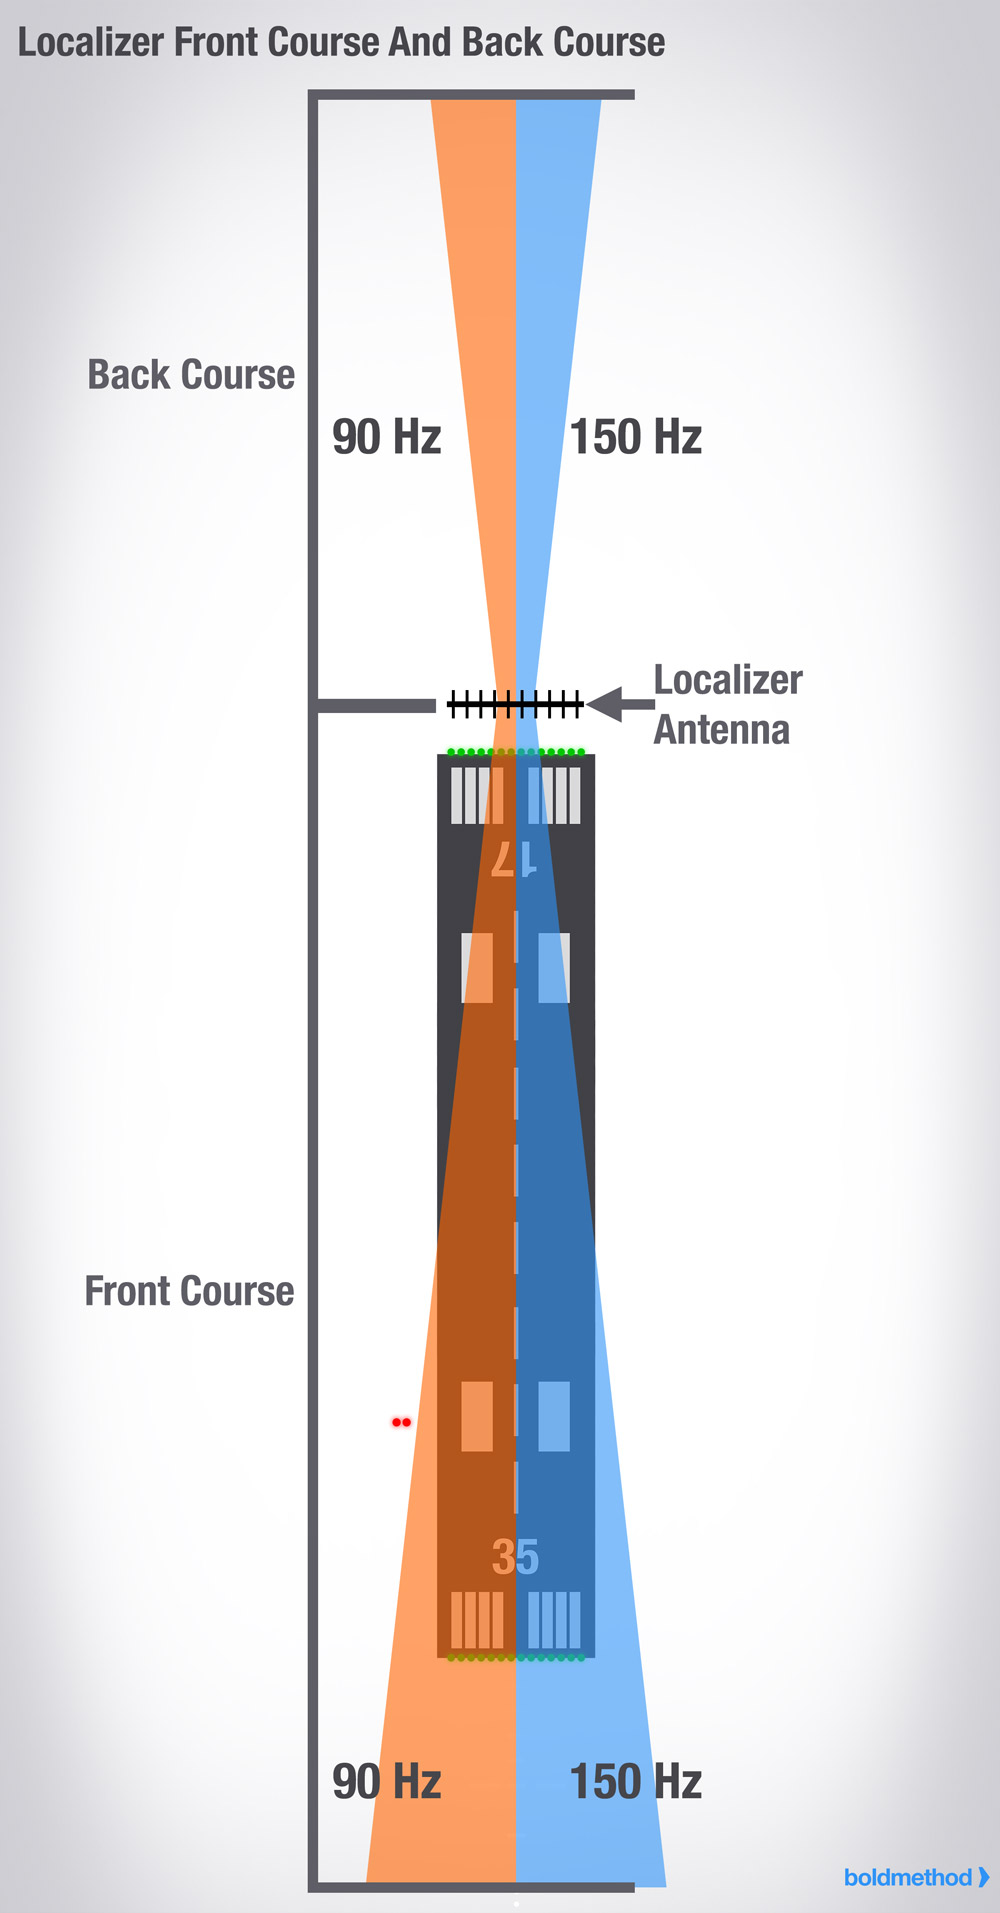
*ILS APPROACH AND LANDING ENTRIES
Diamond DA62 and Diamond DA40NG

1. Press PROC
2. Select ILS Approach with ENTER
3. Accept Everything
4. Use Outer FMS Knob to move to "LOAD"
5. Press "Enter"
6. Press CLR
7. Sit Back and Enjoy the Flight :)
9. After the aircraft makes its final turn to the runway PRESS APP to Activate Approach
10. Press Enter
11. Press APP (approach button)
12. Manage your speed
13 Gear Down (If Required)
14. Manage your speed
15. Flaps Down (usually Full)
16. Manage your speed
17. Get out and Kiss the ground when the plane stops :)
melão.dota 18 Mar, 2023 @ 4:55pm 
Thanks for the info, got AP working on all my flights using G1000! Great stuff
amohlman59 4 Mar, 2023 @ 7:20am 
Very well explained, thanks
d3rov 22 Jan, 2023 @ 8:12am 
Thanks. Lots of good info.
Rokisek 26 Dec, 2022 @ 2:48pm 
awesome
NL-Pretender 19 Dec, 2022 @ 4:23am 
thanks
Sgt Hawk 3 May, 2022 @ 12:45am 
very nice
cantanope 24 May, 2021 @ 2:08pm 
This is fantastic. Thank you.
david.dkaaa 26 Jan, 2021 @ 1:19pm 
Thanks for the info. Like I said, always something to learn!
nkcaump 22 Dec, 2020 @ 6:37am 
Very helpful overview. Thank you.