Pathologic 2

Pathologic 2

159 ratings
Haruspex's Handbook, or How to Survive on Imago with no Deaths and Everyone Alive, or Pathologic 2 Min-Maxed
By orionali
For those who wish to survive on the intended difficulty while not dying once and keeping every named NPC alive, here are my miscellaneous observations and hints on how to do exactly that.
16
7
3
   
Award
Favorite
Favorited
Unfavorite
Introduction


I'll try to keep this guide spoiler-light, but be conscious that reading this before you play the game yourself may – and will – spoil the experience. This game is meant to be role-played: you're but one man, there's a decimating epidemic going on, and you've got 20+ people to protect, so min-maxing and straining the game's mechanics will quickly turn all of this into a power fantasy where the Plague is an inconvenience at best.

But if you do not shun ludo-narrative or want a helping hand, then do keep scrolling.

Please note that this guide won't encompass the complete 100% of the game and isn't newbie-friendly. This is just one big collection of hints, but you must know how to play already to utilize these.

Also, please be informed that while it's very possible to finish the game on Imago without dying, saving everyone else depends essentially on RNG. These RNG rolls cannot be save-scummed –most things cannot be save-scummed, but there are a few things that can be; more on that below – so if anyone from your 'People' tab gets sick, your main priority would be to present them with a shmowder or a Panacea on that same day. Otherwise, even someone whom you treated with the most powerful antibiotics can rolls snake-eyes and die.

Of course, nothing's stopping you from 'peeking' at the midnight dice rolls and then reloading to give the people that would've rolled 'death' a shmowder to save up on resources. It's tedious, but it's a way out.

But, it's doable as you can see below; if SulMatul did it in her Day 11 Redux, then so can you! It just means you'll have to procure as many shmowders as you can, complete the Day 9 quest, and pray for benevolent RNG.


The screenshots that will be presented will be in both English and Russian as I've completed the main campaign four time: three times in Russian, one time in English.

Do note that this picture has been edited because one of people on here dies no matter what you do, and I don't want to spoil who it is just yet.

In short: I wrote this guide in hopes it'll make the game less stressful and anxiety-inducing. I myself, who's prone to panic attacks, tried playing this game 100% blind back in November 2020, got to Day 3, and quit, thinking that this game is just not for me. I hated the game and would've asked for a refund if I hadn't played for 6 hours.

Now, in 2021, after finishing the game four times, it's one of my favorite games of all time.
Tips: General


Take care of yourself first and foremost. If you discover that you're running out of supplies, don't be afraid to abandon a questline. Don't be afraid to get your hands dirty and do not shun crime.


Starting from Day 3, be sure to always fix and mend your equipment. Without properly-sharpened weapons, you won't be able to defend yourself. Without protective clothing, you'll burn through tinctures and immunity boosters more quickly than you might expect.

These are the things you should be seeking at all times and stockpiling later in your Lair. Trade these away only in case of emergencies or if you've a surplus of them.


Grindstones – repairs your melee weapon and scalpel if they're at the high durability.
Chisels – same as above, but for medium durability.
Straight Razors – same as above, but for low durability. Once you fix and do not forget to maintain your weapons, you can trade/sell these.
Springs – repairs your revolver if it's at high durability.
Metal Scrap – repairs your shotgun if it's at high durability.
Thimbles and Thread – mends your clothing. Safety Pins are used too, but they're more plentiful than these two. With Thread and Thimbles you should always barter for them when possible; all high-end clothing requires these.

From Day 4 onward, you'll need Chisels, Springs, and Metal Scrap to repair water pumps.

What resources you need for repairs for each tier, both clothes and weapons alike.

Note: Due to a typo in the code, the Army Cloak item cannot be repaired back to 100%, rendering it effectively useless when compared to the 100%-durability Repellent Cloak.


If you've got enough resources to mend only one or two pieces of your equipment, prioritize boots. Boots protect you from the flakey infected air that passively gnaws at your immunity bar. Sounds strange, but it makes sense once you understand that the Plague comes from below the earth, so of course, your boots would bear the brunt of it. That being said, equipping just boots won't be enough; all of your other clothing items also shield you from the infected air somewhat and decrease the wear-and-tear on your boots.

On a related note, all of your clothing items protect you from contracting the disease in various ways:

Boots – protect you from infected air.
Masks – protect you from Plague clouds whenever you run into one or one flies into you.
Cloaks – protect you from physical contact with the infected townsfolk.
Gloves – protect you whenever you open an infected door or a drawer.


Twyrine – the spirits that are sold in the Broken Heart and can frequently be found on looters and bandits – will mark 'full' childrens' caches on your map. Only these 'full' caches can contain shmowders, but even if they do not, they'll often spawn other useful stuff like bullets, fingernails, and miscellaneous trading items. If you've got the time, I recommend you clear every full cache every day to make your life a little easier.
Tips: Combat


If you're struggling with combat:
  • Forget combat. This is meant in all seriousness. The reward rarely outweighs the cost, and you're better off just running away most of the time.

But if you're adamant about getting into fights:
  • Don't underestimate stealth. Stealth decreases your chances of being seen by 50%, and being heard – by 100%. A combination of a backstab and some light attacks will kill pretty much any foe. Yes, even the burly Worms/Odonghs you'll have to fight on Day 9.

  • Don't bother with heavy/power/block-breaking attacks. They burn through your stamina in moments, and without stamina, you won't be able to attack or block attacks. Quick jabs are much more effective and they also stunlock your enemies.

  • If two or more foes gang up on you and you do not have a ranged weapon, run. You won't win, ever, period, and you yourself can be stunlocked like your enemies – each hit you take also drains your stamina. The only way to win against multiple enemies is to lure them into a bottleneck and fight each one individually. This is how you can take on the three bandits in Bad Grief's late-game sidequest.

  • If your melee weapon is on the verge of breaking, consider switching to a lockpick. Lockpicks break after three-four jabs (at maximum durability), but if it breaks in the middle of the jab animation, it'll result in an insta-kill.
Tips: Bodily Functions – Hunger and Exhaustion


If you're struggling with your hunger and exhaustion:
  • Boddho's roots. You can find them by following the incessant, otherworldly grumbling to a round patch of barren earth. If you've some blood on you, you can feed the roots and collect three random twyre herbs. You can repeat this every day and there are around ten such patches around the Town. You can then sell the twyre to the bartender at the Broken Heart.

  • The Sand Pest Fund. On Day 4, the authorities will establish a fund that replenishes rations, money, and (later, with the Inquisitor's arrival) drugs every day – depending on how well you perform your duties. You perform your duties by working at the hospital (1 quest per day) and healing the sick in the infected districts. You can also treat the people at the hospital itself, but the people in the infected districts 'count' more and the patients at the hospital have a chance of spawning a homing Plague cloud every now and then.
⬤⬤⬤ As an example, this is the reward for maxing out the fund bar and having a good reputation across town.

As far as I can tell, your reputation affects only the amount of money you get. If you're respected in the Town you'll get those 7000 coins per day. If you've low to average reputation, you'll get 4000 coins instead. The amount of food, medicine, and coupons remains unchanged.

  • Organ harvesting. This causes your reputation to plummet if you abuse this, but it will return to normal as you're filling that fund bar by being a good doctor. Var in the Stone Yard will buy healthy organs for good coin. Very good coin.

  • Looting. Once you accumulate a lot of + tinctures (6+), you can head into infected sections of the Town and loot houses. Infected houses have the best loot which is offset by the presence of deranged tenants who want to give you a hug and Plague clouds, but if you keep your immunity high, you'll be fine.There will be several occasions where you'll be able to loot infected houses that have neither Plague clouds nor sick people. Those will be outlined below.
⬤⬤⬤ This is in direct contrast to Pathologic Classic where it was a lot better to loot burned houses. In Pathologic 2 however, burned houses spawn inferior loot and because of punishing combat, multiple hostiles present, and how the revamped infection works, it's really not worth visiting burned houses.

⬤⬤⬤ A side-note on stationary Plague clouds. They can be 'dispersed' by lighting your lantern, so bring matches. However, for some bizarre reason, that cloud doesn't "go away" – it'll pop back in the moment your lantern goes out. And your lantern goes out every time you stop to loot a container. In other words, if a cloud's blocking your way to some loot and you dispel it, opening any container will make the cloud 'activate' and obliterate your immunity off-screen. Be careful.

⬤⬤⬤ Infected houses often spawn 'dead' items: used-up bandages, shattered morphine ampules, and rotten food. Hoard these and take them to the Dead Items Shop (DIS) at night. The Fellow Traveler offers food and occasionally shmowders. The DIS's inventory is changed if you reload, provided you reload to before 00:00 strikes. So if you're willing you can save-scum until you get a shmowder from the Traveler on nigh-every night.

⬤⬤⬤ When in the infected districts, generally, look for townsfolk. No, not the bandaged mummy-like ones, but those who look like normal NPCs. Those are still sane and will trade with you regardless of your reputation. They offer amazing deals in exchange for medicine and painkillers.
  • If your hunger/exhaustion are critical and you still have stuff to do, book a boat ride. All of Artemy's stats are static during those (even if in-game time's ticking away as usual) so you can go to the other side of town and/or return to your Lair without taking any damage.

  • Catnip at Notkin's Fortress will always trade items for food. She also has the best 'rate' for Fingernails (only 2 barter points instead of the usual 6) which you can then liquidate into Coffee from Geese NPC. Catnip's only problem is that accepts only 'bulky' items (bull bells, spindles, etc) and items you otherwise need yourself.
Tips: Bodily Functions – Infection

  • If you get infected (and you are going to get infected if you want to save Murky on Day 6) do not race to cure yourself and waste precious resources; the game hands you two cure 'freebies' on Day 6 and Day 9. You will have to test the Panacea on someone infected, and talking to Zürkhen's Heart on Day 9 will cure your infection.

  • Always keep an eye on your immunity if you're in an infected district. If your immunity drops to a zero, your screen will become covered in a spiderweb-like texture. That's the tumor. And the tumor is your in-between phase; if the tumor reaches 100%, the infection will take hold of you.
⬤⬤⬤ The tumor phase – while you're breathing in the infected air only – lasts around 30 seconds, provided you do not contact will an infected individual, run into a Plague cloud, open an infected drawer/door or raise your immunity. In other words, if you're right out in the open, you've got those 30 seconds to get out of the infected air by either leaving the district or ducking into a building.

⬤⬤⬤ If you've got nothing to raise your immunity with, your homemade analgesics (tincture + healthy organ) will lower your tumor by 75%, granting you more time to get out. Morphine doesn't have this effect.

⬤⬤⬤ Drinking muddy water and eating rotten food will always cause the tumor effect even if your immunity's maxed out. This can be startling, but the effect will wear off by itself after around 20 seconds. Muddy water will quench your thirst but lower your immunity by a fifth. Rotten food will satisfy your hunger but lower your immunity by a fourth.
  • If you get 'prematurely' infected, then do not despair. In the first several hours, the illness is not that bad – but it will get out of control if you're not careful.
⬤⬤⬤ Do not bother with store-bought antibiotics; the ones you can brew are far better – especially if you brew them out of infected hearts and brains since they also lower your exhaustion and hunger. Keep the store-bought medicine and your homemade blood-kidney-liver antibiotics for when you need to boost your Fund bar.

⬤⬤⬤ Unlike Classic, antibiotic overdose won't kill you since all antibiotics lower your current and not your max health.

⬤⬤⬤ Infection and immunity occupy one bar in 2, any amount of infection lowers the cap on your immunity. To stave off infection growth, keep your immunity high.

⬤⬤⬤ Like in Classic, the infection level can be lowered by dousing yourself in fire courtesy of the Flamethrower Corps. Naturally, it's very easy to die to it – every lick of the flamethrower will take off more than a third of your max health.

Generally, start treating your infection when it gets about this high, since with this amount, you're going to start losing health at noticeable rate.


Ideally (if you maintain your immunity bar at max at all times) this means taking one antibiotic every 24h.
Tips: Reputation & Crime


Reputation is the lifeblood of trade and barter. The game features four different levels of reputation and, typically, you don't want for it to drop into 'you're hated here.' Here's a list of all possible actions that influence your reputation across the Town. These have been grouped by what increases your reputation and what lowers it (the % is of the bar's maximum).

Action
Change in % - Witness Present
Change in % - No Witness
Affects Nearby Districts?
Theft (Per Item Taken)
-4%
-1%
No
Picking a Door Lock (Lockpick)
-6%
-3%
No
Picking a Drawer Lock (Needle)
-3%
-1%
No
Looting the Body of a Neutral NPC (Per Item Taken)
-2%
-1%
No
Shooting a Neutral NPC
-20%
-20%
Yes
Shooting a Neutral Infected NPC
-15%
-15%
No
Attacking a Neutral NPC
-5%
-5%
Yes
Attacking a Neutral Infected NPC
-3%
-3%
No
Murdering a Neutral NPC
-50%
-20%
Yes
Murdering a Neutral Infected NPC
-30%
-15%
No
Murdering a Bandaged-Up Infected NPC
-5%
-3%
No
Mugging a Neutral NPC
-6%
-6%
Yes
Mugging a Neutral Infected NPC
-4%
-4%
No
Murdering a Dying Neutral NPC
-5%
-5%
No
Autopsy on a Healthy Body
-10%
-2%
Yes
Autopsy on an Infected Body
-4%
-2%
No

Action
Change in % - Witness Present
Change in % - No Witness
Affects Nearby Districts?
Murdering a Bandit
+3%
+1%
No
Curing NPC Infection
+50%
+50%
Yes
Treating NPC Infection
+10%
+10%
Yes
Curing Bound Character's Infection
+80%
+80%
Yes
Treating Bound Character's Infection
+20%
+20%
Yes
Bartering At a Loss with a Neutral NPC
+0.5%
+0.5%
No
Bartering At a Loss with a Neutral Infected NPC
+0.25%
+0.25%
No
Repairing Water Pumps
+10%
+10%
No

Naturally if a neutral NPC sees you commit a crime, you'll suffer a much heftier hit to your reputation. All NPCs look in a ~135° cone in front of them. Be mindful that if any male NPC witness catches you stealing, he'll immediately turn hostile. Women and kids do not attack you – they run away.

The reputation penalty only registers when you transfer an autopsied organ to your inventory; the action of simply cutting a body open does nothing. If an autopsy fails and the organ is damaged, you'll suffer a -2% reputation penalty even if there's a witness around.
— Early Game; Day 1


After the tutorial, Day 1 begins at the Station.

Side-note: The Station – as well as the Steppe and the Cemetery regions on your map – will never become infected and the NPCs that live there would never have to roll for infection. The two smaller tributaries that divide the Town, the Gullet and the Guzzle, and traversable where these areas begin.

The Haruspex starts the game at 7:30 with around 30%-filled Hunger and Exhaustion parameters. Despite that and the fact the local governor wants your head on a pike, Day 1 is undemanding since the Sand Pest hasn't started yet. Spend your time exploring the Town, memorizing the layout (especially the locations of kids' playgrounds) and doing quests. And scavenging. Lots of scavenging.

Do not be shy about venturing into 'you're hated here' districts; out of all NPCs, only leather cap-wearing patrolmen will attack you. Other men will only join in on the fun if you fight back the patrolman, but it's easy to run away. Spam sprint every 1-2 seconds. This will allow you run for far longer than normal.

Fun fact: the Town-wide bounty on you is triggered by a certain NPC – Whistler – who runs up to you when 8:10 rolls around. If you kite him – you can out-sprint him and dip into houses to regain your stamina – you can keep your “no one cares about you” reputation and keep bartering/trading with townsfolk as if nothing has happened.

Of course, you cannot evade him forever and he's bound to catch you sooner or later, but use this window to stock up on food while it's cheap. It won't be this cheap ever again. Just do not run away so far from him that you lose line of sight of him – this will make the game teleport him straight on top of you. And I mean on top of you.

Loot Rubin's apartment for some money and items. Swing by groceries and the Broken Heart pub for food. Buy all the nuts you can – child NPCs appreciate them. Prioritize chestnuts and walnuts – they can be traded for shmowders from Teensy NPCs – but grab other types + raisins too as different kids love different types of nuts.


On a jetty near the Factory – your future Lair – you'll find a man who's willing to part with his revolver for 3000 coins. Make a mental note to come back as you'll need this revolver later on – you won't (reliably) find another for so cheap.

Visiting Lara and taking a nap will clear your bounty in the Flank, the Chine, and the Backbone.

Bad Grief's quest will lead you into an abandoned house which you can (and should) loot, so bring your empty pockets. A lockpick is handed over to you there, but it won't be enough to open all the doors in the house. Consider exchanging for one from Notkin's gang or asking a Prompter (the tutorial-Tragedians around the city) for one.

Notkin's quest will supply you with a Leash which you can immediately trade in for 10 barter points, but do not do that. On Day 4, in the Nutshell, you'll be able to trade this Leash in for a shmowder from a doghead called Maera.

Be on the lookout for Boddho's roots as noted above because drawing blood from bodies doesn't incur a reputation drop. Don't try to go out into the steppe to gather herbs yet – they won't spawn on Day 1.

On a related note, also as per above, you can dissect bodies for their organs and bring them to Var in the Stone Yard. Var pays a lot, but you'll have to contend with a reputation drop. Still, since you'll be a wanted man in any case, you might want to take Var up on his offer. Collecting just blood doesn't affect your reputation.

Your reputation will return to normal at 20:00 or sooner if you complete all quests, talk to any neutral NPC, and go see Fat Vlad. Or if you submit to Saburov's authority – but in that case, he'll keep you locked up until 20:00.

Near the DIS today you'll always find a body of a bandit. It's notable not only because it has some 'dead' items on it but because you can cut out the organs without any consequences.
— Early Game; Days 2-3


Steppe herbs start spawning at exactly 7:30 so you can stuff your pockets as you at a leisurely pace make your way to the Cemetery. The Cemetery is also a marvelous place to gather Ashen Swish – one of the rare herbs which will only grow in burnt districts. Swevery is also abundant.

Note: The + tinctures that these rare herbs make will help us a lot later on, so stock up as best as you can. The + tinctures are a lot better at boosting your own and others' immunity; leave simple tinctures for diagnostics only. I reiterate: administer only + tinctures if you want a 'save everyone' scenario.

Accepting your father's duty will teleport you to Aspity's Hospice; refusing the duty will keep you in the Cemetery and you'll have to later talk to Aspity on your own. Talk to her for a free inventory upgrade.

After the funeral, concentrate on getting access to your Lair so you could begin stockpiling goods.

Be sure to complete the children's cache game. To save time, after you're accepted into the game, you can directly go to the playground near the Theatre and complete the hide-and-seek game which will yield a shmowder for just 5 barter points instead of the usual 35/40.

After this, you're bound to run into the Changeling who'll give you another worthwhile quest: talking to Grace and then Murky at the Cemetery and letting the latter show her way of speaking to the dead. However, you can save time by going straight to the Cemetery after you're done with the funeral. This sidequest allows you to gather a good amount of twyre, especially if you hadn't scoured the Cemetery before.

Using the inheritance money + what you've earned from selling twyre and organs, buy the revolver.

At any rate, this is another peaceful day, but the fun's starting.


Day 3 marks the arrival of the Sand Pest, but the Town will not act until 19:00 or until you visit the Bachelor at Stillwater. So until then, you've time to barter and stock up even more. Be ready: you've got a lot to do.

At 7:30, a courier will find you and begin the 'inheritance' sidequest – it's a profitable sidequest, so I recommend you complete it. After you're tasked with delivering the necessary papers to the head of Hindquarters, go where the map marker's showing.

This is the tutorial that teaches you how to survive in an infected house, so there are no sick people around and only two Plague clouds: one is floating near the stairs and will not bother you – you can shimmy past it without disturbing it – and the second one is patrolling the second floor. It won't chase you, it's just patrolling, so if you time it right, you can dash right past it. The house, however, does feature infected drawers, so you shouldn't just go in there butt-naked. Gulp down some tinctures and you'll be able to help yourself to some good loot by early game standards.

You might also be tempted to loot Rubin's apartment i.e. all of Rubin's neighbors' rooms, but don't do that. The doors there will be unlocked, yes, but you're going to lose reputation if you take items. I mean, if you want to gather items in an unlocked, Plague-less house, then, by all means, take that reputation hit.

EDIT: Take that reputation hit. Truth be told, you can do practically whatever in the infected districts before 19:00. Once you enter the Town Hall for the main quest, your reputation in the infected districts will automatically (and subtly) revert to 'no one cares about you.'

Be sure to treat Patches at Notkin's fortress before 19:00. Otherwise, Aspity will have to do it for you and she'll die as a result.

After the alarm bell tolls, administer prophylaxis to both Peter Stamatin and Anna Angel, and then visit the Broken Heart. While there, pick up the House of Death sidequest from Notkin and Khan. When there, loot the house before talking to Notkin as that conversation trigger-awakens the infectious spirit that follows you around.

To confuse the spirit, don't stay on one floor for long; better run between the two floors since the spirit's pathfinding is of a regular Plague cloud and it physically needs to go up and down the stairs to catch you. Light all the candles before midnight so the Crude Sprawl doesn't become infected tomorrow.
— Mid-Game; Days 4-5


Notkin will be infected today no matter what you do; cure him as fast as you can to avoid wasting your prophylaxis and antibiotic resources – and to get unique dialogue from the '???' character.

This day introduces burned districts. If you're aiming for a no-death run, avoid them as best as you can. Burned districts have an atrocious habit of spawning multiple (armed) muggers, and if you don't have the stamina to outrun them, you're dead. Even if you've got a revolver, be extra careful – shots draw the attention of other bandits in the vicinity which can result in situations like this:

Context: I crept up on one bandit in the burned!Flank and shot him. Immediately, from behind the brick wall you can see here, four more muggers emerged, forcing me to shoot them as they jumped out one by one. Good thing the revolver didn't jam once.

If you absolutely need to go through a burned district remember to not run when you're not pursued. Save your stamina for when someone will ill intent sees you.

One noteworthy quest today is the water barrel one, obtainable from Lara. It's pretty notorious for not having a 'good' resolution, but IMHO, it is better to report the contaminated barrel to Dankovsky. It will cause all water barrels from the Knots (middle) districts to vanish, but it'll also guarantee you won't ever stumble across muddy water yourself later. Otherwise, you'll have to remember the location of the muddy barrel and avoid it (as it remains contaminated for the rest of the game, and the initial placement of this barrel is randomized – it'll be the second barrel you examine.)

Lara's cupboard in her Shelter will contain some bread and milk today. Just like in the first game!

Finish the hospital task by distributing painkillers to four patients and venture into the infected Chine to fill your Fund meter. If your immunity's decent, you can also try to save an infant that's crying in one of the houses (Artemy will mark the house as soon as he enters the Chine.) Make sure to bring a lockpick as the child can be behind a locked door. Mind that this quest (and the baby) will only spawn if Anna Angel is not infected – she participates in the quest.

You'll also need to fix the big alembic back at the Lair, and you've got a couple of ways of resolving this: either buy the toolkit yourself from any clothing shop, go along with Sticky's plan and allow him to steal it from a clothier in the Atrium or go back to Isidor's house. The backroom door will now be opened and you'll find a toolkit within. Just be aware that like any burned house, Isidor's house will be teeming with burglars, but you can take nearly all of them out with some well-timed stealth attacks.


On Day 5, Sticky will give you a very important quest – finding a house with unburied corpses in the Stone Yard. If you do not complete this quest by midnight, Stone Yard will be infected tomorrow, and his district houses 4 important NPCs. Fortunately, it's a very short quest if you do not let things distract you.

The precise location of the house you need to mark; to save time, you can safely ignore the 'noisy' house and the house with Maria in it (mouse over). You can still inspect those if you're a completionist, but be wary: inside the 'noisy' house you'll be attacked if you trespass and it's a close-quarters two men vs. you fight. And if you fight them off with a melee weapon, it's pretty easy to accidentally kill them which will tank your reputation in the Stone Yard.


The main quest involves testing your new antibiotics, but if you've already been delving deep into infected districts, then finding infected organs and willing test subjects is going to be simple. Giving a patient the correct (colored) '???' antibiotic will contribute to your Fund.

The Kin will be walking a bull in Hindquarters today, so be sure to speak with them, and when your Mind Map updates, go to the Ragi Barrow to acquire two pieces of fresh meat, a nice scalpel, and some herbs you can pick along the way.

Bring the bull's blood to Dankovsky before you finish testing your antibiotics, and Dankovsky will let you use his Stillwater bed.

Tonight, the DIS will be on the very tip of the Cape and the Fellow Traveler will for once sell you things. Try and buy all of his 'candy wrappers' out of stock; these will make your life a lot easier tomorrow. You'll need 1250 in hard currency to buy all ten of these wrappers.
— Mid-Game; Days 6-7


Today, as you wander around town, you're bound to stumble across Murky – yes, that includes infected and burned districts, so keep your eyes peeled. Don't worry for her safety: enemies ignore her.

You'll also run into Clara who'll ask you to check on her adoptive parents. Make sure to complete at least one branch of this quest – either the 'Rat Prophet' or the 'Carrier.' If you do not complete these, later at the Crowstone the correct dialogue choice will not unlock, and the Plague will kill Murky.

The main quest today requires crafting the Panacea: for this, you must first test all of your antibiotics, give up, have Daniil check the bull's blood, and have a dream with the Mother Superior who'll tell you where to look for the Udurgh's 'ear.' Make sure you collect two bottles of blood; if you take only one for whatever reason, the spring will be desiccated later on anyway, robbing you of one dose of Panacea.

You must create and test the Panacea before 7:30 on Day 7. If you do not do this, Rubin will have to do it for you and die because of your negligence.

This day is relatively quiet. The highlight of it, of course, is the Crowstone meeting – but if you haven't talked to Murky earlier, your Mind Map will update automatically to remind you. As noted above, be sure to have completed at least one part of the Saburovs' questline before you go there. When speaking with the Plague that's masquerading as the Changeling make sure you DO NOT say 'people say it didn't start on its own...' or 'you're right, I still don't know enough' – it won't like those options and it'll kill Murky on the spot. Additionally, before you go there, to maximize efficiency, craft – but do not test – the Panacea. You'll become infected in the end, and you can take out two birds with one stone if you save Murky and acquire the cure.


Day 7 heralds the arrival of the Inquisitor; at 7:30, a courier will find you to inform you of this. Pay Aglaya a visit and then return to Shekhen to advance the main quest.

You'll also get a Mind Map node telling you that Capella wishes to talk to you, but you can shorten the trip by going straight to the Cemetery (the Mind Map will update with the appropriate notification). Make sure to solve Grace's conundrum with the corpses: you can either burn them against her preferences, let the Rat Prophet in the bushes near the Lodge deal with them, or let Dora take her to live with Peter. If you do nothing, Grace will perish the following night.

Today, the Termitary will be opened and another major questline will become available. You will be tasked with 'understanding' the Kin by delivering them the one who'd locked them in in the first place. To save both Olgimskys, you need to go to the Lump and talk to Fat Vlad, then to Clara in the Lump's foyer, then to Fat Vlad again. Young Vlad will relocate to the Lump for the time being and both will survive. Not talking to either Olgimsky will doom them both. The Kin will respect your decision regardless.

Afterward, you'll be asked to heal the schism in the Kin by killing exactly four dissenters that roam the upper Termitary floors. They're Odonghs so hand-to-hand combat is out of the question (unless you've a melee weapon and are exceptionally good at brawling) but if you've got a gun and a handful of bullets, you can finish the quest right there and then and convince the Kin to go to Shekhen. Alternatively, on Day 9, after a particular quest, you can convince the dissenters to lay down their weapons and accept you as the new leader peacefully.

Go with whichever you fancy, but I'd go with the first option solely because of all the Kin traders that'll be present at Shekhen sooner than Day 9. The entirety of the Town will be ravaged by the Plague at this point, eliminating a lot of NPCs who'd trade with you, so Shekhen will become your go-to trade outpost immediately. Better yet, the steppe teenagers – Siskins – who trade you Fingernails and Packages with goodies will stay despite the Army evacuating all of the children on Day 10. Worms there will also take organs for rare herbs.
— End-Game; Days 8-9


On Day 8, if you go to the Marrow and if Katerina Saburova wasn't infected two nights ago (or she was infected and you cured her), you'll also hear shrill crying coming from one of the houses. The door will be blocked, but Artemy will be able to pry the bars off. Inside, you'll find Katerina and have an interesting conversation with her, but more importantly, this infected house won't have any Plague clouds or crazed residents, so loot to your heart's content. Infected drawers and door handles still apply, though.

The exact location of this house (mouse over):


The Hospital quest today is also quite intriguing: you have to survive for 1 hour and 15 minutes while being pursued by multiple Plague clouds. Fortunately, the clouds' pathfinding is wonky so if you jump over some corpses (mouse over for screenshot) they won't be able to touch you and instead just drift to the second floor and groan into your ear.


You might additionally meet Grief in the Cathedral today. He'll ask you a favor: go back to the Warehouses and scatter the remaining bandits by killing Barley the Barber. Barley is inside Grief's Lair, accompanied by two generic ruffians – if Barley turns hostile then so will they, and you've to fight them all at the same time. This can be achieved by sprinting quickly back to the stacked crates near the entrance and forcing each bandit into a funnel. Don't try to fight them all out in the open. Grief will reward your efforts by giving you his shotgun.

You'll also find a body underneath the gallows in the Stone Yard. The note on Veronica's body is worth 15 barter points at the DIS.


Day 9 begins by introducing the Army to us, and if you've been running around infected get ready to face a new problem: Flamethrower Corps. These bulky boys are found only in infected districts, and should they notice you, they'll try to make a barbeque out of you. Those hurt. Fortunately, they're quite slow and you can dodge them. The silver lining is that normal soldiers won't care if you're infected even if they like shooting the bandaged-up folk.

This day doesn't have any major quests beside the Olonngo, but if you're aiming for a 'save everyone,' you'll be running around a lot to administer prophylaxis to the ten people who are in danger today. In the afternoon, Oyun will send a messenger and tell you that the gates of the Abattoir have been opened. Go there whenever you're ready as it'll be a lengthy and challenging quest. But if you've been practicing, you'll be done in 10 minutes. Creep up on a Worm and deliver one stealth punch. Quickly exit stealth and before it turns to face you, beat it up using light attacks. Three-four hits will be enough, and it devolves to two hits when the Herb Brides give you a Menkhu's Finger. There are five hostile Worms in total.

You can also get that fully-repaired Menkhu's Finger if, during the Abattoir fights, you manage to break it – either by attacking or extracting organs. The extracted organs won't 'follow' you when you exit the Abattoir, but the Finger will and it'll be (magically) repaired.
— End-Game; Days 10-11


When you exit the Abattoir, it'll be Day 10, 01:00 regardless of when you had entered, and everyone will roll for infection as usual. Special mention goes to Notkin and Khan. If either of them catches the Pest due to unlucky RNG, be sure to give them your best antibiotics (read: not a cure) BEFORE you go to sleep. They – as well as all others on your List – will be claimed by the Plague when you wake up or at 7:30, and if they were infected before, they'll have to roll for death instead. Antibiotics will buy you the time you need to brew the Panaceas and go on a cure-spree.

Other quests today include solving Lara's dilemma. At 12:00 you'll get an ominous feeling and a Mind Map warning. Going to the Shelter will reveal that Lara has left for the Town Hall, and you must convince her to give up her revolver and leave quietly. If you do not do this, Lara will be shot by midnight.

Lara's letter in the Shelter cupboard where you found fish/milk/bread is worth 20 points to DIS.

Be sure to follow-up on your father's murderer. For a 'save everyone,' tell Oyun that you forgive him. This is the only way to keep him alive for the ending.

A side-note: if you visit the Hospital, you'll be told you no longer work there and that the Sand Pest Fund has been shut down. That's untrue: the Fund bar remains despite the Hospital's closure and you can fill it normally by healing the sick. Max it out, and you'll be given not only food tomorrow but also five of each ammunition rounds, 7500 coins, and 5 coupons. Those supplies will last you the entire day and you'll have more time to track down the courier.

At 20:00 you'll get another Mind Map thought asking you to go to Aglaya. She'll ask you to run away with her – I recommend you accept her offer. There's no financial value behind this 'detour,' but it is still a very memorable quest because you get to hear the best OST on the Pathologic 2's album, IMO. No, there's no way to save Aglaya – she'll be shot either on-screen or off-screen no matter what you do. If you do not run away with her then you'll be able to find her body near the Town Hall tomorrow. You can loot a perfect-condition revolver off of her. Her body will only become 'lootable' if you talk to Bad Grief before going to the Town Hall or to the Officer at the said Town Hall.


Day 11 is all about tracking down the courier and this is the final stretch. You've got until 22:00 to recover the Inquisitor's Orders and if you start at dawn when you'll have plenty of time. Just be sure to visit all three hotspots – otherwise, the courier won't spawn.

At the mutineers' campsite near the Cathedral, you can loot a perfect-condition Rifle and some ammo. It's in a box near Clara.

After you visit all hotspots you'll be tasked with finding the courier yourself. You can then visit the homes of major NPCs for unique flavor text. Visiting three such places will then mark the Haruspex's Lair as your final destination, because, of course, a wounded man would be seeking a surgeon.

And you're done! Either burn the orders or deliver them to Block for your ending!


Thank you for tuning in!
Changelog and Recs


22/03/2021 — The guide's initial completion.
28/03/2021 — Added the 'Tips: Reputation & Crime' category and uploaded more imagery.
29/03/2021 — Added the all available repairs & resources needed for said repairs.
30/06/2022 — Added more information for Days 1 & 3.
15/07/2022 — Added more information for Days 5, 6, 7, 8, 9 & 10.
27/12/2022 — Minor pronoun corrections @ Sul-Matul.


If you think that some of the aforementioned information is inaccurate or if you've any suggestions, comments or concerns, please let me know down in the comments. Those are really appreciated!


I will now recommend some other resources I've been referencing beside my own and the present in-game code:

Pathologic Wiki.[pathologic.gamepedia.com] A go-to place for any kind of information or lore on the game.

A very detailed guide of the main campaign with all events and quests outlined.[gameplay.tips]Highly recommended.

COMPLETE | Let's Play - Pathologic 2 (200% Difficulty) by No Justice. A lot of meta and game-breaking stuff is referenced in this Let's Play.

Let's Play Pathologic 2 by SulMatul a.k.a. the most well-known Pathologic 2 playthrough.

Fan-made spreadsheets with all the food, tincture, and antibiotic values as well as all barter values.[docs.google.com]Available in both Russian and English.
16 Comments
Setanta017 8 Aug, 2023 @ 6:09pm 
Also, there is a way to keep Aglaya from dying. Though admittedly it is technically an exploit since she is basically scripted to die. But a way has been found.

On Day 10, make sure the last thing you do (easy since you get the prompt for this so late in the day) is get on the train with Aglaya, BUT DO NOT TALK TO HER ON THE TRAIN.

Just stand around in the cargo car with her, and wait . . . Just run the clock out for ALL of Day 11 to Day 12. On 22:00 of Day 11, you should automatically be warped back to the Theatre, and Aglaya will not be marked as "dead" in your Bound List.

Be sure to probably pack some food and stuff for exhaustion though before doing this just to be sure you don't die on the train. Also goes without saying, you'd miss out on all of Day 11's activities doing this.
Setanta017 8 Aug, 2023 @ 6:08pm 
Little additions I found out via Andy North's videos:

With the exception of those on The List who all become infected on Day 10 and thus will all roll for deaths if left uncured that night, its worth noting that if you make it to Day 10 and nobody else BESIDES the List-Bound are infected, everyone else is "safe" from the plague.

Sure, plenty will still be "in danger" on Day 10 and 11, however, even if they do get infected at midnight of the 10th day, because Day 11 ends at 10pm(22:00) it doesn't hit the midnight rolls, meaning there are no rolls for infection or death on the 11th.

If you can cure everyone already infected on the 10th, there is no risk of Bound dying from Sand Plague, even if they become infected that night.

Thus, do not let the "in dangers" distract you from your affairs in those final days.
blueyandicy 6 Jul, 2023 @ 8:27pm 
Pretty good guide, though the later parts (mid-game and onward) are sketchy as hell. For example, the guide omits the mention of Foreman in order to start the kin quest, lies about Stakh dying (you don't need to test it, only make it), and some other insignificant things. Still gave it an award though, nicely done.
malksrather 1 May, 2023 @ 11:44am 
I have a tip for Day 1. When you find 3 dead bodies near Big Vlad's house. Loot them and disect them, then drop their stuff and organs on the ground. You'll suffer reputation drop, but it doesn't matter because you're already hated. Go talk to Vlad, he'll fix your reputation, then go get the stuff you dropped and sell them to Var.
Alex7900 26 Dec, 2022 @ 5:28pm 
Awesome guide, I think it will motivate me to do a second playthrough! I felt bad about all the people that died at the end lol, so being able to save everyone (except Agyala...) sounds nice.

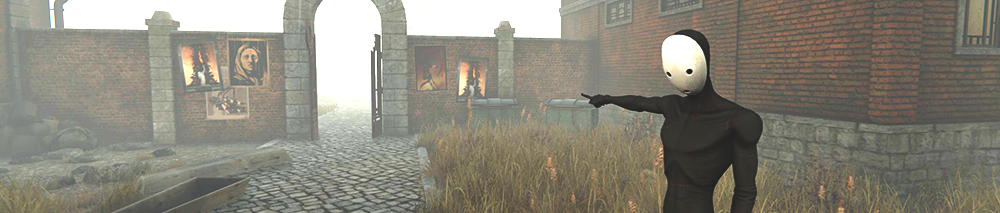
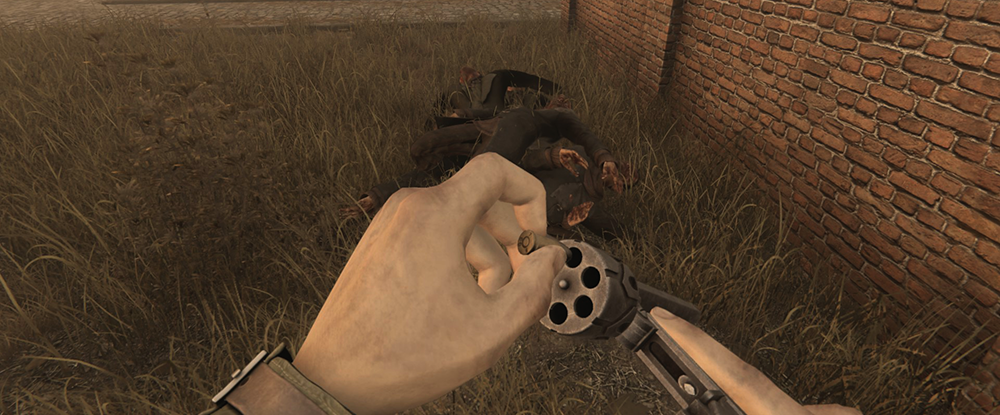
One thing I'd add to save a lot of pain is that the quest where you need to kill Grief's men is extremely easy if you cheat: as soon as the fight starts, run to the entrance, make a right at the crates, and climb the ladder there (by jumping on it). When I did that, two of the bandits ganged up on the guy with white face paint for some reason, then I just pulled out a revolver and shot the last two. I didn't wait to see if the last two dudes would fight each other, but would help save some bullets if it does.
MehGahLorp 11 Jul, 2022 @ 9:15pm 
Adding onto what Setana017 said, I found that you can store stuff inside Rubin's apartment and Grief's warehouse in their respective cabinets without the stuff de-spawning.
vaguething 19 Jan, 2022 @ 3:07pm 
@orionali Thanks a bunch, I really appreciate it. And thank you for your point regarding theft's reputation nuances.
orionali  [author] 19 Jan, 2022 @ 1:05pm 
@vaguething -- Sure, go right ahead! It's not like I *own* the reputation-adjustment table. I'm just someone who looked at the files with AssetStudioGUI and compiled a table.

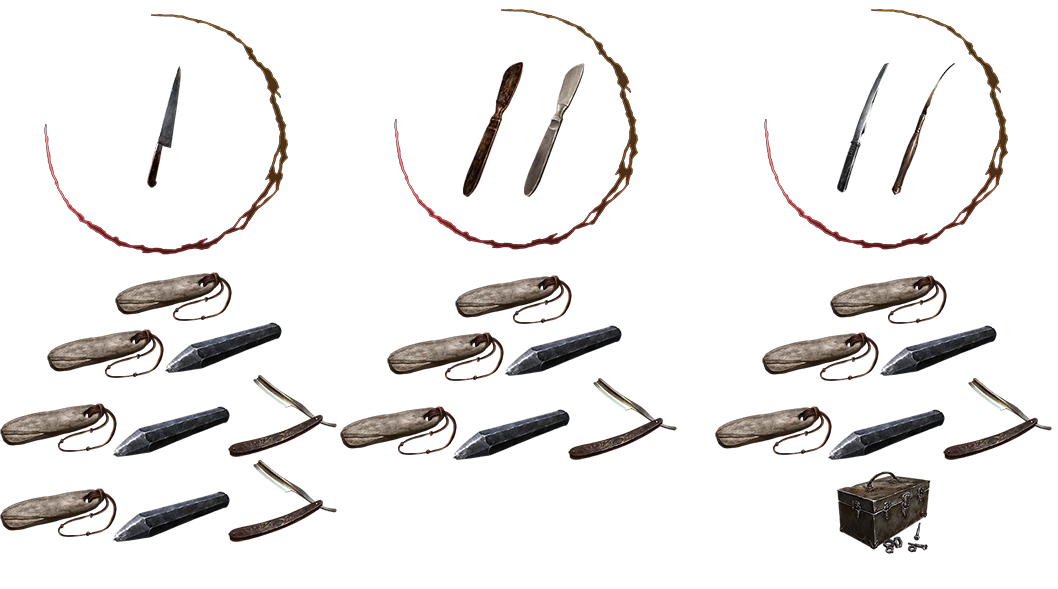
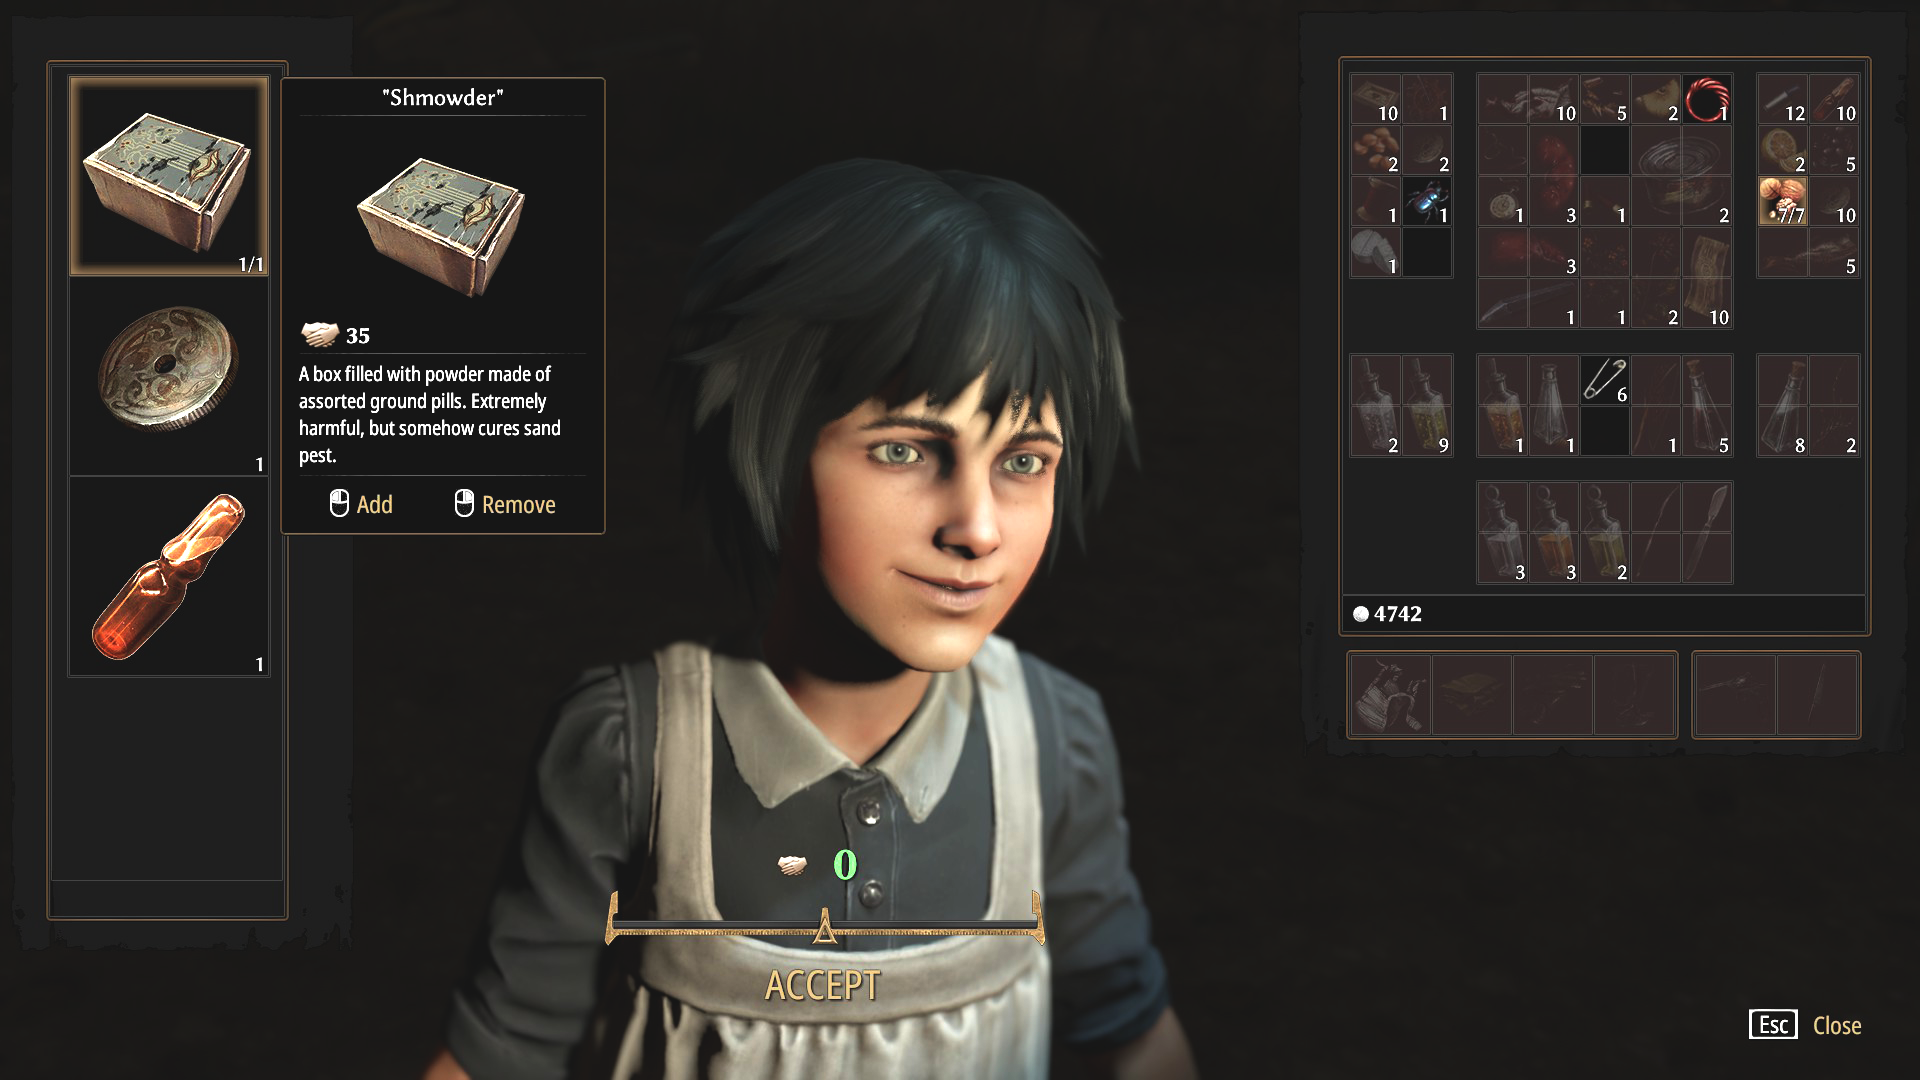
But, one thing, the first row is incorrect; you'll take the reputation hit if you merely look at the unlocked container's things w/o taking anything. The penalty is small, like around 1% small, I believe, but I'll need to edit the info in the guide nonetheless.

And, you're welcome! I'm sure when I replay the game again, I'll find even more ways to min-max the poor, unfortunate Haruspex. :)
vaguething 15 Jan, 2022 @ 12:26pm 
Hi! This guide of yours is a remarkable resource. Recently I've been meaning to update the wiki's info regarding reputation, and have a working draft for the changes that involves a modified version of the table from your guide. I double checked this stuff with what I found in the XML files, and have rephrased/rearranged some things, but I think if you saw it you would understand that it was a derivative from your own table. How do you feel about that premise? I just don't want you to stumble upon it and feel you've been ripped off. And understand if you'd rather I come up with a more radical redesign.

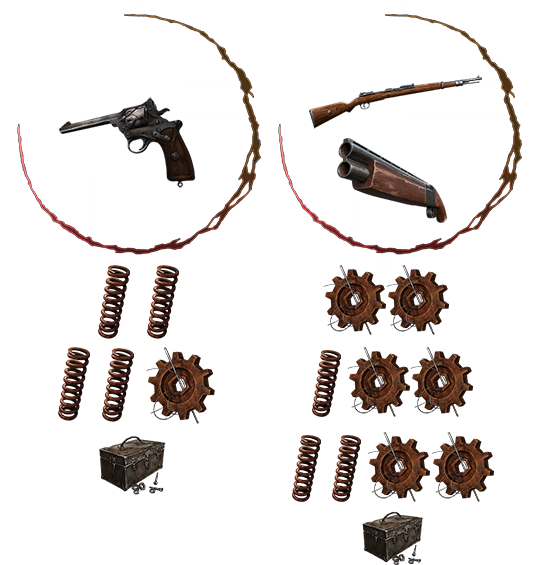
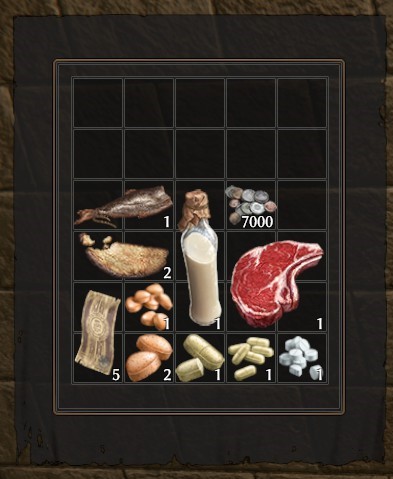
Otherwise again, this guide is great. I especially like your use of PNGs for illustrating certain mechanics (such as repair requirements). Thanks for taking the time to compile it- I cannot imagine the labor that went into this. Hope to hear back from you in time, thanks. :)
Foot 24 Oct, 2021 @ 8:19am 
Wait...How is this even possible to save Aglaya?