Left 4 Dead 2

Left 4 Dead 2

41 ratings
UI Editing Basics
By мяFunreal
Learn how to edit the game's UI easily, while the game is running.
Contains some basic pointers on how the UI system works, along with copy-paste examples.
   
Award
Favorite
Favorited
Unfavorite
Foreword
This guide shows how to modify .res files for any Source engine game.
This guide is in the L4D2 Guides section because it covers some L4D2 specific HUD elements.
But the setup and how the files work are the same for every game.

What we're going to do is fool the game into thinking it has no .res files in its vpk.
This allows us to edit and reload the menus while the game is still running.
Requirements
Here's a list of things you need to make this work:

For the Pak01_dir.vpk editing I'm using Notepad++.
But any editor able to interpret fancy NULL letters works, like "Visual Studio Code"

To extract files from the pak01_dir.vpk
Notepad++[notepad-plus-plus.org]
To edit the Pak01_dir.vpk's and the .res files.
Optional Macro to automatically change the filetype inside the pak01_dir.vpk
Swap the set of used pak01_dir between vanilla and modded.
Delete all but .res files in the folder we'll create

Optionally, you could get a Notepad++ language file i made for .res files.
It's basic, for what it is, but it does highlight stuff for you.


You can download the "Valve Developer File Language Pack" on my here on my Github.[github.com]
═══════════════════════════
Preparation
The first thing we need to do is get all the hud files out of the pak01_dir.vpk files.
This requires a new folder.

1.00
Right click the game in the library and head to the "Browse local files" button.
This opens the folder your game is installed in.


Make a folder called "HUD_Files", right next to where the games .exe is.

1.01
Open the folder that has the same name as the .exe.


Note:
Some games are different.
Portal 2, for example, uses its "dlc2" folder.

Inside it, find and open gameinfo.txt, scroll down to the first "Game" line and above it, add
"Game HUD_Files"


Save the gameinfo.txt. Keep it open for now.

1.02
Take note of the folders listed in that gameinfo.

You have a |Gameinfo_path|. and maybe some extra listings.
The order of this listing is very important.
the top most "Game" lists the most recent files, which may have newer hud files than the lower.
Which means we need to gather the old files first, then progress to the newest.

Instead of painstakingly looking for the .res files, we just copy all folders containing any .res files.
Then we use a script to delete everything but these .res files. Way easier this way.
We'll start with the lowest listed game directory, then work our way up.

Most of the time, only the "Resource" and the "Scripts" folder have .res files.
So, just copy over those two folders and all their content into your HUD_Files folder.

Open the pak01_dir.vpk in crowbar and drag its Rescource and Scripts into HUD_Files aswell.
Just drag and drop from the right window. It might take three seconds to begin copying files.


1.03
We'll continue working our way through the folders listed in the gameinfo.txt.
Open the next folder further up
In the case of Left 4 dead 2, it's the dlc1, dlc2, dlc3, update. In that order

Copy the loose Resource and Scripts folder, then the ones from the pak01_dir.vpk again.
Just keep doing that until all res files in the correct order are unpacked.

1.04
Now we got all our .res files, along with some others that we don't want.
So, we will use that little batch script to delete everything but the .res files.

Just place the "Delete_Non-res.bat" in the "HUD_Files" folder and run it.


We're using a bat file cause if you wanna do this more often, you can just run the script again.

1.05
We'll modify all the pak01_dir.vpk files, so the game cannot read the .res files from them.
We'll achieve that by editing a single string that defines the "res" file type.
That's enough to make all res files be unreadable.

But first, make a backup.
If you don't make a backup you'll need to either verify game files or "modify" the file back.
You also will not be able to play online while the modded pak01_dir.vpk is loaded.
At least not on dedicated valve servers, or any that enforce consistency

Make a copy of only the pak01_dir.vpk files. (Or whatever _dir.vpk files you took res files from).
Simply add a .bak to the file ending.
Make sure that you actually have file endings enabled to give it the proper file ending.


You can use a .bat file later to automatically switch between the backup and modded vpk.
More info about that later.

1.06
Now we can modify the original pak01_dir.vpk files.
Don't even dare to think about editing the backup vpk file.

There's two ways. One by using a Notepad++ macro, and the other by manually doing it.
The macro is faster but you need to "install" the macro.
I don't know if the macro works for anything but NP++

First i'll show you how to get it done using the macro, and then manually.
This entire box here shows the macro way, so scroll past it if you wanna do it manually

Macro
Click into the folderpath box.It allows you to enter paths manually.
We'll make it open Notepad++'s macro file
Copy this string into that box and hit enter: %AppData%\Notepad++\shortcuts.xml


It should immediately open that xml file.
If it does not, then you may have to manually seek Np++'s install folder and open that file.


Open the NP++ Res extension changer Macro[github.com] in a new tab.
Copy the content of the macro below the first <Macros>, but before the first <Macro name=...


Save the file and reload Notepad++.
Open all Pak01_dir.vpk files with Notepad++ and run the macro on each.
It'll automatically save the file.

Manual
Open the Pak01_dir.vpk file(s) with Notepad++.
Look for: \x00res\x00, with Regular Expression enabled.
You should have only one of these in the entire file.


change the "res" to a "rex" or something else, by just editing that one single letter.
Save the file and close it. Donezo.

Now the pak01_dir.vpk treats all ".res" files as ".rex", causing it to no longer read the files.
This, in turn, makes the game load the loose .res files from the HUD_Files folder.

With this setup you can now make a "loose files addon" and edit on the go.

If the game gets an update you might need to unpack the newest hud files again.
You're more likely required to make new backups and edit the pak files, after updates.
Switch Between Pak01_dir's
If you want to switch between the Vanilla and the Modded pak01_dir.vpk use that script i made.
Which only works on windows. Other OS have other rename commands.

Download the Swap_Pak01_dir bat file into the same folder where your game's .exe is.

Open it in Notepad++ and edit the path on line 13 to wherever your game is installed.


If you're doing this for anything but L4D2, edit the pink highlighted folder names.
Those would be the same folders as listed in the gameinfo.txt

You could add or remove "ren" lines to handle as many folders and their vpk files as you need.
You can also rename the pak01_dir highlighted in green if you use hl2_misc_dir or whatever.

But do not, under any circumstance, change the order!
If you swap the order, your .custom or .bak will overwrite the used .vpk.
That causes you to either delete the backup or the modded version.

To actually use it, just double click this bat file.
It will swap between backup and modified vpk sets based on whether you have a .bak or .custom.
Setting up "Loose Files" Addon.
So far we extracted all the .res files from the game and made the game read those.
And now its time to begin creating mods. But you're not allowed to edit these files you extracted.
Because the extracted files are the base. You need to make another folder with just your mod.

Depending on what game you mod, you may need one extra step.

2.00
On games that are not L4D2, or games that do not have an "addons" folder, this step is required.
All it is, is adding yet another folder to the gameinfo, in which we then build our addon inside of.


Inside this folder you can recreate the resource folder and place only modified files into it.

2.01
For L4D2, you can create a folder inside the "addons" folder, and build your mod there.

Short explanation as to how and why this works:
The game loads files in this prioritization:
  1. Packed addon.vpk files
  2. Pak01_dir.vpk, according to gameinfo order.
  3. Loose addon files in addons/ subfolder.
  4. Loose files everywhere else, according to gameinfo order.

Since we want to edit the hud in real time, we cannot use a packed addon.vpk.
Now that we prevented the pak01_dir from loading its .res files we essentially are at step 3.
The game now loads the loose addon files from our addons/ subfolder.

In this example screenshot you can see I got two folders of "loose res files".
It only reads the .res files and entirely new textures from it.
Below is a vpk file that only contains replaced textures, like the loading spinner.


If you want to work with both loose res files and replacement textures, make two folders.
One for loose res files, and the other that only has textures.
Pack the textures into an addon, to see the texture replacements while being able to edit the .res.


Once you're happy with the mod, merge the folders back together and pack it into an addon vpk.

2.02
Now you'll need to find out which files you want to modify. And that is up to you.
L4D2 has over 500 hud files, and i cannot explain all of them. I don't get paid for this.

Most of L4D2's hud files are in "resource\ui\l4d360ui". Like Mainmenu.res.
However, the hud that has the weapon panels, is Scripts/Hudlayout.res.

There's also a few occurrences of one file loading another.
For example, Hudlayout.res defines where the player's health panels are.
The panels themselves are in "resource/ui/hud" TeammatePanel.res and LocalPlayerPanel.res.
So this will probably get a little confusing for you.

If you don't know which file to edit, you could just use crowbar to download someone elses hud mod to find out what files they modified, to begin making your own mod.
But do not just use their mod as a base. Don't be lazy, make your own tings!
═══════════════════════════
Basic Understanding
All elements of the .res files have the same basic setup.
Yet some elements have unique settings only they can have.
For example, only text labels allow you to have a font setting. Cause duh.

Here is a basic breakdown of what the core settings do.
Value
Description
ControlName
What type of item it is (text, panel, button, ect)
fieldName
name of that specific item. (You'll define names twice, cause idk)
xpos
Horizontal Position. Negative is left
ypos
Vertical position. Negative is up
zpos
Render Layer. Negative is further back.
wide
How wide it is.
tall
How tall it is.
bgcolor_override
Background color (RGBA)
fgcolor_override
Foreground color (RGBA)

Unfortunately, the numbers don't make any proper sense.
One unit is not one pixel of your screen resolution. It's based on a 640x480 resolution.
Which means, if you move a panel by 1, it actually moves maybe two or three pixels.

The anchor point, or "origin", is always the top left of all the placeable items.
The Xpos and Ypos values determine where the top left of the item is.
If you scale something to be taller, it scales the item downwards, away from the top-left center.
If you make something wider, it'll scale to the right, away from the top-left center.

Xpos and Ypos can have "Position and Size Flags".
These allow you to scale and position things relative to their parenty.

You can read up on those Here on the VDC.
Scheme Files
The Basic schemes of your entire game are saved in multiple files in the "Resource" folder.
Clientscheme.res, Sourcescheme.res, Chatscheme.res, L4d360uischeme.res (L4D2 only).
There's more "scheme" files that lay out the basic fonts, colors and other shared details.

Here, for example, is my l4d360uischeme.res, that shows color and font definitions.

All color lines, such as bgcolor_override can use color values, or these predetermined names.
This would ensure that all, lets say menu boxes, would use the same "MediumGray" color.


This line here, as a nice example. It handles that grunge frame border and color for all menus.


Unfortunately, editing the scheme files does not allow you to just reload the UI ingame.
Editing these files does require a game reboot!
Filters
There are a few bracket options that decide when an item can be seen.
Such as [$X360], [$WIN32], [$DEMO], ect.

[$X360] Means something is only available for Xbox.
[$WIN32] Means its only for PC.
[$DEMO] is only for the "Demo" mode where you could try the game.
There's also a few [$LANGUAGE] filters, for when a language needs more space or something.

You would be pretty unlikely to ever have a real use for them, to be honest.
Unless perhaps you're making a whole game yourself, or if you just really want to make sure that your UI mod works perfectly on all aspect ratios and languages.

Example usages:
These lines define the "navup" and "navdown" targets when on PC and when on Xbox.
The xbox has more buttons for swapping players, so it needs to rearrange the UI this way.


These Filters have "Logic Gates" if you wanna call them that.
These can be combined if you work with additional ( ).
This table is built on assumptions, the VDC yields no data on any of this.
!
specifically not for the listed filter.
||
For listing multiple related filters. Usually for languages.
&&
For listing multiple unrelated filters. Like filtering for OS and then language.
( )
For when you want to group to things together. Useful for making exceptions for two things at once.


The image above defines the same "wide" value multiple times.
The filters behind the value define in what case the specific value should be used, and when not.

Another thing that might be important for some items is specifically defining aspect ratios.
L4D2 has that "Game Mode Carousel" which shows 5 images on 16:9, but only 3 on 4:3.
There's filters to set one value for only "wide" screens, and another for only "not wide" screens.


Fonts
I made a separate guide about fonts, because that is a science on its own.
But don't fret, its not a lot of work.

https://test-steamproxy.haloskins.io/sharedfiles/filedetails/?id=3232590568
Reloading the UI
The only reason we did this whole setup wit hthe loose files, backups and gameinfo, is so we can reload the UI without needing to reboot the game every ten seconds.

For Main Menu Subscreens like the options, you just close and open them again.
Reloading the Main Menu itself is different, and you got three options.

1. Loading an entirely new screen so the main menu is unloaded.
Like the "Create Singleplayer Game" screen.

2. Using the console to enter the commands "hud_reloadscheme;ui_reloadscheme".
But you may not have a button to turn on the console and keybinds don't work in main menu.

3. Adding a button to the Main Menu, to fire the above mentioned commands. Lmao.
Add this to your mainmenu.res file, to add a "Reload UI" button to the top left of the screen:
Just don't forget to remove or comment it out before you finish and release the mod
"RELOAD_UI" { "ControlName" "Button" "fieldName" "RELOAD_UI" "xpos" "5" "ypos" "5" "zpos" "99" "wide" "50" "tall" "15" "labeltext" "Reload UI" "Command" "#con_enable 1;hud_reloadscheme;ui_reloadscheme" "ActivationType" "1" }


The ingame huds (ammo counter, player panels, ect) require the same commands.
It's easiest to bind them to a key to reload the UI, so open your console and enter this string:
bind "KP_MINUS" "hud_reloadscheme;ui_reloadscheme"
This makes Num- reload the hud. But you can bind it wo any key you want.

In case you want to use another special key who's name you don't know, check this VDC Page.
═══════════════════════════
Buttons
There's a wide variety of buttons available. Which type of button you use, is up to you.
But here's how a very basic button would work.

"button_1" //Name of button element { "fieldName" "button_1" //Name of button element, again. "ControlName" "Button" //type of button (mostly design) "style" "HybridButton" //Style (not available for all ControlName's) "xpos" "5" //position "ypos" "5" //position "zpos" "99" //position "wide" "50" //size "tall" "15" //size "labeltext" "Click me!" //text on button "tooltiptext" "I do things" //tip text telling you what the button does. "Command" "Audio" //what the button does (audio settings) "ActivationType" "1" // don't really know. Not needed. }

Designs:
ControlName - Button (this is the source engine's default button style)

ControlName - L4D360HybridButton (L4D2's default button version)

ControlName - L4D360HybridButton (SmallButton style)


There's many more styles, defined in the clientscheme files.
I'm not gonna list them all, you can find out yourself.


The Command setting defines what happens when you click the button.
Most of the button commands are hardcoded into the game and cannot be changed.
More info about that in the "Commands" section.
Flyout Menus
Left 4 Dead 2 is the first game to implement "Flyout menus". Alienswarm being the second.
Those are the buttons that load a small menu to the right of it, listing multiple things.


You can add these flyout menus anywhere you want, provided your game has them coded.
Their setup is special, because you need the entire flyout menu to be a second res file.

Here is the setup:
A basic button, that has a command to load the flyout.

The top block is the button. The "Command" loads the flyout that is defined below it.
The flyout itself only defines what .res file to load.
"Flyout_1" { "fieldName" "Flyout_1" "ControlName" "L4D360HybridButton" "xpos" "200" "ypos" "200" "wide" "85" "tall" "15" "labelText" "click me for a menu!" "style" "SmallButton" "command" "example_flyout" //this is the FieldName of the flyout you want } "example_flyout" { "fieldName" "example_flyout" "ControlName" "FlyoutMenu" "InitialFocus" "option_1" //which button to highlight by default "ResourceFile" "resource/example_flyout.res" //Which .res file the flyout is. }

The flyout res file is a res file like any other. Nothing new by this point.
Not knowing what to do as example, take this meme.


You can nest flyout menus. Meaning one flyout and load another.
But instead of opening more and more flyouts, you merely replace the previously opened flyout.

As an example, my main menu mod adds the TUMTaRA flyout inside the extras flyout.


Every single flyout, needs to be "predefined" on whatever base menu it shows up.
As in my example, the main menu has the "Extras" flyout. The extras has the "TUMTaRA" flyout.
So, the main menu must predefine the extras flyout as well as the TUMTaRA flyout.

Adding an extra button that is invisible, will define where the nested flyout will appear.
Sliders and Checkboxes
Previously, i told you that console command buttons only work in the main menu.
Luckily, you can get a workaround by mapping a slider to the command's 0 and 1 values.
Like i did in my main menu mod. Clunky, but works.


Or, you can just use the sliders for their intended purpose, which is picking a float value.
Like volume or FOV settings.
Does not work for text based values, like game difficulty (easy, normal, hard, impossible).

Here's a basic setup for a slider.
"Sld_SvCheats" { "ControlName" "SliderControl" "fieldName" "Sld_SvCheats" "xpos" "715" "ypos" "95" "zpos" "3" "wide" "120" "tall" "15" "visible" "1" "enabled" "1" "minValue" "0" //minimum value the slider goes to. "maxValue" "2" //maximum value the slider goes to. "stepSize" "2" //the amount the slider moves if you use left/right arrow. "conCommand" "sv_cheats" //the command bound to this slider. "inverseFill" "0" //If set to 1, reverses the maximum value to the left of the slider. "BtnDropButton" { "ControlName" "L4D360HybridButton" "fieldName" "BtnDropButton" "tall" "15" //tallness of text label "visible" "1" "enabled" "1" "labelText" "Cheats" //text for the slider "style" "SmallButton" //button style (also font) "ActivationType" "1 //VDC has no data. does nothig? } }

And here's a checkbox, for if you want a visual indicator if the cvar is set.

"sv_cheatscheck" //this is a checkbox button { "ControlName" "CvarToggleCheckButton" "fieldName" "sv_cheatscheck" "xpos" "700" "ypos" "92" "zpos" "0" "wide" "150" "tall" "20" "visible" "1" "enabled" "1" "tabPosition" "1" "labelText" "" //if this should have text with it, define that here. "textAlignment" "west" "Default" "0" //Tick appears if cvar changes to other legal value. "cvar_name" "sv_cheats" //what console command to look for. }
Images
Adding images is simple as hell.

"Image_1" { "fieldName" "image_1" "ControlName" "ImagePanel" "xpos" "0" "ypos" "0" "zpos" "-2" //pushes image into background "wide" "f0" //scale F0 makes it scale fullscreen "tall" "f0" //scale F0 makes it scale fullscreen "image" "witch" //vmt file, relative to materials/vgui "scaleImage" "1" //scale image if needed }

As mentioned, the "image" field loads textures that are in materials/vgui.
If your material is in another folder, like the old static background images in materials/console, you can add ../ in front of the path, to then enter the new folder. as such.

"image" "../console/background_menu_widescreen"

OMG BEYTAH!


Also, if you wanted to manually make a widescreen/non widescreen background image swap, make use of them filters.
"image" "../console/background_menu_widescreen" [$X360WIDE || $WIN32WIDE] //widescreen "image" "../console/background" [!($X360WIDE || $WIN32WIDE)] //"narrow" screen

You can also just put the images anywhere you want.
Image Buttons
At least in Left 4 Dead 2, the "imageButton" does not work.
So the only workaround is making an image, and then a button over it.

Unfortunately, i can not find a way to make an actual image be the button, in L4D2.

Here's the workaround approach though.
"btn1_img" { "ControlName" "ImagePanel" "fieldName" "btn1_img" "xpos" "150" // button and image need same settings. "ypos" "100" // button and image need same settings. "wide" "160" // button and image need same settings. "tall" "320" // button and image need same settings. "zpos" "1" // has to be "below" button layedr "scaleImage" "1" "autoResize" "0" "image" "select_survivors" } "btn1_btn" { "ControlName" "Button" "fieldName" "btn1_btn" "xpos" "150" "ypos" "100" "wide" "160" "tall" "320" "zpos" "2" "autoResize" "1" "pinCorner" "0" "tabPosition" "2" "labelText" "" "Command" "SoloPlay_coop" //what the button does. "defaultBgColor_override" "0 0 0 0" //When seen normally. "armedBgColor_override" "0 0 0 0" //When hovered over the button. "depressedBgColor_override" "0 0 0 0" //idfk }
Panels (Basic Boxes)
Panels are often used as backdrops for various things.
Like this list of buttons.


They're simple, and there's not much to say about them.

"PnlBackground_1" { "fieldName" "PnlBackground_1" "ControlName" "EditablePanel" "xpos" "0" "ypos" "100" "zpos" "-1" "wide" "120" "tall" "95" "bgcolor_override" "0 0 0 230" //RGB + Alpha "PaintBackgroundType" "0" // What type of background it has. }

The PaintBackgroundType has multiple styles, probably differently coded per game.
At least in L4D2, they're as follows:
0 = default, 1= weird blur, 2 round corner, 3= left to right gradient.
Text Labels
You can add plain text, which you write out in the res file.
The best part is, the text allows you to actually use line breaks.
But you can not use " characters, so you need to use ' or the curly “ ” instead.
"label_1" { "fieldName" "label_1" "ControlName" "Label" "xpos" "50" "ypos" "50" "zpos" "1" "wide" "300" //size of the whole text box, NOT the font "tall" "45" //size of the whole text box, NOT the font "wrap" "1" "Font" "DefaultVerySmall" //Which font to use, set in the ClientScheme "labelText" "This is a “funny” text. It allows breaklines. Cool, innit? ( ͡~ ͜ʖ ͡°)" "fgcolor_override" "255 0 255 255" }

As you can see, the "labelText" has its text box start on the next line. unlike all other lines.
You don't need to do this, but looks nicer for when you're editing text boxes.

Commands
Every button has a "Command" function. Which is what makes the button do things.
There's also "ConCommand", which only work in some occasions, like sliders for float values.


Most commands are "menu commands", meaning some part of the game somewhere defines what commands are available, and what they do, but they're not console commands.

Limitations:
Some things are just walled off behind hard coded obstacles.
Some examples include:
  • The cvar buttons work in main menu, but not pause menu.
  • Some buttons are linked to code, meaning only one specific button does the command.
    One of them being the "Voice input volume" slider. It ha no command assigned, but the game's code somehow reads the slider and saves some value, somewhere.
    The number display on the multiplayer menu that reads out the fov value is hardcoded to show a number, but only on that specific menu. Copying the button somewhere else breaks it.

I made a list of all "Menu Commands" L4D2 has.
To save space, you can look at it here[github.com].

Here's the setup to run console commands.
This button will run the console command assigned. Even runs aliases. ( ͡~ ͜ʖ ͡°)
The # is required to make it work.
"command" "#maps *"

In some cases, you may need a "con_enable 1" before the command actually begins.
But this isn't always the case.
For example, the two following lines do the exact same thing, with and without the prefix.
"Command" "#con_enable 1;incrementvar sv_cheats 0 1 1"
"Command" "#incrementvar sv_cheats 0 1 1"

All other types
There's more ControlNames, and therefore more types of things to place down.
I don't know all of the items, because i never had to use any of the ones not yet listed.
If you want to find out how to do something i have not yet described, try using the VDC
Should the VDC not have any info, you can try loading the original res files and reverse engineer.


I made a list of all ControlNames L4D2 has.
To save space, you can look at it here[github.com]

Fair warning, a lot of the stuff in there is probably leftover from cs:s and won't work in L4D2.
References
I went and merged all the L4D2 res files into one GIANT file.
This allows you to look at all their hud files at once, to look for reference.
For example, you can quickly check how they made any button or slider work.

Super cool for referencing stuff.
Here it is[raw.githubusercontent.com].
Making custom textures fit
Fitting UI to custom textures is easiest if you actually fit the texture to the finished UI.


C.T. 1
Finish that spot of the UI where you want the image to be.
This could be the ammo counter of the gun, or some button, or whatever.
In my specific case, i want to replace the title of something.

Once the rest of your UI is done, make a half translucent temporary texture.
Here's a simple VMT you can copy, UI doesn't need much.
UnlitGeneric { $translucent 1 //or alphatest $basetexture "vgui\..." $ignorez 1 }

This texture should be the actual aspect ratio of what you want it to cover.
In other words, if you want to cover a rectangular thing, make this texture 2:1, 4:1, 8:1...
Otherwise you'd have a giant 1:1 texture, like 1024x1024, but only use 1024x256 of it.
This would be bad practice, and requires useless computing power.
When working with rectangular textures, you will always have some amount of empty space.

Overlay that texture in a spot you want it to be.

Bad setup, too much empty space. (1204x512 / 2:1)


Good setup, doesn't cover lots of empty space. (1024x128 / 8:1)


C.T. 2
Take a screenshot of that half translucent temporary texture, as seen above.
Import that image to whatever image editing software you have.
Crop this image right down to the exact pixels of that half translucent texture.

Now, you know where the rest of the ui is, relative to your texture.
Do whatever you want now.
In my example, i want to cover the original title with a texure.


C.T. 3
Once you're done, you must rescale the screenshot to a power of two texture, to save it as vtf.
We're rescaling it at the end, because all the edits you did were relative to screen resolution.
Power of two would squish and stretch things.


C.T. 4
Save this texture, replacing the previous temporary solid color with what you've made.
Load the game, and the texture should work just fine.
═══════════════════════════
Closing Words
And that's the basics.
With this knowledge you should be able to create HUD mods fairly easily.
The rest is just trial and error until knowledge and skill is acquired on how to make it look good.

Should you need help with this process, join the "Dead 4 Mods" Discord Server[discord.gg].
There's a few members, including me, who can help you out.
Please for the love of Lucifer, do not join and immediately DM me.

I have my own Discord Server[discord.gg] if you'd like to hop in and chat.
I sometimes post WIP images of what i'm doing, but it's mostly memes.

It would mean a lot to me if you'd consider donating a bit of money.
Considering i've been writing guides for over a decade now, and never got a penny for my work.
Paypal[paypal.me]
8 Comments
红酒炖兔兔♨ 18 May @ 8:18pm 
I have published it on both Steam and Bilibili, thanks again for your effort MrFunreal :nya_toru:
https://test-steamproxy.haloskins.io/sharedfiles/filedetails/?id=3484052625
https://www.bilibili.com/read/cv41724176
红酒炖兔兔♨ 26 Apr @ 7:34pm 
I'm also going to publish it on Steam, but I have to put it on bilibili because most of my followers are in that site.
мяFunreal  [author] 25 Apr @ 11:25am 
i was hoping you'd do it on steam..., as to not send people to third party sites.
红酒炖兔兔♨ 25 Apr @ 8:02am 
Okay, my translation will be published on bilibili as a public column, I will also post my link here after done, thanks again:nekoheart:
мяFunreal  [author] 25 Apr @ 7:53am 
If you want, sure.
As long as you don't put it behind a paywall or some other goofy nonsense.
红酒炖兔兔♨ 25 Apr @ 7:27am 
Thanks MrFunreal, your tutorial is really useful and helps me a lot. I'm wondering if I could get your permission and translate your guide into a Chinese version? I would keep the original author and link to this tutorial:nekoheart:
мяFunreal  [author] 24 Apr @ 7:51am 
it doesn't work cause the hud files are inside the pak01.
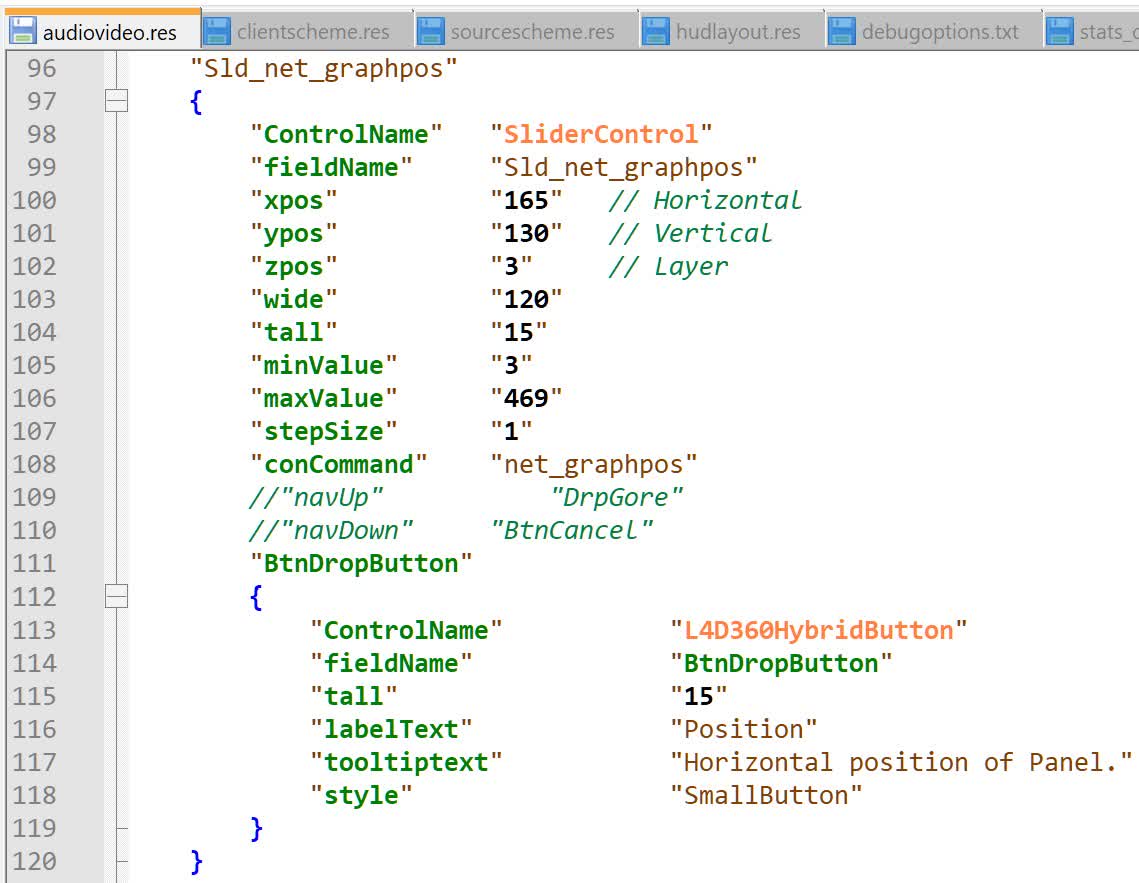
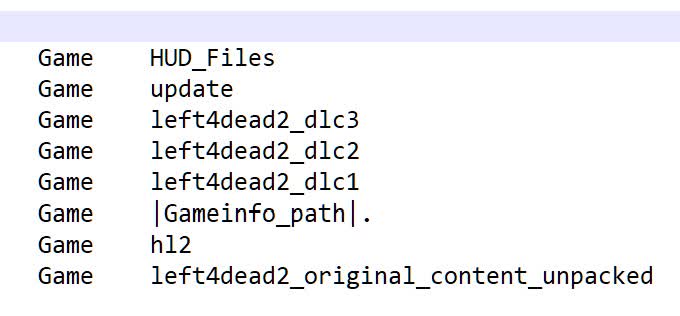
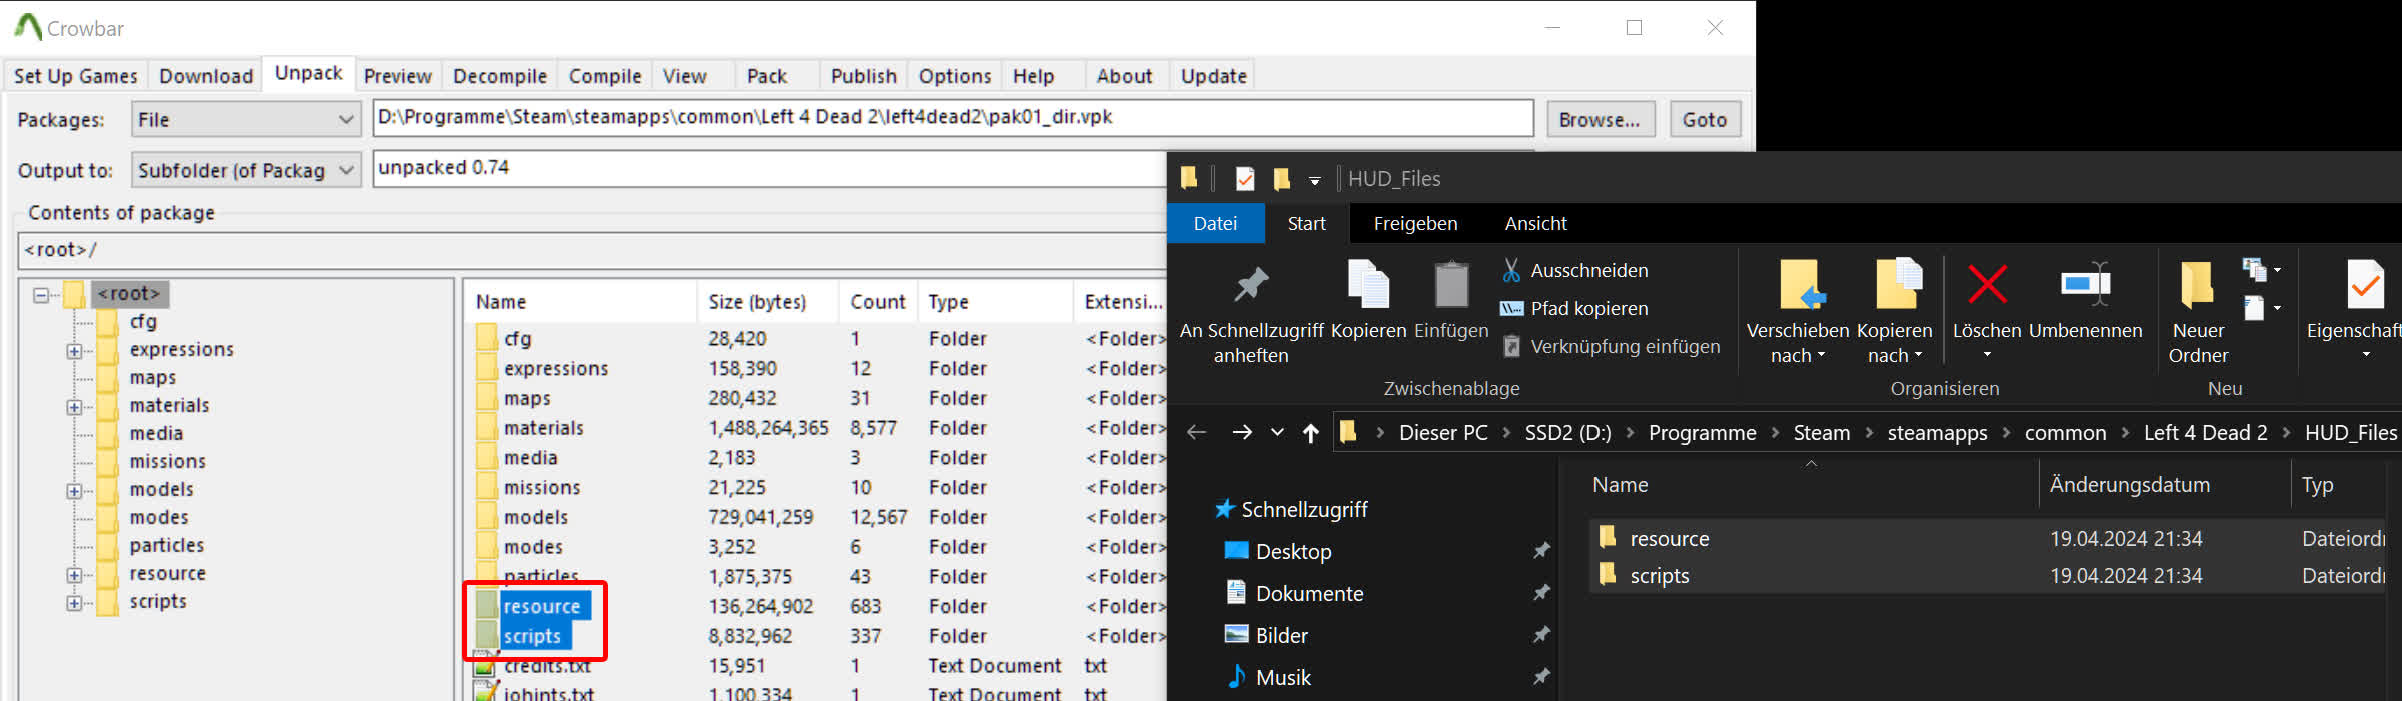
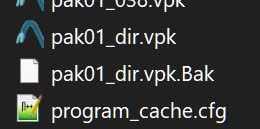
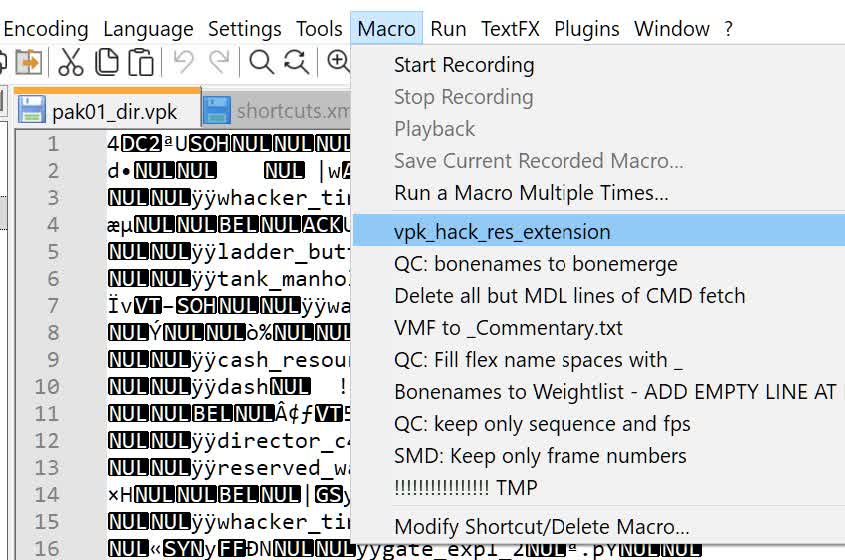
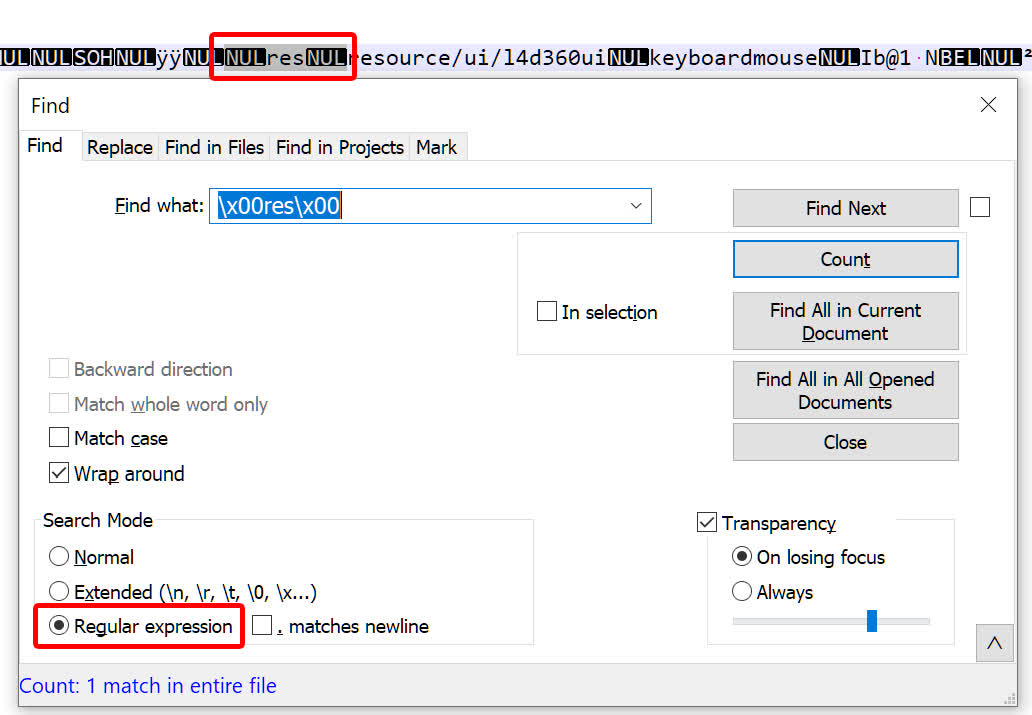
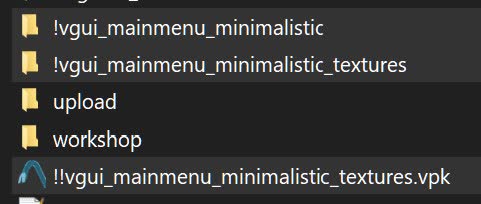
It will always pick the files in the pack01 over any loose files, ever.
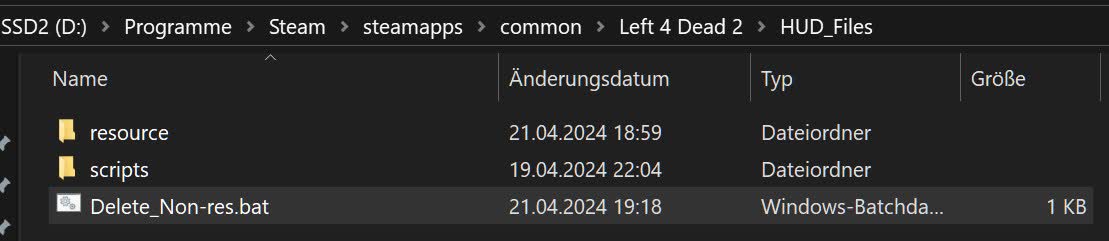
Hence why you need to "destroy" the res files in the pak01, to make the game no longer recognize it.

Yes, it is time consuming. Unfortunately things take time (ten minutes, max), and you don't have a one button click solution for every task out there.
kabyidon 24 Apr @ 12:26am 
Great guide. Unfortunate that its so time consuming to make the game not load the pak01_dir. Tried it myself to no avail but wondering why adding


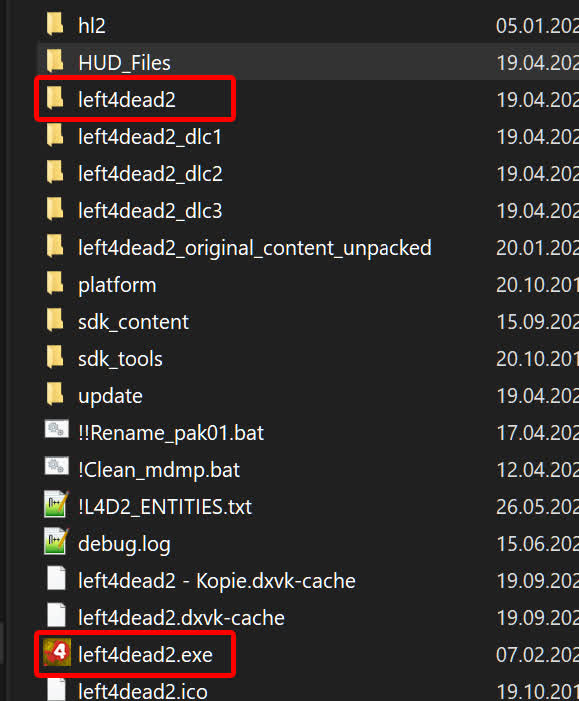
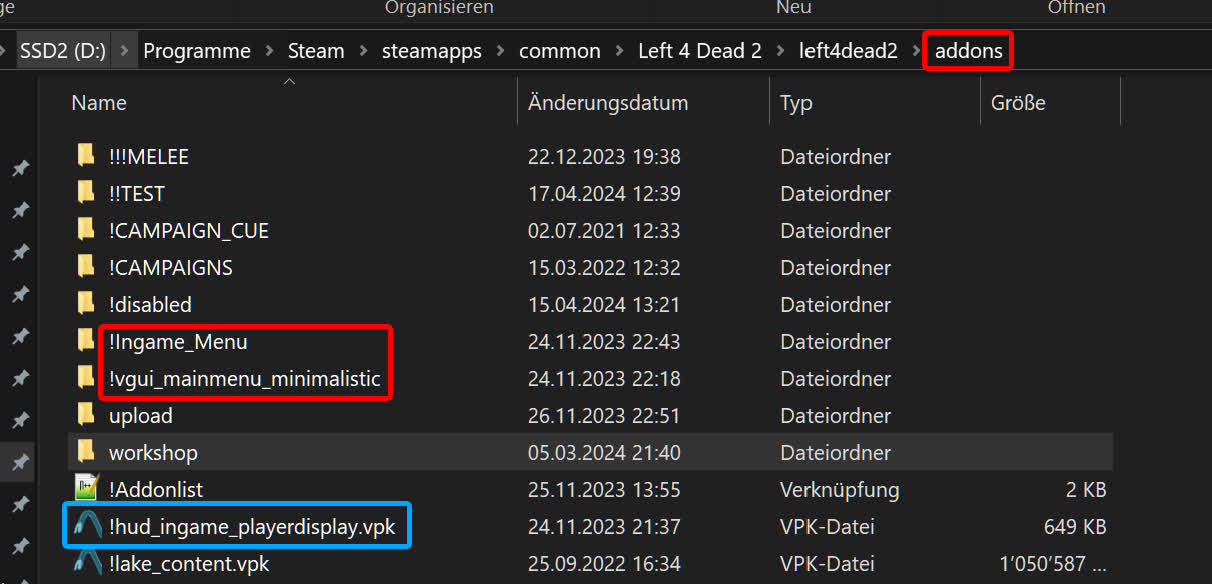
Game left4dead2\addons\MY_HUD_MOD

to the top of the SearchPaths doesn't work.