Gauntlet™

Gauntlet™

81 ratings
Lilith the Necromancer
By Lein
The purpose of this guide is not to tell you how you should play, but rather to introduce you to possibilities, to teach you to recognize certain patterns that can be taken advantage of, and to equip you with knowledge to further develop your own way of playing. I will be giving advice, but as it should already go without saying, you are, of course, free to dismiss whatever you'd like.


This series is intended to provide exhaustive and in-depth insight for playing characters at a high level and to reveal nuances that may be understood by only a few top players but are rarely discussed, if at all. This is not a general overview of any character's equipment.

It is an amalgamation of things I have learned through many hours of studying other players, receiving advice from mentors, and of course, much trial and error, practice and discovery. I hope to help others come to learn what I know without them having to spend any unnecessary hours pursuing it. This is not to say, however, that much practice will not be required on your part to reach proficiency—it most certainly will—but I hope to demystify any secrets I can and to give you a substantial advantage in your journey nonetheless.

I have also taken the liberty to coin a few terms for the purpose of describing certain phenomena, patterns, and series of moves (whether I invented them or not) in memorable and succinct ways as a means of referencing them more easily. In the case of attacks or moves that have no known official names, I will be assigning names to them for the same reason. Feel free to think of these things in your own way if that helps.


3
2
6
2
   
Award
Favorite
Favorited
Unfavorite
Lilith the Necromancer is something of a hybrid character whose combat style is comprised of both moderate range and close-quarter elements. Though a very powerful character indeed, this power is not without its trade-offs.

She is the character I would consider to be the most oversimplified by many players, and I believe this is due to her strengths appearing quite obvious while her biggest weaknesses and caveats much less so, or even being even completely hidden to or ignored by some. In my opinion, this is a misunderstanding that has created a certain stigma that she is disproportionately easy to use in exchange for the benefits she delivers when compared to other characters—demanding little skill or practice to reach her full potential. This is a sentiment I strongly disagree with, but I intend to outline all her notable strengths and weaknesses just the same, and leave room for everyone to draw their own conclusions.

To generalize her two overall downsides (barring her potion selection), she can be quite easy to die with, and she is also the most dangerous character to have on a team when in the hands of the undisciplined. That said, she can be a dominating force when equipped with the necessary information and when used wisely.

This chapter references material from Heroes of the Gauntlet. It is highly recommended that you read the fundamentals in that chapter either prior to or alongside Lilith the Necromancer.


Attacks
To start, we'll go over the basic abilities that Lilith has at her disposal. Later, we will start to see how these can be linked together in more useful ways.


Skeleton Slash is a quick short and mid-range attack. It is quite weak, however, it can be used to stun small enemies. Within a certain range, the summoned skeleton will automatically adjust its distance from Lilith in order to hit the closest target. While it lacks impressive damage, ignoring this attack altogether would be a regrettable waste of great utility.


Skeleton Smash is a mid-range attack and is Lilith's primary way of dealing damage. It particularly excels at killing groups of light enemy units. It is a highly unusual attack for the fact that it is regarded as its own entity, meaning that enemies are able to see it and will attempt to attack it (this will become important to know later on).


Lilith can teleport short distances by using Ghostwalk—a means of both mobility and invincibility. Ghostwalking through enemies slows them, minimally damages them, and collects Soul Power, a source of power Lilith's weapon abilities. Good timing can help you evade the dangers of nearly any imminent threat.


Use Soul Power to summon Skeletal Archers from out of the ground. These archers are very fragile (collapsing from the touch of virtually anything that contacts them) but provide ranged assistance during battle. Summon Skeletal Archers is the ability of Lilith's third weapon, Necrotic Vessel.


Dominate is one of the two abilities in the game that allows for mind-controlling enemies (the other being the Siren's Lute relic). Enemies placed under this effect will remain so for limited amount of time. In the case of Dominate, this amount of time is relative to the amount of Soul Power used. This is a special weapon ability exclusive to Scepter of the Vampire King.


Note:⠀⠀⠀⠀⠀⠀⠀⠀⠀⠀⠀⠀⠀⠀⠀⠀⠀⠀⠀⠀⠀⠀⠀⠀⠀⠀⠀⠀⠀⠀⠀⠀⠀⠀⠀⠀⠀⠀⠀⠀⠀⠀⠀⠀⠀⠀⠀⠀⠀⠀⠀⠀⠀⠀⠀⠀⠀⠀⠀⠀⠀⠀
Ghostwalk does not make Lilith change her face direction. For example, if Lilith is facing north and you use Ghostwalk to go east, she will have moved east but will still be facing north until you move in another direction.
Caution:⠀⠀⠀⠀⠀⠀⠀⠀⠀⠀⠀⠀⠀⠀⠀⠀⠀⠀⠀⠀⠀⠀⠀⠀⠀⠀⠀⠀⠀⠀⠀⠀⠀⠀⠀⠀⠀⠀⠀⠀⠀⠀⠀⠀⠀⠀⠀⠀⠀⠀⠀⠀⠀⠀⠀⠀⠀⠀⠀⠀
Enemies can see Lilith's hammer (Skeletal Smash) and may attempt to attack it. This is dangerous when in the presence of Cultist Sorcerers and sometimes mini-bosses.
Loadout
For this section, I will choose some equipment options that I recommend and explain why I recommend them. Be aware that I do not intend to cover all weapons, relics, talismans, abilities, etc. I will be limiting loadout topics to what I believe to be the strongest and/or most popular options as they relate to high-level Endless mode play unless I feel there is something noteworthy to say otherwise.

Caution:⠀⠀⠀⠀⠀⠀⠀⠀⠀⠀⠀⠀⠀⠀⠀⠀⠀⠀⠀⠀⠀⠀⠀⠀⠀⠀⠀⠀⠀⠀⠀⠀⠀⠀⠀⠀⠀⠀⠀⠀⠀⠀⠀⠀⠀⠀⠀⠀⠀⠀⠀⠀⠀⠀⠀⠀⠀⠀⠀⠀
Do not use Lilith's minions during Elf's Dryad's Song potion. (Again, if you have not read the fundamentals in Heroes of the Gauntlet, it is very important that you do so, especially for this chapter.)
⠀⤷ Weapons


Summon Skeletal Archers


Weapon: Necrotic Vessel

Necrotic Vessel is Lilith's penultimate weapon and uses Summon Skeletal Archers as its special ability. Up to five Skeletal Archers may be summoned with a single use of the weapon's ability, however, if you can manage to keep them alive, you can stack uses and potentially build a small army of ranged units. Skeletal Archers, when used with full Soul Power, are capable of using fire arrows for a substantial increase in the damage that they deal.


Dominate


Weapon: Scepter of the Vampire King

The final weapon Lilith has in her arsenal, Scepter of the Vampire King, is very powerful and considered by some players to be the strongest weapon in the game. It has the capability to charm any enemies of a lower standing than a mini-boss via its ability, Dominate. With full Soul Power, Dominate enables charmed enemies to attack with speed greater than that of their uninfluenced counterparts.

This weapon also allows you to heal through its use. Healing is done simply by gaining Soul Power; anytime you gain Soul Power, you gain health. It is a common belief or speculation that other weapons can heal Lilith or that it is a general ability of Lilith herself. This is not true. Scepter of the Vampire King is the only weapon able to provide healing.
Caution:⠀⠀⠀⠀⠀⠀⠀⠀⠀⠀⠀⠀⠀⠀⠀⠀⠀⠀⠀⠀⠀⠀⠀⠀⠀⠀⠀⠀⠀⠀⠀⠀⠀⠀⠀⠀⠀⠀⠀⠀⠀⠀⠀⠀⠀⠀⠀⠀⠀⠀⠀⠀⠀⠀⠀⠀⠀⠀⠀⠀
Mind-controlled enemies do not build Skull Coins. I suggest not worrying about this during fights, but definitely keep it in mind when the Skull Coin count is at zero.
⠀⠀⠀⤷ Soul Power
Lilith has a very unique element to her abilities, and that is Soul Power. Instead of having her special attacks operate on time-based cooldowns like the other heroes, hers are based on how much Soul Power she has acquired. Soul Power is acquired by killing enemies (including by way of relic—except Tempest Locket—and talisman abilities), or by using Ghostwalk to phase through them. The amount of Soul Power she has at her disposal at any given time can be seen in the meter that is displayed under her person at all times (this will only be visible to the player playing as her). This meter has what I have broken down into four stages: empty, tier 1, tier 2, and full.

There is also a number displayed in her HUD (Heads-Up Display) that corresponds with the Soul Power she has, though this does not convey as much detail as the meter does.


Empty
Empty is the default state. This is the state of Lilith's Soul Power any time she revives, spawns, or begins a new floor. The Soul Power meter will return to this empty state anytime your weapon ability is used.

Tier 1
The first tier reflects the number of souls you have, which in turn corresponds with what the intensity of your special ability would be if you were to use it at that time. For example, when using Summon Skeletal Archers, having three souls in your meter would mean that you would summon three Skeletal Archers. When using Dominate, having three souls would mean that enemies stay mind-controlled longer than they would if you only had only one or two souls but fewer than if you had four or five.

Tier 2
As strange as this may seem, the second tier actually doesn't do anything. It adds no extra units to your summons nor grants them additional bonuses in any way. Your weapon ability, when used at anytime during this tier, is exactly the same as it would be when using it while having five souls in the first tier. The purpose of the second tier is simply to be a prerequisite to gaining full Soul Power.


Full
Waiting until your Soul Power reaches full charge before deploying your special ability grants it an extra benefit. The manifestation of this benefit varies from ability to ability. In the case of Summon Skeletal Archers, archers will use fire arrows to deal greater damage, while in the case Dominate, mind-controlled enemies move and attack much faster than they otherwise would.
⠀⤷ Talismans


Dark Hunger


Talisman: Lilith's Heart

Dark Hunger is a potion ability that creates a circle surrounding Lilith. Within this circle, enemies will have their movement impeded and be drained of health as she adds it to her own. Be cautious; there is a brief moment where Lilith is immobile and vulnerable while activating this ability. For security, use this potion before walking among enemies—not during.
⠀⤷ Relics


Boots of Ranadam


Boots of Ranadam not only makes you faster, but also slows enemies around you. This speed is especially nice for building Soul Power quickly (which also means heals when wielding Scepter of the Vampire King) with Ghostwalk and Skeleton Smash. It is also very handy for getting through dense crowds when combining it with Ghostwalk and weapon abilities.


Ring of Mirrors


Ring of Mirrors is the only relic that varies depending on the hero wielding it. It tends to be not as suited as Boots of Ranadam for traveling through crowds, but rather excels in combative situations. Should you choose this relic, I would recommend pairing it with the weapon ability, Summon Skeletal Archers, as it can help you create openings for archer placement.

It is possible to make at least decent use of some of the other relics with Lilith, including ones not listed here, so feel free to experiment with other relics.
Caution:⠀⠀⠀⠀⠀⠀⠀⠀⠀⠀⠀⠀⠀⠀⠀⠀⠀⠀⠀⠀⠀⠀⠀⠀⠀⠀⠀⠀⠀⠀⠀⠀⠀⠀⠀⠀⠀⠀⠀⠀⠀⠀⠀⠀⠀⠀⠀⠀⠀⠀⠀⠀⠀⠀⠀⠀⠀⠀⠀⠀
Enemies can see illusions even if you are invisible. This can cause Cultist Sorcerers to attack you via hex if you are not careful.
Techniques & Strategies
Probably the most immediate thing that requires some getting used to is Lilith's range. For many, it can initially feel awkward due to the nature of her range. Her reach is more than what you might expect from Warrior's or Valkyrie's, yet less than Elf's or Wizard's.

Note:⠀⠀⠀⠀⠀⠀⠀⠀⠀⠀⠀⠀⠀⠀⠀⠀⠀⠀⠀⠀⠀⠀⠀⠀⠀⠀⠀⠀⠀⠀⠀⠀⠀⠀⠀⠀⠀⠀⠀⠀⠀⠀⠀⠀⠀⠀⠀⠀⠀⠀⠀⠀⠀⠀⠀⠀⠀⠀⠀⠀⠀⠀
To get the most out of this chapter, read it in its entirety. I have created subsections for each of the recommended weapons for the purpose of addressing topics that are especially relevant to it. This does not mean it is advisable for you to skip over areas pertaining to weapons that you have little or no interest in. Some information may be designated to a section based on its significance to that weapon, but this is not to suggest that there is no useful information to be gleaned from it even if you are generally uninterested in the weapon itself.

Both Skeleton Slash and Skeleton Smash have a sort of "auto-correcting" feature, meaning that while both of these attacks have a maximum range, the game will automatically shorten their distance as appropriate when you attempt to attack enemies in front of you.

Lilith's Skeleton Smash also has a minimum distance. It does have an auto-correcting property, but there is limit to how close to Lilith it can spawn. If an enemy is very close to her, Skeleton Smash will likely not work as an offensive measure (with some exceptions to bigger enemies—some of them are simply too big to miss, even if you're standing right next to them). I say "offensive measure" because although the hammer itself must be used at a distance, there is actually a space in front of Lilith that will stun small enemies, even if they are not hit by the hammer itself.


When you need to deal with a threat directly in front of you, there are primarily three options: the aforementioned stun capability of Skeleton Smash, Ghostwalk, and Skeleton Slash. Skeleton Slash is weak, but it is a fast way to hold off enemies (this does not work on larger ones). It also does not have a "minimum distance" like the hammer attack does; no enemy can be too close for slash attack to hit.

Using Ghostwalk Safely
Be careful about using Ghostwalk mindlessly and haphazardly, especially in battle. Teleporting often without plan or purpose can make it easy for you to be hit by stray projectiles or nearby enemies while you are recovering (especially in lava levels).

If the nearby enemies are too sporadic, Ghostwalking can be rather dangerous (after all, you wouldn't want to teleport right next to an enemy and be hit). When using Ghostwalk, enemies grouping together is usually ideal (you naturally obtain more Soul Power when going through them, and enemies clustered in one place usually means open and safer areas elsewhere for you to teleport to), and kiting enemies is one way to manipulate them into doing this.

On the other hand, if there's one thing we know gaps are good for, it's weaving, so take advantage of it as needed. Whether you find yourself in a situation where enemies are bunched up or spread out, you will likely have a card you can play.


⠀⠀⠀⠀⠀⠀⠀⠀⠀⠀⠀⠀⠀⠀⠀⠀⠀Traversing Spikes
Spike traps can be traversed quite quickly with Ghostwalk, which can be important when under threat (e.g. being chased by Death Incarnate). When met with a set of conjoined automated spike traps, you can largely ignore the middle and last sets and focus solely on the first trap. Wait for the first trap to be safe to stand on, then with certain timing, Ghostwalk to the last set just before the spikes come up. Since the first and last traps have the same cycle, dodging the first set with Ghostwalk means dodging the last as well.


Dual Wielding
Lilith's hammer attack has a slight intermission period between uses (a cooldown, essentially). This means that after Skeleton Smash is used, you must wait a moment before you can use it again. You will, however, still be able to do other things, and as it so happens, this waiting period is almost the exact duration of the slash attack, serving a purpose fairly similar to animation canceling.


When timed right, a slash can be placed between your hammer attacks during what would otherwise simply be downtime anyway. Reasons you may wish to use this might include dealing slightly extra damage or attacking or stunning multiple targets quickly (as demonstrated in the example above).
⠀⤷ Forbidden Practices
Forcibly bringing souls back from the Great Beyond in order for them do your bidding is fine and all, but there certainly are some lines you should not cross. These practices are referenced throughout this chapter, but since there's a few of them and they're very important to know, I'll consolidate them here as well for a more concise resource. These are the usual huge "no-no's" when playing Lilith.


Dryad's Song is one of Elf's potions that causes enemies to be unable to see heroes. A minion is anything that fights on your behalf and is seen by enemies to be its own entity. This includes illusions (Ring of Mirrors relic), gargoyles (Demonic Effigy relic), mind-controlled enemies (either by the Siren's Lute relic or Lilith's Scepter of the Vampire King weapon), anything summoned by Lilith's weapons, and Lilith's hammer (Skeleton Smash).


(Excerpt from Heroes of the Gauntlet)

Knowing that enemies will attempt to attack minions, there are a few circumstances where using minions during Dryad's Song is exceptionally dangerous: when a boss or mini-boss is present, or when a Cultist Sorcerer is present. The reasoning behind bosses and mini-bosses is probably obvious (they become active and launch large-scale attacks), but less so for Cultist Sorcerers. Cultist Sorcerers will often attempt to attack your minions with a hex, but the problem here is, hexes reach everyone on the heroes' team—including heroes themselves, whether they're invisible or not. Ironically, hexes don't work on minions (though this doesn't stop Cultist Sorcerers from trying).

Sometimes this is unavoidable, however; you may have already deployed minions by the time Elf decides to use his song potion and there's little you can do about it afterwards. I suggest refraining from using minions at the beginning of lava levels (until the first room) and in the beginning of heavily populated rooms unless necessary, as these are areas where a skillful Elf is likely to use potions.

Caution:⠀⠀⠀⠀⠀⠀⠀⠀⠀⠀⠀⠀⠀⠀⠀⠀⠀⠀⠀⠀⠀⠀⠀⠀⠀⠀⠀⠀⠀⠀⠀⠀⠀⠀⠀⠀⠀⠀⠀⠀⠀⠀⠀⠀⠀⠀⠀⠀⠀⠀⠀⠀⠀⠀⠀⠀⠀⠀⠀⠀
Again, your hammer is a minion. When Elf's Dryad's Song is playing, resort to using Skeleton Slash as your primary means of dealing damage. Many players either fail to realize this or quickly forget. Commit this to memory! As one television host once said, "Stop the hammering!"


This one really only pertains to those that use the Scepter of the Vampire King weapon, though it is still common for players to be ignorant of it. I've already spoken of this previously, but Cultist Sorcerers who have been mind-controlled (even after the effects have worn off) sometimes do not care about room boundaries. Avoid mind-controlling any Cultist Sorcerers that stand anywhere near room entrances before you enter the room.


(Excerpt from Heroes of the Gauntlet)

This causes a glitch where Cultist Sorcerers may be able to see you in the room even while they are locked outside of it—and if they can see you, they will try to attack you (which can mean by way of a hex). This can be extremely dangerous since it is often very difficult to deal with them while you are trying to engage with the enemies inside the room as well. If you do happen to do this, be sure to kill them before entering the room.

Keep this in mind when using the Siren's Lute relic or Necromancer's weapon, Scepter of the Vampire King.

Note:⠀⠀⠀⠀⠀⠀⠀⠀⠀⠀⠀⠀⠀⠀⠀⠀⠀⠀⠀⠀⠀⠀⠀⠀⠀⠀⠀⠀⠀⠀⠀⠀⠀⠀⠀⠀⠀⠀⠀⠀⠀⠀⠀⠀⠀⠀⠀⠀⠀⠀⠀⠀⠀⠀⠀⠀⠀⠀⠀⠀⠀⠀
To a lesser extent, this also pertains to using your weapon ability just before entering a room. If you leave Skeletal Archers outside of a room, Cultist Sorcerers may attempt to attack them as well. This usually is not as major point of concern since your minions will likely die quickly, but it's something to note.


As with the previous item, this too is exclusive to Scepter of the Vampire King. Usually killing enemies builds towards making a Skull Coin, however, when mind-controlled enemies are killed, it does not. In most cases, this is not something you need to concern yourself with, but when the Skull Coin count is at zero, it is vital that you keep use of Dominate to a minimum. Do what you must to survive, but be aware that using Dominate frivolously can be counterproductive.


⠀⠀⠀⠀⠀⠀⠀⠀⠀⠀⠀⠀Dominate Vs. Tempest Locket
Enemies that have been mind-controlled are not susceptible to tornadoes. When you see someone's tornado in play, avoid needlessly running ahead of it and mind-controlling enemies (any enemies you fail to control will just be blasted away by the tornado anyway, giving your minions no one to fight).

By doing so, you are counteracting the very purpose of the tornado, which is to clear a path by tossing enemies aside. When you mind-control enemies in a tornado's path, you may be creating obstacles that your teammates cannot walk through and their tornado cannot clear.
⠀⤷ Acquiring Soul Power
As we know, Lilith has two ways of gathering Soul Power: killing enemies (including destroying spawners) or Ghostwalking through them. This is usually a good reason to prioritize taking out crowds of weak enemies over targeting a few strong ones when it is practical to do so. The most common method of racking up kills will likely be to use your Skeleton Smash, but know that your minions and relics are also options. With the exception of Tempest Locket, all offensive relics are capable of generating Soul Power.


⠀⠀⠀⠀⠀⠀⠀⠀⠀⠀⠀⠀⠀⠀⠀⠀⠀Allies in the Arts
Merlin the Wizard is one of Lilith's most helpful allies when he's wielding The Hollow Chapters, which contains a spell known as "Vacuum". When Vacuum is used, it gathers surrounding enemies to a central location. This is an opportune moment for Lilith to use Skeleton Smash and gain large amounts of Soul Power.

Summoning stones grant substantial amounts of Soul Power, but you will only receive credit for destroying them if you are the one to deliver the final blow. That said, it is not your team's responsibility to make sure you get enough Soul Power—it is your responsibility. Your teammates have enough things to focus on without making special accommodations for you. If you feel that others are "stealing your kills", focus on placing yourself in better positions and develop better timing for delivering killing strikes.

It is possible to kill with Ghostwalk, but the damage it deals is near insignificant. In exchange for dealing low damage, phasing through enemies is a relatively quick way to build Soul Power. One noteworthy aspect of generating Soul Power via Ghostwalk is that it does not consider the rank of the enemy—meaning, when getting Soul Power through kills, killing large enemies gives more soul power than killing smaller enemies, whereas Ghostwalk makes no such distinction. You can take advantage of this when there is only a small group enemies nearby but you wish to build up your Soul Power. Killing those enemies would only grant so much, but by using Ghostwalk through them a few times you will be able to garner a bit more before they die.


⠀⠀⠀⠀⠀⠀⠀⠀⠀⠀⠀Bloated Mummies are Your Friends
Kill Bloated Mummies when they are near other enemies. When Bloated Mummies are killed, they explode, and any enemies they kill with their explosion will be credited to whomever initially killed the Bloated Mummy.

For Lilith, this means any enemies killed by a Bloated Mummy's explosion will be attributed to her in the form of Soul Power, so long as she was the one to kill the Bloated Mummy. In the animation shown, notice the souls that are gathered to Lilith even though she did not kill those enemies directly. Also, Ghostwalking through a Bloated Mummy is a valid way to kill it.

Note:⠀⠀⠀⠀⠀⠀⠀⠀⠀⠀⠀⠀⠀⠀⠀⠀⠀⠀⠀⠀⠀⠀⠀⠀⠀⠀⠀⠀⠀⠀⠀⠀⠀⠀⠀⠀⠀⠀⠀⠀⠀⠀⠀⠀⠀⠀⠀⠀⠀⠀⠀⠀⠀⠀⠀⠀⠀⠀⠀⠀⠀⠀
For wielders of her weapon Scepter of the Vampire King this is very important to know, especially when you are injured. This is a means of accumulating substantial Soul Power quickly, and acquiring large amounts of Soul Power also means acquiring relatively large amounts of health.

⠀⤷ Animation Cancelling
To review, many of Lilith's abilities can have their animations canceled, allowing you to perform a move then immediately perform a second move before the first one has finished. This pertains to nearly all of her abilities (e.g. Skeleton Slash, Skeleton Smash, Ghostwalk, and even her weapon abilities). With good timing, this can actually look quite seamless, and you can appear to be using two moves (or even three in a particular case) at the exact same time. Let's take a look at an extremely common example of the basic concept of animation cancelling.


In the animation above, it appears as if two moves are happening at once, but in fact, the Skeleton Smash happens first then the Ghostwalk immediately afterwards. I have demonstrated here just how instantaneously a move may be cancelled, however, your timing need not be this strict; you can cancel out of the first move anytime after it has begun.


⠀⠀⠀⠀⠀⠀⠀⠀⠀⠀⠀⠀⠀⠀⠀⠀⠀⠀Hit the Breaks
Ghostwalk can be cancelled at anytime with a weapon ability. Utilize this whenever you find yourself on a collision course with something detrimental and need to come to an abrupt stop. Any weapon is capable of doing this, but you will not be able to utilize this technique if you have no Soul Power (or a potion, though this is a far more expensive and often dangerous way).


Cooldowns Still Exist
Nearly all moves have cooldowns—once you use a move, you will not be able to use it again for a predetermined amount of time. Know that while you can cancel animations, doing so will not negate these cooldowns.

To put this into more practical terms, for example, this means that you would not be able to use Ghostwalk, cancel it with your weapon ability, then cancel that with another Ghostwalk, and so on. Once you use that first instance of Ghostwalk, you will still have to wait the minimal amount of time before being able to use it again, even if you cancelled it.


Here you can see three different things going on at once: Skeleton Smash, a weapon ability (it doesn't matter which one you have equipped), and Ghostwalk. Again, they are not technically happening at the same time; one follows the next, with each animation cancelling the one before it.

The order of these three moves in this particular case is important: Hammer ⟶ Weapon ability ⟶ Ghostwalk. Lilith's standard attacks cannot cancel other animations; standard attacks can only be cancelled by other moves. This is why the hammer (or you could substitute this for the slash) must come first in this sequence. Of course, the Ghostwalk is completely optional as you may not wish to teleport anywhere. You could even swap the last two moves like so: Hammer ⟶ Ghostwalk ⟶ Weapon ability.


⠀⠀⠀⠀⠀⠀⠀⠀⠀⠀⠀⠀⠀⠀⠀⠀⠀⠀Cross-training
If you're familiar with playing Wizard, using Skeletal Smash and cancelling it with her weapon ability is the same action as conjuring a spell with .
⠀⤷ Necrotic Vessel
(Necrotic Vessel is Lilith's weapon with the ability, Summon Skeletal Archers.)

Once you've become acquainted with the basic combat style of Lilith in general, the main concern of using the Necrotic Vessel will naturally be managing your Skeletal Archers: when to use them, where to use them, etc. A key benefit that comes with having Skeletal Archers is the rate at which they can passively generate Soul Power for you. Skeletal Archers can actually be used for many purposes, but defensive methods will be covered in more depth a bit later. For now, let us focus on their more common, offensive uses.

Note:⠀⠀⠀⠀⠀⠀⠀⠀⠀⠀⠀⠀⠀⠀⠀⠀⠀⠀⠀⠀⠀⠀⠀⠀⠀⠀⠀⠀⠀⠀⠀⠀⠀⠀⠀⠀⠀⠀⠀⠀⠀⠀⠀⠀⠀⠀⠀⠀⠀⠀⠀⠀⠀⠀⠀⠀⠀⠀⠀⠀⠀⠀
Skeletal Archers have a lifespan of 20 seconds unless killed.

Building an Army
In combat, a good strategy with Skeletal Archers is to amass an army and maintain it. This is where you're essentially playing a numbers game. The aim here is simply to produce archers at a rate faster than which you lose them, and your archers will often do the rest for you.

To start, you'll need a cleared area to work with in order to build your army, otherwise, your archers are likely to die too quickly and become outnumbered (the Ring of Mirrors relic can be very helpful for clearing out such an area or hold off enemies while you summon your archers). Prime locations for you to begin setting up camp are usually in corners or against walls, since this limits the directions from which they can be approached.


⠀⠀⠀⠀⠀⠀⠀⠀⠀⠀⠀Don't Spread Your Forces Too Thin
Group your Skeletal Archers together when possible, and this will usually make it much harder for your army to be defeated. While enemies are occupied by striking at your front lines, the archers behind those will be protected and left unimpeded for a longer period of time.

Once you've gained control over some ground, continuously spawn new archers in that area as often as you can—don't worry about getting large amounts of Soul Power before spawning them. There are only two types of archers: those that shoot fire arrows and those that do not. Their respective stats do not change. In other words, any normal archer (i.e. non-fire arrow archer) is identical to any other normal archer; you do not generate a "slightly better" version of a normal archer even if you charged up your Soul Power more (until you get full Soul Power, the amount of Soul Power only determines the number of archers—not the quality of them), so get archers out and onto the field quickly where they will be the most beneficial.

Also remember to utilize distance as needed. Enemies tend to initially focus on the target nearest to them; if you manage to place Skeletal Archers far enough from the heat of the battle, they will often be ignored and left to their own devices.

Using Fire Arrow Archers
In principle, the best places to summon your fire arrow archers are areas that are are relatively safe. These areas may be among your already-established standard archers, across gaps that cannot be accessed by most enemies (some rooms require you to use jump pads to enter or exit them), or anywhere you can otherwise defend or is difficult (or unlikely) for enemies to access.


Many of your archers are going to be destroyed while you gain a foothold in building your army, so don't throw away your fire arrow archers when you're just getting started. Focus on building up your forces with normal archers first, then place in fire arrow archers once you've solidified your position.
⠀⠀⠀⤷ Defense
Skeletal Archers can be used defensively just as they can be used offensively. For example, you might seize an opportunity to utilize them as diversions for grabbing the enemy's attention while you slip away from a crowd of large enemies, or effectively have them act as shields to protect you from projectiles and other attacks.

An important thing to note when using Skeletal Archers in a defensive manner is that they spawn behind Lilith by default, so it is usually very important to be aware of which direction your back is facing while summoning archers.


⠀⠀⠀⠀⠀⠀⠀⠀⠀⠀⠀⠀⠀⠀⠀⠀⠀⠀Bait and Ditch
Use Skeletal Archers as bait to gather surrounding enemies (or to hold their attention) to a single location while you step back smash them with your hammer. A good moment to do this is usually when you only have a few souls and aren't currently building an army. If you already have four or five souls, it may be better to make more worthwhile use of them than appointing them to the role of being mere bait.

Fortifying
Probably the most obvious defensive use of Skeletal Archers is to simply place them between yourself and oncoming danger as a sort of barrier, allowing your archers to take hits in your stead. This can be a good way to block projectiles or buy yourself time to deal with small enemies cornering you.


Bear in mind that Skeletal Archers are very weak and can usually be killed in a single strike or two, and in the case of any beam-like attacks (e.g. a Lich's ice beam) or heavy attacks (Orc Juggernaut punches), Skeletal Archers offer very little or no protection.

Stunning
Another efficient use for Skeletal Archers is their ability to stun as they are rising from the ground when you initially summon them. This doesn't harm the enemies, but it does throw them off balance (it's fundamentally the same thing as tagging; it just doesn't deal any damage). When under immediate threat, you can summon archers to stun enemies.


In the example above, if I had not turned my back to the Orc Juggernaut before summoning my archers, they would have been placed on the opposite side, failing to stun the orc and allowing it to hit me.

Pivoting
Instead of changing your face direction before using your weapon ability, you can actually do both of these at the very same time. This is what I call a "pivot", and it is useful for instantly determining your direction when using your weapon ability or even other attacks.


While you cannot technically change your face direction during a Ghostwalk, we know that it is possible to cancel out of a Ghostwalk with a weapon ability, and knowing this means we can also pivot out of a Ghostwalk. No matter which direction you are facing when you use Ghostwalk, you will be able to cancel out of it, using your Skeletal Archers in any direction you please with a pivot.

When moving through corridors and other pathways containing many enemies, one option for safe travel is to Ghostwalk towards walls and use pivots to place archers between you and the nearest enemies. This sandwiches you between a wall on one side and your archers protecting you on the other.


In this diagram, the green icon would be Lilith with the purple arches representing the placement of Skeletal Archers. The trick here is simply to make Lilith face the nearest wall as you press the button to summon your archers out of Ghostwalk.
⠀⤷ Scepter of the Vampire King
(Scepter of the Vampire King is Lilith's weapon with the ability, Dominate.)

Perhaps the most important part of wielding this weapon in particular is being aware of what you should not do. When using this weapon, be absolutely sure that you are well familiar with the forbidden practices laid out earlier in this chapter and have them committed them to memory. Without a firm grasp of these concepts, you can very easily become a huge liability for your team (when using any of Lilith's weapons, but especially this one).

Note:⠀⠀⠀⠀⠀⠀⠀⠀⠀⠀⠀⠀⠀⠀⠀⠀⠀⠀⠀⠀⠀⠀⠀⠀⠀⠀⠀⠀⠀⠀⠀⠀⠀⠀⠀⠀⠀⠀⠀⠀⠀⠀⠀⠀⠀⠀⠀⠀⠀⠀⠀⠀⠀⠀⠀⠀⠀⠀⠀⠀⠀⠀
Mind-controlled enemies cannot be damaged or killed with Skeletal Smash. For these enemies, use Skeletal Slash instead.

Healing
Health-regeneration is tied directly to your Soul Power accumulation and is a fairly slow process. You do not tend to gain extravagant heals at once, but rather accumulate many small heals over time. You may wish to think of it as a reward for taking very little or no damage at all for extended periods of time. Do not make the mistake of assuming this to mean that it is insignificant. On the contrary, being able to heal is a very important trait of this weapon. Some overlook this aspect—some out of woeful underestimation, others out of mere ignorance of its existence. Whatever the reason, if you are someone accustomed to such an oversight, I advise paying it more mind.


⠀⠀⠀⠀⠀⠀⠀⠀⠀⠀⠀⠀⠀⠀⠀⠀⠀⠀Allow for Heals
When your Soul Power is full, you can no longer collect souls, and by extension, heal. Knowing this, it can be advisable to use Dominate (even when there are no enemies nearby) simply to empty out your Soul Power when it is full to allow for heals during your next attacks.

Dominate
Be careful while using Dominate on certain enemies like Orc Juggernauts. Just because an enemy comes under your power while their attack is in progress, this does not mean you are exempt to taking damage from it. Whether you can be hit by an attack is determined when the attack begins.


So in this example, if an Orc Juggernaut begins swinging its club and you use Dominate on the orc partway through the attack, you will still receive damage from that hit if you are in the way. This is why I suggest standing behind large enemies before using Dominate on them, and Ghostwalk is fairly safe way to do that.


⠀⠀⠀⠀⠀⠀⠀⠀⠀⠀⠀Dominate Weakens Tough Enemies
Use Dominate on strong enemies, including Necromancers, to make them easier to kill. This does not technically lower their health, but rather alters how much damage they take from attacks (in lower difficulties, this either makes no difference or makes them actually harder to kill, but in higher difficulties, they become easier to kill). I've gone into greater detail in the first chapter on how difficulty modifiers work, so refer to that at your leisure.


⠀⠀⠀⠀⠀⠀⠀⠀⠀⠀⠀⠀⠀⠀⠀⠀⠀Death Sentence
Mind-controlled enemies work for you, of course, but you can also manipulate other enemies to fight for you as well. Instead of mind-controlling a few small enemies to fight for you, select a single large target to use Dominate on and simply walk away while hordes of smaller enemies take care of the rest.

When you do this, you may find it beneficial to charm as few enemies as possible aside from your selected target. This will decrease the chances of your target receiving assistance from allies and surviving. When the small enemies are done working for you, feel free to crush them for more Soul Power (after all, this trick baits them into clustering up anyway, which works out perfectly for you).


Taking cover among your minions can be one of your primary means of defense. Mind-controlled minions can be used to take hits in your stead, and as an added bonus, Dominate influences enemies all on sides of Lilith. Beware that this will not protect you from strong attacks such as a Lich's ice beam or from area of effect attacks such as a Skeleton Commander's lob shot, but it can be quite an effective tactic for evading lighter attacks and projectiles especially.


For instance, in Lich rooms especially, this is a great way to defeat large amounts of Ghosts while staying practically hidden and relatively safe. Because Ghosts dissipate upon contact, all you need to do is to get them to collide with some of your minions and they will essentially defeat themselves, and since Ghosts will target you and your minions, they'll inadvertently be seeking to bring your plans to fruition for you.

Just remember that if you used a low number of souls to mind-control your enemies, they will only be under its effects for a short while, so be prepared to escape when necessary. Even when you must evacuate, finding a new crowd to hide among will not necessarily be difficult.


⠀⠀⠀⠀⠀⠀⠀⠀⠀⠀⠀⠀⠀⠀⠀⠀⠀Chain Charming
Lilith can safely travel through mobs through repeated use of Ghostwalk and Dominate. Know that you will need to Ghostwalk through about four enemies (ones that are already influenced still count) to acquire the minimum amount of viable Soul Power.

If needed, wait as long as you can before teleporting to the next group. This gives crowds as much time as possible to compress, ensuring more Soul Power (and therefore your safety) as you travel.


As tempting as it may be, I actually recommend against mind-controlling highly dense groups of small enemies except when you are using them for protection of yourself and your teammates. If you are simply mind-controlling hordes of weak enemies for the sake of having a fighting force, I suggest killing them instead. Ridding the field of those enemies and gaining the Soul Power and heals you would get from killing them instead almost always outweighs what little damage they would deal on your behalf. If a fighting force is what you want, try mind-controlling strong enemies instead, as weak enemies will end up fighting them anyway and the strong enemies will be easier to kill.
⠀⤷ Potions
Dark Hunger can be thought of as a second chance at life. If you're low on health, instead of dying and reviving by spending a Skull Coin, just use a potion and stay in the game—allowing someone else to make use of that same Skull Coin later—not to mention that you will also be slowing and weakening enemies around you.

Anytime your health is in a critical state (i.e. your main health bar is flashing and a secondary health bar remains visible under your character as a visual cue), this is almost always a justifiable reason to use a potion, provided that there are enemies nearby to heal off of and you can do it safely. You don't necessarily have to wait until reaching such a perilous state before using a potion either (especially if the situation is tense and you're likely to take damage very quickly), but if you arrive at it regardless, look for an opportunity.


Dark Hunger does not grant you immunity, as some initially believe—you can still die while using it. However, the more enemies you surround yourself with, the faster you will heal. You may take damage, but in a packed horde, you'll regain that health extremely quickly. This will also slow enemies and increase the chances of survival for any teammates behind you.

Note:⠀⠀⠀⠀⠀⠀⠀⠀⠀⠀⠀⠀⠀⠀⠀⠀⠀⠀⠀⠀⠀⠀⠀⠀⠀⠀⠀⠀⠀⠀⠀⠀⠀⠀⠀⠀⠀⠀⠀⠀⠀⠀⠀⠀⠀⠀⠀⠀⠀⠀⠀⠀⠀⠀⠀⠀⠀⠀⠀⠀⠀⠀
Coupling Dark Hunger with Dominate, you can Ghostwalk into a group of enemies, use Dominate and activate Dark Hunger to safely heal without the surrounding enemies attacking you.
Caution:⠀⠀⠀⠀⠀⠀⠀⠀⠀⠀⠀⠀⠀⠀⠀⠀⠀⠀⠀⠀⠀⠀⠀⠀⠀⠀⠀⠀⠀⠀⠀⠀⠀⠀⠀⠀⠀⠀⠀⠀⠀⠀⠀⠀⠀⠀⠀⠀⠀⠀⠀⠀⠀⠀⠀⠀⠀⠀⠀⠀
Boots of Ranadam shortens the effect Dark Hunger when used together.

I said it before, but I will remind you here as well, there is brief moment where Lilith is vulnerable during the initial activation of Dark Hunger. Begin using Dark Hunger before approaching enemies you intend to heal off of. This will prevent you from taking damage and dying from while activating your potion. In tense situations, you can cancel out of this startup animation by using your weapon ability immediately after activating your potion. Be cautious when nearing the end of Dark Hunger though; you wouldn't want to take damage only to have the ability wear off before healing it back.


⠀⠀⠀⠀⠀⠀⠀⠀⠀⠀⠀⠀⠀⠀⠀⠀⠀⠀⠀Free Pass
Use a potion just before entering the crowd then Ghostwalk your way through. You don't have to wait until you're on the brink of death before using Dark Hunger (in this case, you could even use it when at full health). When you need to make it through a dense crowd or a path so riddled with enemies that you know you wouldn't be able to make it through without taking significant damage or even dying, this is a good opportunity, regardless of the current state of your health.

Potion Value
I agree with many others that Lilith's potion selections are probably among the worst when compared to those of other heroes, however, I also believe that most people (including Necromancer players themselves) don't give Dark Hunger nearly enough credit. It's not a bad potion; it's actually quite decent, in fact.

What I typically see from Lilith players, even veterans, is them ignoring potions and seemingly regarding them as almost worthless—almost never picking up potions nor enough gold to buy them. Even when these players have potions, they rarely use them. If this is applicable to you, I understand why you might think this, but I advise against harboring this mindset. Dark Hunger is not worthless by any means. Of course, I am aware of prioritizing potions to certain members of your team, but if high-priority abilities are already stocked with a few potions, don't feel shy about picking up a couple yourself, and more importantly, use them.


⠀⠀⠀⠀⠀⠀⠀⠀⠀⠀⠀⠀⠀⠀⠀⠀⠀⠀Ghost Busting
Dark Hunger is a very useful way to defeat large numbers of Ghosts. Any Ghosts that encounter Dark Hunger's perimeter will be eradicated immediately.
Closing
Practice
Although it probably goes without saying, practice anything you care to improve at. You may have learned something here, but it will take time to build habits around that knowledge, break old habits you'd like to be rid of, and to develop a certain feel for things such as timing and assessing situations and making good judgement calls.

Knowing all the tricks in the world doesn't make you skillful—it just makes you knowledgeable. Being able to apply what you know when you need it is what makes you skillful, which is the one part I can't teach you with words and pictures. That only comes with practice and discipline. It's on you to develop your own style and habits.

Play Other Characters
One thing that I tell people who are trying to learn to play the character of their choice is to play other characters once you've become comfortable with that one. There's a couple of reasons for doing this. Playing other characters allows players besides yourself to use that character, which can be beneficial to you. This can give you further insight and new ideas about how to play that character. Speaking from personal experience, most of what I have learned has come to me by watching others play. You can also apply several little things you learn from one character to other characters—things you might not have thought of otherwise. I've also done that several times as well.

I've seen many players who play exclusively one character. If "their character" is taken, they just don't play, and as a consequence, they tend to plateau their own improvement since under those circumstances, you'd rarely come across any ideas that weren't already your own. When I think of the players that I would count among the best I've ever seen play the game, they all play multiple characters (even if they have a favorite they usually play—they can play at least two other characters well).

Though there are some, very few of the techniques or combinations I use (across all characters) have been invented by me. The vast majority of them I either picked up by watching others or they're a derivative of something I got from someone else. You may come up with an idea that mostly belongs to you, but maybe you needed to get that first piece from someone else.

“That's kind of you.”
Thanks for visiting. I hope you found something useful here.

⠀⠀⠀⠀⠀⠀⠀⠀⠀⠀⠀⠀⠀⠀⠀⠀⠀⠀⠀⠀⠀⠀⠀⠀⠀⠀⠀⠀⠀⠀⠀Good luck!

⬅ Previous Chapter⠀⠀⠀⠀⠀⠀⠀⠀⠀⠀⠀⠀⠀⠀⠀⠀⠀⠀⠀⠀⠀⠀⠀First Chapter ➡
Questor the Elf⠀⠀⠀⠀⠀⠀⠀⠀⠀⠀⠀⠀⠀⠀⠀⠀⠀⠀⠀⠀⠀⠀⠀⠀⠀⠀⠀⠀⠀⠀⠀⠀⠀⠀⠀⠀⠀⠀⠀⠀⠀⠀⠀Heroes of the Gauntlet

17 Comments
DryRubberChicken 8 May @ 1:39pm 
This is a good one. Guidance, not demands. Encouraging people to develop their own style from a range of possibilities. This is how it is best done in terms of both communication strategy and in terms of like...it's a video game and is here to have fun and explore with.
Tiny & Edible 14 Mar @ 3:20pm 
I much prefer the weapon that lets you summon ghosts instead of skeletons. The strong attack turns from a skeleton smash to a orb projectile that can snipe enemies and has a small AOE, making it very spammable. And the ghosts? Oh boy, when you get to full summon power, those kamikaze phantoms can REALLY help you out! Just make sure you take out those pesky skeleton generals first to fully utilize their power.
Lein  [author] 22 Mar, 2021 @ 7:27am 
It has checkpoints but no arbitrary saves. Red portals mean you've already unlocked the area they lead to. So for example, first time you play Endless, floor 1's portal won't be red. If you work your way up to to floor 19, you'll unlock a portal. That means the next time you're on floor 1, you'll see a red portal. If you enter it, it'll take you to floor 19. Checkpoints are every 18 floors.

For more details on how portals work exactly, check out the "Portals" section under Fundamentals → Endless in my other guide.
https://test-steamproxy.haloskins.io/sharedfiles/filedetails/?id=1794914137
Nightbringer 22 Mar, 2021 @ 7:16am 
Thank you. Btw: What are those red portals or rather when can I unlock them? I thought that Endless mode did not had any 'save' function.
Lein  [author] 22 Mar, 2021 @ 7:11am 
If you're interested, I made a live commentary playing through a high portal solo. I made it to help a friend to explain my thought process while playing and address a lot of the same concerns you're mentioning. It's Thor and not Lilith, but a lot of the information is universal.
https://www.youtube.com/watch?v=1kFKsdkUKLM
Lein  [author] 22 Mar, 2021 @ 7:11am 
I wouldn't say "supposed to". The whole "Do I stay and fight, or do I push through?" is one of the bigger points of contention in the community. Many people feel strongly one way or the other. Personally, I find staying behind to fight every single enemy to be mind-numbingly boring. It's like grinding a rock with a nail filer until one of them is dust—yeah, I can do it if I'm willing to spend the time, but it's not a challenge nor fun. I already know I'm stronger than a handful of lowly mummies. I want to know if even the biggest crowd is powerless to stop me from reaching the goal (next floor). Can I do it without dying? Without damage? No damage and quickly? What about with other characters or weapons?

Like I said, that's me. There's no appeal to game for me otherwise. I'd rather see who'd win between a lion and a limp zebra. lol Granted, I've worked up to this point with thousands of hours. For players still learning the ropes, it makes sense and you have to start somewhere.
Nightbringer 21 Mar, 2021 @ 11:41pm 
Yes, I play below endless 37 level. You seem to play different, for example in your endless mode you run through hordes of enemies rather than fighting them. Is it how you are supposed to play? How I'm supposed to deal with those hordes of enemies myself when I'm surrounded and locked in a room? I often find that there are too few potions (when playing co-op at least). Doesn't this make wave clearing abilities a necessity for your hero? Does game scales with 1-4 players or it is always best to go with 4 players?
Lein  [author] 21 Mar, 2021 @ 5:08pm 
Play Endless mode on floors no lower than 37. Colosseum and Campaign even on "Hard" is incredibly easy for advanced players. Unless you're playing on 37+, it's really difficult to grasp the full scope of relative gear value because the stakes aren't high enough in lower the difficulties to really punish "low entry/low ceiling" gear. When crowds get huge this potion becomes very powerful and you're nearly invincible. Lower difficulties don't provide the sheer number of enemies required to make that potion reach its potential.

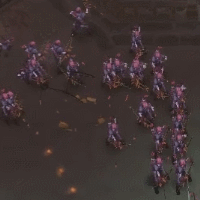
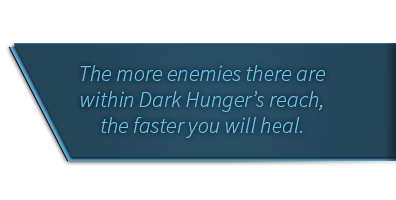
Watch this video to see the type of chaos I'm referring to. Unfortunately, I don't think I have any clips of me actually using the potion, but the Lilith clips are good places to use them if you can't get by without them. There are definitely times where the crowds are so dense that there's no way to get past without that potion (or spend a lot of time).
https://www.youtube.com/watch?v=W_I-qf050cU
Lein  [author] 21 Mar, 2021 @ 5:08pm 
As for the guides, I still intend to finish them eventually (and fix what Steam has broken). I have several open projects, but there's only one of me in my life to get everything done. Unfortunately, the sheer amount of time and work I've put into this community (much more than just these guides) vs the payoff when compared to other projects I spend precious limited free time on makes this a low priority right now. Rest assured it is still on my list, and I appreciate the compliment, so thanks.
Nightbringer 21 Mar, 2021 @ 9:23am 
I'm also not sure for what mode this guide is made for. I had played Gauntled on normal campaign, endless mode and colosseum. In neither of them Dark Hunger for example was anything more than a trash spell. It requires potion to use vs just free resurrection. It requires activation time which can get you killed. It also does not make you immune to death which means that you can just die anyways. It also is near useless in anything other than a misplay when you are surrounded as its range is in a dead zone of necromancer where you never want to be in a first place. Health drain itself is not reliable as there is rarely enough mobs around and you often just can get hit anyways, leaving you with same amount of less health. Combine this with non existent health pool of most Gauntlet heroes and you get just really bad ability to use.