Gauntlet™

Gauntlet™

130 ratings
Thyra the Valkyrie
By Lein
The purpose of this guide is not to tell you how you should play, but rather to introduce you to possibilities, to teach you to recognize certain patterns that can be taken advantage of, and to equip you with knowledge to further develop your own way of playing. I will be giving advice, but as it should already go without saying, you are, of course, free to dismiss whatever you'd like.


This series is intended to provide exhaustive and in-depth insight for playing characters at a high level and to reveal nuances that may be understood by only a few top players but are rarely discussed, if at all. This is not a general overview of any character's equipment.

It is an amalgamation of things I have learned through many hours of studying other players, receiving advice from mentors, and of course, much trial and error, practice and discovery. I hope to help others come to learn what I know without them having to spend any unnecessary hours pursuing it. This is not to say, however, that much practice will not be required on your part to reach proficiency—it most certainly will—but I hope to demystify any secrets I can and to give you a substantial advantage in your journey nonetheless.

I have also taken the liberty to coin a few terms for the purpose of describing certain phenomena, patterns, and series of moves (whether I invented them or not) in memorable and succinct ways as a means of referencing them more easily. In the case of attacks or moves that have no known official names, I will be assigning names to them for the same reason. Feel free to think of these things in your own way if that helps.


3
2
7
2
   
Award
Favorite
Favorited
Unfavorite
Thyra the Valkyrie is the synthesis of speed coupled with defense and where other heroes may be required to attack from a distance or retreat, she can hold her ground and force enemies back.

Thyra is an aggressive fighter in her own right. Though her defensive capabilities are alluring to those too timid to do much other than hide behind her shield indefinitely when in difficult circumstances, these same defenses can become a crutch. I've found that Thyra is better suited to confident and ambitious play. Simply retreating behind her shield and little else in the face of danger is, ironically, perhaps the most surefire way to reach your eventual demise. If you are one of the players I speak of, worry not for we are to change all of that for the better here and now.

While some people (perhaps even most) might consider Warrior or Wizard to be the most difficult character to master, I've personally attributed that honor to Thyra. That said, I've come to regard her as one of the most enjoyable heroes to play in a group and think of her as arguably the most team-oriented of the cast if not also most underrated.

This chapter references material from Heroes of the Gauntlet. It is highly recommended that you read the fundamentals in that chapter either prior to or alongside Thyra the Valkyrie.


Attacks
To start, we'll go over the basic abilities that Thyra has at her disposal. Later, we will start to see how these can be linked together in more useful ways.


Although basic, it's a very quick way to deal minor damage or stun light enemies to disrupt their attacks, which will come in handy for a few situations that we'll explore later. With repeated sequential use, Thyra will chain various types of slashes together into a string of attacks.


Spear Thrust is a powerful attack that can stun heavy enemy units and instantly slay all lesser foes in its path. It does have a moment of vulnerability when starting up and when recovering, so be careful where you use it. Later we will learn how to improve the versatility of this attack and circumvent some of its disadvantages.


The Valkyrie's signature defense move is, of course, the Shield Block. It can be used to oppose any force or explosion. You can also take a more proactive approach, rather than a purely defensive one, to assertively push your enemies back or keep them where you'd like. This may be used to keep an area clear while teammates pass behind you, for example.


Extreme Prejudice is a sweeping axe move that attacks and stuns enemies surrounding Thyra, buying her just enough time to safely use Spear Thrust immediately afterwards. It grants her invincibility for the duration of the attack and can be used to avoid Cultist Sorcerers' hexes. It is the weapon ability of the weapon, Final Justice, and therefore operates on a cooldown.


Slash Attack Sequence
Continually using the Slash Attack will cause Thyra to use a series of seven attacks—two of which are heavy attacks that can stun large enemies and deal significant damage.


The two attacks I mention occur at the fourth and seventh attacks in the series (they're the ones with the white blur effects). If you know when these slashes will happen, you can intentionally direct them at larger targets while spending the lighter attack on weaker enemies, or do anything of the like. You might think of the full set of slashes in two groups: the first group containing of 4 slashes, then the second containing 3 slashes. So, instead of counting the slashes like 1-2-3-[4]-5-6-[7], you could alternatively use, 1-2-3-[4]-1-2-[3], with the numbers in brackets indicating the heavy slashes. The timing of these particular slashes may take a while to get used to, especially if you continue into additional sequences (e.g. 1-2-3-[4]-1-2-[3]-1-2-3-[4]-etc.).

Note:⠀⠀⠀⠀⠀⠀⠀⠀⠀⠀⠀⠀⠀⠀⠀⠀⠀⠀⠀⠀⠀⠀⠀⠀⠀⠀⠀⠀⠀⠀⠀⠀⠀⠀⠀⠀⠀⠀⠀⠀⠀⠀⠀⠀⠀⠀⠀⠀⠀⠀⠀⠀⠀⠀⠀⠀⠀⠀⠀⠀⠀⠀
By repeating this sequence you will be able to keep a single heavy enemy unit stunned indefinitely. As it so happens, the the amount of time an enemy remains stunned is enough to reach the next heavy slash in the sequence.
Loadout
For this section, I will choose some equipment options that I recommend and explain why I recommend them. Be aware that I do not intend to cover all weapons, relics, talismans, abilities, etc. I will be limiting loadout topics to what I believe to be the strongest and/or most popular options as they relate to high-level Endless mode play unless I feel there is something noteworthy to say otherwise.
⠀⤷ Weapons


Extreme Prejudice


Weapon: Final Justice

Final Justice is a great weapon and is set apart from the rest of Thyra's arsenal as her virtually undisputed best. It's the safest of her weapon abilities to travel with—meaning that when you are traversing through crowds of enemies, Extreme Prejudice is of greater assistance than any of her other specials since it can clear enemies around you in tight areas or allow you to safely chain to Spear Thrusts together by using this special between them.
⠀⤷ Talismans


Divine Aegis


Talisman: Guardian Symbol

Divine Aegis protects all heroes from practically all dangers except Death Incarnate for a period of time and heals them slightly. Not only is Divine Aegis Thyra's best potion for Endless, but it is one of the three best potions in the entire game, along with Warrior's More of Thor and Elf's Dryad's Song. A well-used Divine Aegis can save numerous lives at once (or significant damage), and by extension, potentially several Skull Coins.
⠀⤷ Relics


Boots of Ranadam


The Boots of Ranadam make you faster and recharge your cooldowns slightly quicker but also slow enemies around you. When playing lava floors in Endless mode, Boots of Ranadam can be extremely helpful for getting through large crowds (often occurring at the end of the floor). Just remember that you can only progress through a floor as fast as the rest of your team, but it can be a solid choice for solo play.

It's not my preferred or recommended relic when on a team. To be candid, I find there's little-to-nothing it can accomplish that can't also be done so at least equally as well (if not better) with Tempest Locket or skills that we will be reviewing in this chapter. Still, it is a solid choice nonetheless and has its own benefits for the individual.


Tempest Locket


Tempest Locket is great for clearing large gatherings of light enemy units and momentarily stunning heavy units while dealing slight damage to all.

I personally find Tempest Locket to be an overall more useful relic for Thyra than Boots of Ranadam when considering teamwork especially. While Boots of Ranadam can get you through crowds easily, Tempest Locket is good at helping your entire team get through crowds, which in turn can further help your cause (not to mention it can disrupt Cultist Sorcerers locked outside of rooms that are trying to kill you). Plus, a well-thrown tornado can have a longer-lasting effect than Boots of Ranadam.

Using a Tempest Locket can also be a really nice way to break up intense battles to give your team more room to breathe.
Note:⠀⠀⠀⠀⠀⠀⠀⠀⠀⠀⠀⠀⠀⠀⠀⠀⠀⠀⠀⠀⠀⠀⠀⠀⠀⠀⠀⠀⠀⠀⠀⠀⠀⠀⠀⠀⠀⠀⠀⠀⠀⠀⠀⠀⠀⠀⠀⠀⠀⠀⠀⠀⠀⠀⠀⠀⠀⠀⠀⠀⠀⠀
Cracked walls (Campaign only) can be broken by Tempest Locket in most situations.
Techniques & Strategies
Like Warrior, she too is a melee fighter but exchanges some strength and vitality for speed and resistance. Much of her mobility and fighting style, however, is centered around her use of the spear and shield (both of which we will observe in much greater detail later) and she is less apt to use brute force to power her way through hordes like Warrior or Necromancer might. Instead, our methods must be a bit more methodical and designed.

Destroying Summoning Stones (Sword vs Spear)
A question I've gotten a few time from beginner Thyra players is whether it is better to destroy summoning stones with sword slashes or repeated spear thrusts. The difference between these methods in regard to time is quite negligible (assuming you continue the slash sequence long enough to activate the heavy slashes)—so much so that I wouldn't concern myself with speed. Instead I advise focusing on safety.

For this reason, I generally suggest using sword slashes. The main problem with using repeated spear thrusts is that it leaves you vulnerable to attack while Thyra regains her balance and it limits your options. Sword slashes, on the other hand, give you more control and allow you to adapt to other situations quickly. For instance, after any slash you might transition into a Shield Block or simply redirect your slashes to attack another target.

Attacking a summoning stone with the Spear Thrust can be the better option in more particular situations. For example, if you need to go through some enemies in order to approach the summoning stone, you could spear through them (also hitting the stone at the end of the attack) then use Extreme Prejudice to clear any residual threats. Sometimes there's too many enemies surround the stone for you to stand next to it and whale on it. In such cases, you might kite enemies away and spear through them to get to the stone.

Traversing
One of the more prevalent struggles for beginner Thyra players is travelling through crowds and keeping up with a team (especially in Endless). The natural inclination is often to hold up the shield continuously and slowly slide across a wall. The problem here is that you will often and easily find yourself progressing very slowly, falling behind, getting stuck and killed if this is the full extent of your intentions.


Recall the first chapter and take advantage of opportunities to weave through crowds. This is critical as it's what a lot of traveling boils down to as a Thyra player: finding gaps and slipping between enemies until you reach a dead end (i.e. any place where you've become trapped, either by being surrounded or otherwise). When you reach a dead end, that is the time to spend a resource—meaning anything with a cooldown or fueled by a potion. For instance, Extreme Prejudice can clear the immediate area and buy you enough time to dash to another gap. Be also attentive to teammates for they can create gaps to be taken advantage of (especially if there's a powerful Wizard playing with you).

When the crowds are too dense to slip through, that's the perfect time to use a tornado or potion (generally saving the potion for when the relic is not enough).


⠀⠀⠀⠀⠀⠀⠀⠀⠀⠀⠀⠀⠀⠀⠀⠀⠀⠀Axe and Spear
Your special can be used to safely link two Spear Thrusts together. Reserve your more treacherous traveling endeavors for when you have your special off cooldown. Use this to cross the width of a busy path or force your way through a tight crowd.

⠀⤷ Shield Block
When Thyra blocks an attack, she bashes whatever is immediately in front of her with her shield. Although this will cause no damage to whomever is hit, make no mistake, this is not a purely defensive or passive maneuver; it is also an aggressive one. When her shield is attacked, Thyra will retaliate by pushing back all enemies directly in front of her, regardless of whether or not they initiated the attack. You might think of this as a hidden ability that simply needs to be triggered.


There are many ways in which this is useful, but to give an immediate hypothetical, imagine that there is a Cultist Sorcerer casting a hex and you wish to interrupt him. You may find yourself among many other enemies that you are blocking and if you were to let your shield down they would attack you the moment you tried to stun the Cultist Sorcerer. In this case, keep your shield up and push back the crowd towards the Cultist Sorcerer. When an enemy strikes Thyra's shield, not only will that enemy be pushed away but also the Cultist Sorcerer, thus effectively interrupting his hex.

This is also an excellent way to move enemies out of your way. As soon as that bash happens it is your best opportunity to follow up. You will have at least a tiny amount of time to make your next move such as slashing with your sword, repositioning, or running away. (I don't advise using a Spear Thrust as a direct follow up to a shield bash unless it's clearly safe to do so; the Spear Thrust's startup takes a while and you are likely to be hit by the next enemy that approaches. You can precede it with a slash, though, as we will soon see.)

Note:⠀⠀⠀⠀⠀⠀⠀⠀⠀⠀⠀⠀⠀⠀⠀⠀⠀⠀⠀⠀⠀⠀⠀⠀⠀⠀⠀⠀⠀⠀⠀⠀⠀⠀⠀⠀⠀⠀⠀⠀⠀⠀⠀⠀⠀⠀⠀⠀⠀⠀⠀⠀⠀⠀⠀⠀⠀⠀⠀⠀⠀⠀
Explosions and other area of effect attacks can be blocked by focusing the block towards the center of the explosion. Beware of chilling effects cast by Necromancers (marked with large blue circles on the ground) as you will still experience the slow-down effect even if you do not take damage. It is generally best to avoid blue circles altogether rather than blocking them.

Escaping Corners
There is a scenario that is commonly mistaken as an impasse: the corner. A lot of people seem to think that when Thyra is pinned in a corner she must rely on external aid or a potion to escape. This is not so. In fact, this is practically never the case—there is almost always a way out.


As you can see on the right, it is possible to escape such a scenario (unscathed even), so let us examine how this is done. Take a look at the animation on the left once more and note the certain pulsating rhythm of the enemies being pushed away by Thyra's shield. When one wave bounces off her shield the next wave runs up to follow suit—this rhythm is the key to your escape. When you have your shield up, anticipate when an enemy is about to strike. This will give you as much preparation time as possible and will help you with your timing. Immediately after a shield bash happens is your time to act. In other instances (when not pinned in a corner) this can be the opportune time to walk away from a crowd if you so choose.


⠀⠀⠀⠀⠀⠀⠀⠀⠀⠀⠀⠀⠀⠀⠀⠀⠀⠀⠀ Stun First
If enemies are too close to you when you wish to use a Spear Thrust, tag them with a slash first. This will keep them stunned long enough for you to safely dash. Of course, not only does this work for spearing enemies after you've stunned them but also for when you wish to dash away from them. If you revisit the animation above (on the right) you can see that I did not go for the Spear Thrust first to escape the corner. I used a slash then the spear.


There may be some exceptional situations where time is of the essence, but I generally recommend not attempting an escape while your special is on cooldown. If you're in a corner, hold your position until the cooldown finishes if you are likely to need it as you escape.

Shield Tagging
Enemies being repelled by a Shield Block is not necessarily an advantage as sometimes you may wish to maximize the number of enemies within your killing range. You can prevent enemies from activating Thyra's shield bash by stunning them in place repeatedly. It's a technique I call shield tagging—a name I've derived from the fact that it combines tagging and the Shield Block.


If we were were to simply repeatedly use the slash attack (without using Shield Block) Thyra would constantly move forward with each slash (increasing vulnerability in many cases). To counteract this, we need to move backwards to "undo" the forward momentum the slash gave us. Unfortunately, the problem we then face is: if we walk back to where we started... we then have our back toward the enemy and can't slash them anymore without turning around yet again.

This is where the Shield Block can help us. When Shield Block is activated, the directions in which Thyra moves and faces are controlled independently of each other (also known as "strafing"). Use the Shield Block to control the direction of the slashes while walking backwards to counteract the slash momentum.

Note:⠀⠀⠀⠀⠀⠀⠀⠀⠀⠀⠀⠀⠀⠀⠀⠀⠀⠀⠀⠀⠀⠀⠀⠀⠀⠀⠀⠀⠀⠀⠀⠀⠀⠀⠀⠀⠀⠀⠀⠀⠀⠀⠀⠀⠀⠀⠀⠀⠀⠀⠀⠀⠀⠀⠀⠀⠀⠀⠀⠀⠀⠀
Due to the necessary inputs, this can be an odd thing to pull off as a gamepad user. If it's of any help to know how I personally do this (being a gamepad player myself) I control the left stick () with my left thumb, right stick () with my right thumb, and raise my right index finger to perform the slashes (). It's definitely a useful technique to have in your repertoire, but you can still be an excellent Valkyrie player without implementing it into your style if you find it too awkward to perform.
⠀⤷ Spear Thrust
Thyra's Spear Thrust is excellent not just for attacking but also mobility. Many play styles center around the employment of Spear Thrust's versatility.

Shield Canceling
A default Spear Thrust (left side of the split-screen animation below) has a slight delay at the end, during which you will be largely vulnerable as your options are greatly limited by the fact that you will be unable to move or attack. You may, however, use a Shield Block.


That said, this delay can be circumvented by canceling it with a Shield Block as soon as you are able (right). Of course, you may continue to block with the shield for as long as you wish, but if regaining your mobility is your concern, simply release the Shield Block immediately after it has canceled the delay (as shown on the right). Begin holding down the Shield Block before the Spear Thrust comes to an end and you will automatically cancel the delay as soon as possible.

This is a fundamental element to high-level play as Thyra, regardless of your style. Using this technique is necessary to survive many tense situations. Reclaiming your mobility will very often mean the difference between life and death when attempting to escape enemies' attacks.


⠀⠀⠀⠀⠀⠀⠀⠀⠀⠀⠀⠀⠀⠀⠀⠀⠀Don't Overcommit
By utilizing good shield cancelling, you can have enough time to walk away unscathed after using Spear Thrust into enemies. After a shield cancel walk away from the nearest threat. To best ensure you have an escape route, dash into the edge of a pack—not the middle of one (unless you're prepared to use your special immediately after, for example).


Wall Canceling
If you've played as Thyra for an extended period of time before, you may have noticed that using Spear Thrust causes to her to suffer a moment of immobility and vulnerability when hitting a wall. What you may not have discovered is that you can bypass this unfortunate element with ease.


To prevent Thyra from becoming stunned after using Spear Thrust into a wall, hold down the Shield Block button before using Spear Thrust. Be sure to note that you must already be holding down the Shield Block button while you hit the Spear Thrust button. If you let go of the Shield Block button before hitting the Spear Thrust button, this technique will not work (you can, however, let go of the Shield Block button during the duration of the Spear Thrust, so long as it was held down when the Spear Thrust first began).


⠀⠀⠀⠀⠀⠀⠀⠀⠀⠀⠀⠀⠀⠀⠀⠀⠀Piercing Enemies
By using this technique, not only only will you prevent yourself from crashing into walls, but you can pass through enemies that you would otherwise collide with (this includes the three mini-bosses: Lich, Spider Queen, and Demon Horror).


You don't have to hold down the Shield Block button for as long as I did in the animation for observational purposes. Holding down the Shield Block button for even a single frame prior to using Spear Thrust would be adequate. In fact, with good timing, you can make it look quite seamless and make it appear as though you were never using Shield Block in the first place.

Shield Canceling + Wall Cancelling
We've now been over two techniques that involve using Thyra's Shield Block with her Spear Thrust. We can combine them into a single fluid motion. Instead of wall cancelling with Shield Block then letting go of it for the duration of the Spear Thrust, only to then use Shield Block once again to shield cancel, you can simply hold down the Shield Block once, Spear Thrust, then let go of the Shield Block button at the end to shield cancel.

Note:⠀⠀⠀⠀⠀⠀⠀⠀⠀⠀⠀⠀⠀⠀⠀⠀⠀⠀⠀⠀⠀⠀⠀⠀⠀⠀⠀⠀⠀⠀⠀⠀⠀⠀⠀⠀⠀⠀⠀⠀⠀⠀⠀⠀⠀⠀⠀⠀⠀⠀⠀⠀⠀⠀⠀⠀⠀⠀⠀⠀⠀⠀
Gamepad players, remember that right trigger () is an alternative way to use Shield Block.

By combining shield cancelling with wall cancelling, you can even use the repeated use of Spear Thrust to move at a pace faster than that of running, which can be useful for breaking away from crowds or catching up to your team.

Note:⠀⠀⠀⠀⠀⠀⠀⠀⠀⠀⠀⠀⠀⠀⠀⠀⠀⠀⠀⠀⠀⠀⠀⠀⠀⠀⠀⠀⠀⠀⠀⠀⠀⠀⠀⠀⠀⠀⠀⠀⠀⠀⠀⠀⠀⠀⠀⠀⠀⠀⠀⠀⠀⠀⠀⠀⠀⠀⠀⠀⠀⠀
Spear Thrust is only faster than running if you shield cancel, otherwise, they're about the same pace (the wall cancelling part is just so you don't get stuck on walls as you're zipping about with your spear).

⠀⠀⠀⠀⠀⠀⠀⠀⠀⠀⠀⠀⠀⠀⠀⠀⠀⠀⠀Last Resort
Your Spear Thrust provides invincibility that can nullify even Cultist Sorcerer hexes. This is one of the hardest hex dodges to perform in the game. You may never use this in practical application, but know that it is possible if you have no alternatives (a sort of "Hail Mary" if you will).

⠀⠀⠀⤷ Safety Circle
There's an imaginary circle that surrounds Thyra at all times. Because the Spear Thrust is not activated instantly, there is a limit to how close enemies can be to Thyra before it becomes unsafe for her to use Spear Thrust without taking damage. Likewise, it can become impossible to block all threats with your shield if approached from various sides simultaneously. If you attempt to use Spear Thrust while enemies are within this circle, you will take damage which may lead to you becoming stun locked and dying. Learning the exact size of this circle and knowing what exactly you can get away with will take time and practice.


⠀⠀⠀⠀⠀⠀⠀⠀⠀Imagine the green icon as you playing Thyra and the skulls are enemies.

If enemies are within this circle, your options become limited and using Spear Thrust here will usually mean taking damage unless the enemies otherwise cannot harm you (e.g. they're stunned, Dryad's Song is activated, etc.). Many who find themselves in this predicament often do so because of a lack of weaving or otherwise staying mobilized thereby allowing enemies to close in on them quickly (though this is not always the reason). In an open field you may wish to intentionally place yourself in this situation by weaving and kiting within a small area in order to maximize the amount of enemies to be killed by your special. If you're here and your special is on cooldown, and your relic cannot save you, you will likely need to resort to a potion.


⠀⠀⠀⠀⠀⠀⠀⠀⠀⠀⠀⠀⠀⠀⠀⠀Don't Dash, Just Run
Resist any urge to use Spear Thrust when Death Incarnate's threat is imminent and within your circle. Simply run away and only consider using the Spear Thrust after putting sufficient distance between Death and yourself.

⠀⤷ Potions
As the Valkyrie of a team, you will be charged with protecting the lives of your comrades in the most dangerous of situations. What makes Divine Aegis so incredibly powerful is the fact that a single potion can save three or sometimes even four lives—that's three teammates that can continue to help you complete the task at hand with no Skull Coins spent (and let's not forget the fact that you'll be healing them slightly too).


⠀⠀⠀⠀⠀⠀⠀⠀⠀⠀⠀⠀⠀⠀ Stock Up for Lava Floors
Lava floors are where the demand for Divine Aegis potions is highest. I recommend having at least three potions (ideally five and enough gold to buy even more) when entering lava floors. Out of the six lava levels, the last three will be the most dangerous, so you'll have an a few floors to prepare if you don't have enough.

A good textbook use of this potion is warding against a Cultist Sorcerer's hex. Not only is this an excellent time to use a potion, but it is also makes for a good case study for our purposes here. Let's look at why it's a good time to use a potion and see what other situations we can apply the principle to.


⠀⠀⠀⠀⠀⠀⠀⠀⠀⠀⠀⠀⠀⠀⠀⠀⠀Wait Until Needed
When protecting your team from the hex of a Cultist Sorcerer, wait as long as you reasonably can before using a potion to protect them. This gives the team as much time as possible to deal with the threat without having to resort to a potion. That said, if there are multiple imminent threats regardless, it may be wise to use it earlier whether the hex is stopped or not.


Think about what a Cultist Sorcerer's hex fundamentally represents. It represents a substantial threat to several lives simultaneously since it can potentially kill an entire team (or severely damage its members). So to get a good baseline for when an appropriate time to use a potion would be, look for situations that are fundamentally similar. This may include multiple-Lich rooms in crypt levels with countless Ghosts, large Orc Juggernaut and Spider Warrior crowds in cave levels, or massive bullet storms or crowds in lava levels.


⠀⠀⠀⠀⠀⠀⠀⠀⠀⠀⠀⠀⠀⠀⠀⠀⠀⠀Anti-Trap Card
Divine Aegis can protect against spike traps or any other hazards too. Not many situations call for this particular use, however, there is a place in Caverns of Mag'Ash that contains a very large grid of spike traps (and often in the dark). This can be a good place to use a potion (especially if Death Incarnate is behind your team and you must cross the spike traps before clearing the enemies ahead) since it is very common to lose a few lives with a team in these area.


Don't limit your thoughts to just these or think that the specifically aforementioned places will always require a potion; I'm simply showing you how you can look for good prospects, but apply your own judgement. If you're feeling overwhelmed, don't be afraid to use one. If you're ever looking at the situation before you and having thoughts impending doom, that's probably a good time to use a potion (remember, your relic might be helpful there too).

Note:⠀⠀⠀⠀⠀⠀⠀⠀⠀⠀⠀⠀⠀⠀⠀⠀⠀⠀⠀⠀⠀⠀⠀⠀⠀⠀⠀⠀⠀⠀⠀⠀⠀⠀⠀⠀⠀⠀⠀⠀⠀⠀⠀⠀⠀⠀⠀⠀⠀⠀⠀⠀⠀⠀⠀⠀⠀⠀⠀⠀⠀⠀
Shield Block does not work while you are protected by Divine Aegis (e.g. projectiles will simply move through you while causing no damage). Do not waste your limited protection in a futile attempt to deflect projectiles.

Decision Making
Sometimes you can forego spending a potion to dodge a Cultist Sorcerer if the only heroes alive are Warrior, Wizard and/or yourself (unless you know that your special or Wizard's dash are on cooldown). Warrior and Wizard typically have the easiest time avoiding a Cultist Sorcerer's hex aside from Thyra (though take into account their skill levels—they may need the help), so it is often unnecessary to spend a potion there (assuming your teammates' skill level is up to par, of course) unless you wish to.

In reference to something I said a few moments ago, the reason for waiting until the last possible moment is for when your team is in relative safety and your team can reasonably suppress the threat in time. On the other hand, if you're already in a highly tense situation and a hex comes along and complicates it further, sometimes it's better to just go for the safety net right then, since, ironically, some of your team may end up facing insurmountable odds and dying for the sake of trying to stop a hex in order save the team from dying. In those cases, you might as well use the potion since preventing the hex is just as dangerous as the hex in the first place.

Gaining Experience
I do not advocate the immediate discarding of others' insight in general, but I do suggest that you weigh it and take it accordingly, especially when it comes to this potion in particular. I suppose because this is a potion that affects everyone on a team, people seem to feel more entitled to an evaluation of your potion usage. For instance, some may tell you that you've "wasted" a potion (typically if you've used one at the end of the floor) while others may tell you that you haven't used them enough.

There's little need to be very concerned about "overusing" potions while you are still learning. By making liberal use of your potions and becoming a better player overall, you will naturally become more comfortable as you gain experience and begin to recognize areas where potions are not truly needed while crystallizing your perception of what more optimal uses are. The fact of the matter is, in a very heated moment, it can be impractical to divert your attention to the Skull Coin count while making your decision to use a potion or not—the moment you take your eyes off the situation in order to check the Skull Coin count is the moment you die in many cases. It's sometimes better to "waste" and be safe than to be overly self-conscious and miss a good opportunity and potentially lose the game.

On the flip side, you might find someone who feels you should use your potions more often even when you don't necessarily need to. This has also happened to me. Someone was performing quite poorly in my estimation and repeatedly put themselves into perilous situations and unnecessarily so, even when the rest of the team was doing just fine. They were displeased with me because they felt I should've used my potions more often in order to save them. Do not feel pressured by such disapproval. Spending potions solely to rescue cavalier players from themselves can easily have you lacking for uses in more critical moments later on.
⠀⤷ Vs. Lich
Thyra is definitively the safest hero to use when fighting Liches. These fights can become extremely chaotic and are a showcase of her strengths. If the situation should become dire, she can even resort to corner shielding, which is effective against Liches.

If you've chosen to use Tempest Locket as your relic, this is a place where that choice will pay off greatly. The two most numerous enemy types in Lich battles are Ghosts and Skeleton Soldiers—both of which are easily killed with Shield Block and Tempest Locket.

Note:⠀⠀⠀⠀⠀⠀⠀⠀⠀⠀⠀⠀⠀⠀⠀⠀⠀⠀⠀⠀⠀⠀⠀⠀⠀⠀⠀⠀⠀⠀⠀⠀⠀⠀⠀⠀⠀⠀⠀⠀⠀⠀⠀⠀⠀⠀⠀⠀⠀⠀⠀⠀⠀⠀⠀⠀⠀⠀⠀⠀⠀⠀
Liches have two area of effect attacks and both can be blocked with Shield Block. Just remember to aim your shield towards the center.

Corner Shielding
When the room is chaotic, you will often find that standing in a corner with your shield up is the safest course of action for you and your team, however, corner shielding during Lich battles can be just as boring as it is necessary. The reason for corner shielding in the first place is to keep a foothold in the game while you build up Skull Coins. Wise teammates will usually leave the last Skull Coin for Thyra for exactly this purpose. In the first chapter I've laid out a system that I recommend using for Skull Coin distribution when it comes to fighting Liches.


Do not think that you are invincible while corner shielding. It's true that it is by far the safest place to be for extended periods of time, but you can still be injured or killed while standing here if a Ghost approaches and collides into you from behind. If there is an abundance of Ghosts and you feel this becoming a concern (especially if you are on low health), remember that you might use a potion.

To minimize risk you'll need to clear Ghosts and build Skull Coins as quickly as you can. As it happens, killing ghosts is often the fastest way to earn a new Skull Coin. Shield Block on its own will rid the room of many enemies, but you can also use your Tempest Locket and Extreme Prejudice (immediately resume Shield Block afterwards) whenever possible to further cut down enemy numbers. Remember that staying safe is your highest priority. Your teammates can respawn and bring the fight to the enemy when convenient.
⠀⤷ Vs. Spider Queen
There's not much that proves to be exceptionally difficult when fighting a Spider Queen as Thyra, but there's a few tactics we can keep in mind to better ensure that the battle goes smoothly. As is the case no matter which hero you are playing as, the first thing you'll need to do is familiarize yourself with the Spider Queen's patterns and tells since your actions during this fight will be almost entirely reactionary to the Spider Queen's movements. Fortunately, Spider Queens' actions are quite predictable and can become familiar with a few battles.

The most difficult of the Spider Queen's attacks to deal with might be her charge attack, but her tell here is that she screeches and does a subtle lean backwards before charging. To avoid this charge, you can hold Shield Block and face it towards her (you do not need to change the direction of the Shield Block during the charge—simply hold the Shield Block in the direction the charge initially came from). Alternatively, you can active Extreme Prejudice at the right moment to allow the Spider Queen pass by while you take advantage of your invincibility.


The last attack you need concern yourself with is her leap. The way you can deal with this is very similar to the countermeasures for the previous attack. Simply put, you can either block it with your shield or nullify it with your weapon ability.

The Shield Block defense is easier and requires no precise timing, however, the downside is that you will be jolted back. You will receive no damage from this, but the blast will naturally place you in a position far less suitable for retaliation against the Spider Queen; this may also place you in a spot vulnerable to other attackers. When feasible, I advise simply avoiding the attack altogether rather than use this method, but in demanding situations, Shield Block might be your best option. Using your special instead protects you, gives you immunity to the knockback, and deals damage to the Spider Queen all at once.
⠀⤷ Vs. Demon Horror
Beware of fireballs—not much else poses a threat. In fact, the fireballs don't necessarily pose much of a threat either so long as you are a little careful.

There are two types of fireballs that a Demon Horror will use: orbiting and projecting. The advice I gave to Warrior players for dealing with the dual orbiting fireballs is applicable here as well. I'll repeat it here for convenience, but you may find it useful in general to glean more knowledge from that chapter since Warrior is also is a melee fighter.


(Excerpt from Thor the Warrior)

Although all Demon Horror fireballs deal the same amount of damage, the orbiting fireballs are typically more dangerous because of how suddenly they appear, however, they are also predictable. All you have to do is just watch where the current ones are. If you still see them flying about and they're not near their maximum range, you're safe to attack the Demon Horror without fear of new ones spawning in your face. If you don't see the orbiting fireballs at all or you see them near their outer limit, then watch out. Orbiting fireballs will very likely be one of the next two attacks that the Demon Horror uses. Simply take a few steps back and wait for the next set to appear.


While the Demon Horror is charging its purple blast cone attack you are perfectly safe to continuously attack as the blast cannot reach you while you are standing next to the Demon Horror. Otherwise, you can simply use your shield to block the blast.


⠀⠀⠀⠀⠀⠀⠀⠀⠀⠀⠀⠀⠀⠀⠀⠀⠀Reverse Fireballs
When you deflect fireballs they can no longer do your teammates any harm. I often like to take the opportunity when I can to deflect orbiting fireballs so they do not become hindrances to teammates in the future. Once they've appeared, the sooner you deflect them the easier and more beneficial it will be.

Closing
Practice
Although it probably goes without saying, practice anything you care to improve at. You may have learned something here, but it will take time to build habits around that knowledge, break old habits you'd like to be rid of, and to develop a certain feel for things such as timing and assessing situations and making good judgement calls.

Knowing all the tricks in the world doesn't make you skillful—it just makes you knowledgeable. Being able to apply what you know when you need it is what makes you skillful, which is the one part I can't teach you with words and pictures. That only comes with practice and discipline. It's on you to develop your own style and habits.

Play Other Characters
One thing that I tell people who are trying to learn to play the character of their choice is to play other characters once you've become comfortable with that one. There's a couple of reasons for doing this. Playing other characters allows players besides yourself to use that character, which can be beneficial to you. This can give you further insight and new ideas about how to play that character. Speaking from personal experience, most of what I have learned has come to me by watching others play. You can also apply several little things you learn from one character to other characters—things you might not have thought of otherwise. I've also done that several times as well.

I've seen many players who play exclusively one character. If "their character" is taken, they just don't play, and as a consequence, they tend to plateau since they rarely come across any ideas that weren't their own. When I think of the players that I would count among the best I've ever seen play the game, they all play multiple characters (even if they have a favorite they usually play—they can play at least two other characters well).

Though there are some, very few of the techniques or combinations I use (across all characters) have been invented by me. The vast majority of them I either picked up by watching others or they're a derivative of something I got from someone else. You may come up with an idea that mostly belongs to you, but maybe you needed to get that first piece from someone else.

“I appreciate it.”
Thanks for visiting. I hope you found something useful here.

⠀⠀⠀⠀⠀⠀⠀⠀⠀⠀⠀⠀⠀⠀⠀⠀⠀⠀⠀⠀⠀⠀⠀⠀⠀⠀⠀⠀⠀⠀⠀Good luck!

⬅ Previous Chapter⠀⠀⠀⠀⠀⠀⠀⠀⠀⠀⠀⠀⠀⠀⠀⠀⠀⠀⠀⠀⠀⠀⠀⠀Next Chapter ➡
Thor the Warrior⠀⠀⠀⠀⠀⠀⠀⠀⠀⠀⠀⠀⠀⠀⠀⠀⠀⠀⠀⠀⠀⠀⠀⠀⠀⠀⠀⠀⠀⠀⠀⠀⠀⠀⠀⠀⠀⠀⠀⠀⠀⠀⠀⠀⠀⠀ Merlin the Wizard

33 Comments
Katheb 5 Aug, 2024 @ 8:37am 
this guide looks professional. wow.
Skar Stoker 4 Jul, 2024 @ 10:35am 
Thank Bro :steamthumbsup:
WiFiSamurai 24 Dec, 2023 @ 12:33pm 
This is very good. I played this on my PS4 and loved it, but that was years ago. Now I'm on a pc and found it on sale on Steam, so here I again, starting from scratch. I will be reading all the things now. Keep up the good work!
OKaysional 25 Feb, 2022 @ 2:35pm 
Mate these guides have been invaluable, i lit started playing yesterday and have maybe 4hrs on elf but wanted to learn more about intricacies of others before giving them a whirl. Excellent guides, look forward to wiz and elf when u get around to them!!!
Lein  [author] 11 Feb, 2022 @ 5:08am 
Not a problem. I see you already found my answer to that, so I'll not rehash it, but thanks for stopping by. :)

If you're drawn to a particular weapon or loadout, then by all means, use it as far as you can then potentially switch to something else if and when you feel too disadvantaged by it.
Rhubarb Crisp 10 Feb, 2022 @ 3:29pm 
oh, nevermind, I just looked down...
*facepalm*
Rhubarb Crisp 10 Feb, 2022 @ 3:28pm 
So... uh... I didn't see anything on the second weapon's hidden ability of changing the spear thrust to a javelin throw.
I pretty much solely use that weapon now because of how OP being able to throw the near equivalent to the elf's sniper shot twice as quickly with very little build up and cooldown, despite the loss of the spear thrust and the weapon ability only being a large slash(still quite helpful for stall-kiting never-ending groups of enemies to allow teammates to damage the spawners, help, or get themselves together, or to give you a strategy in solo...

What are your thoughts?
CyberMelt 20 Jan, 2022 @ 2:13pm 
It's real nice to see that you're making guides for the game! I didn't know you could stop the stun from hitting a wall with spear if you were shielding. Good to know. :cybereye:
Lein  [author] 7 Jan, 2022 @ 11:50am 
Thanks everyone!

@Vector:
I just haven't released it yet. I still intend to.

@Egosa:
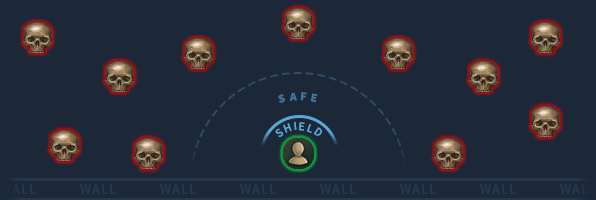
Throw is nowhere near as viable as thrust in high level (floor 37+) Endless mode (which is the hardest part of this game and is what these guides are meant to help you get through). On those floors, there really is no "keeping enemies at a distance", especially when there's bosses, heavy units, Sorcerers, or just overwhelming numbers about.

If you're just playing Campaign or low-level Endless, then you can certainly get away with using throw. On high floors, even seasoned veterans are slaughtered (or carried) with throw.
Egosa-U 7 Jan, 2022 @ 4:20am 
Why didnt you mention spear throw? I found it better that thrust, as it keeps enemies at a distance and you are even able to deal damage to summoning stones.
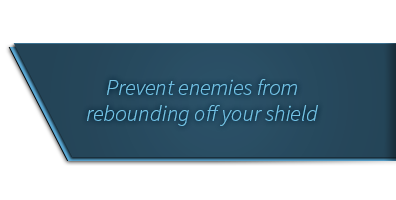
Of couse, you are not able to use the shield-block technique to aid the attack, but I cannot find a disadvantage of the throw.